‘Chevy Madness’ Chevrolet C10 Resto Mod & Full Custom Build
Project Consultation & Design Development
Every truly bespoke build begins long before the first bolt is removed, and Jason's Chevrolet C10 was no exception. Unlike a traditional restoration, this project demanded a far more collaborative and personal approach from the outset. It wasn't simply about restoring a classic pickup—it was about creating a vehicle that reflected Jason's personality, ideas and long-held vision while rectifying the frustrations of a previous unfinished build.
From our very first meeting, we spent considerable time discussing styling, functionality and the overall direction of the project. Through countless conversations, digital concept designs, reference imagery, phone calls and messages, every aspect of the build was carefully explored and refined. Rather than imposing our own ideas, we worked closely with Jason to understand exactly what he wanted to achieve, developing a cohesive design that balanced aesthetics, practicality and engineering.
This was a project that had been years in the making. Following a disappointing experience elsewhere, progress had come to a complete standstill, leaving the truck unfinished and Jason understandably uncertain about where to turn next. When he approached Concours Classics, our objective was not only to continue the build, but to restore confidence in the project itself. We began by carefully assessing everything that had been completed previously, identifying areas that required improvement, and establishing a clear plan to transform an unfinished collection of parts into the custom truck Jason had always envisioned.
With a defined direction and renewed enthusiasm, the journey finally began. Every decision moving forward would be made with Jason's involvement, ensuring the build remained true to his original aspirations while benefiting from the craftsmanship, engineering and attention to detail that underpin every bespoke project undertaken at Concours Classics.
Post-Blasting Welding & Metal Reconstruction
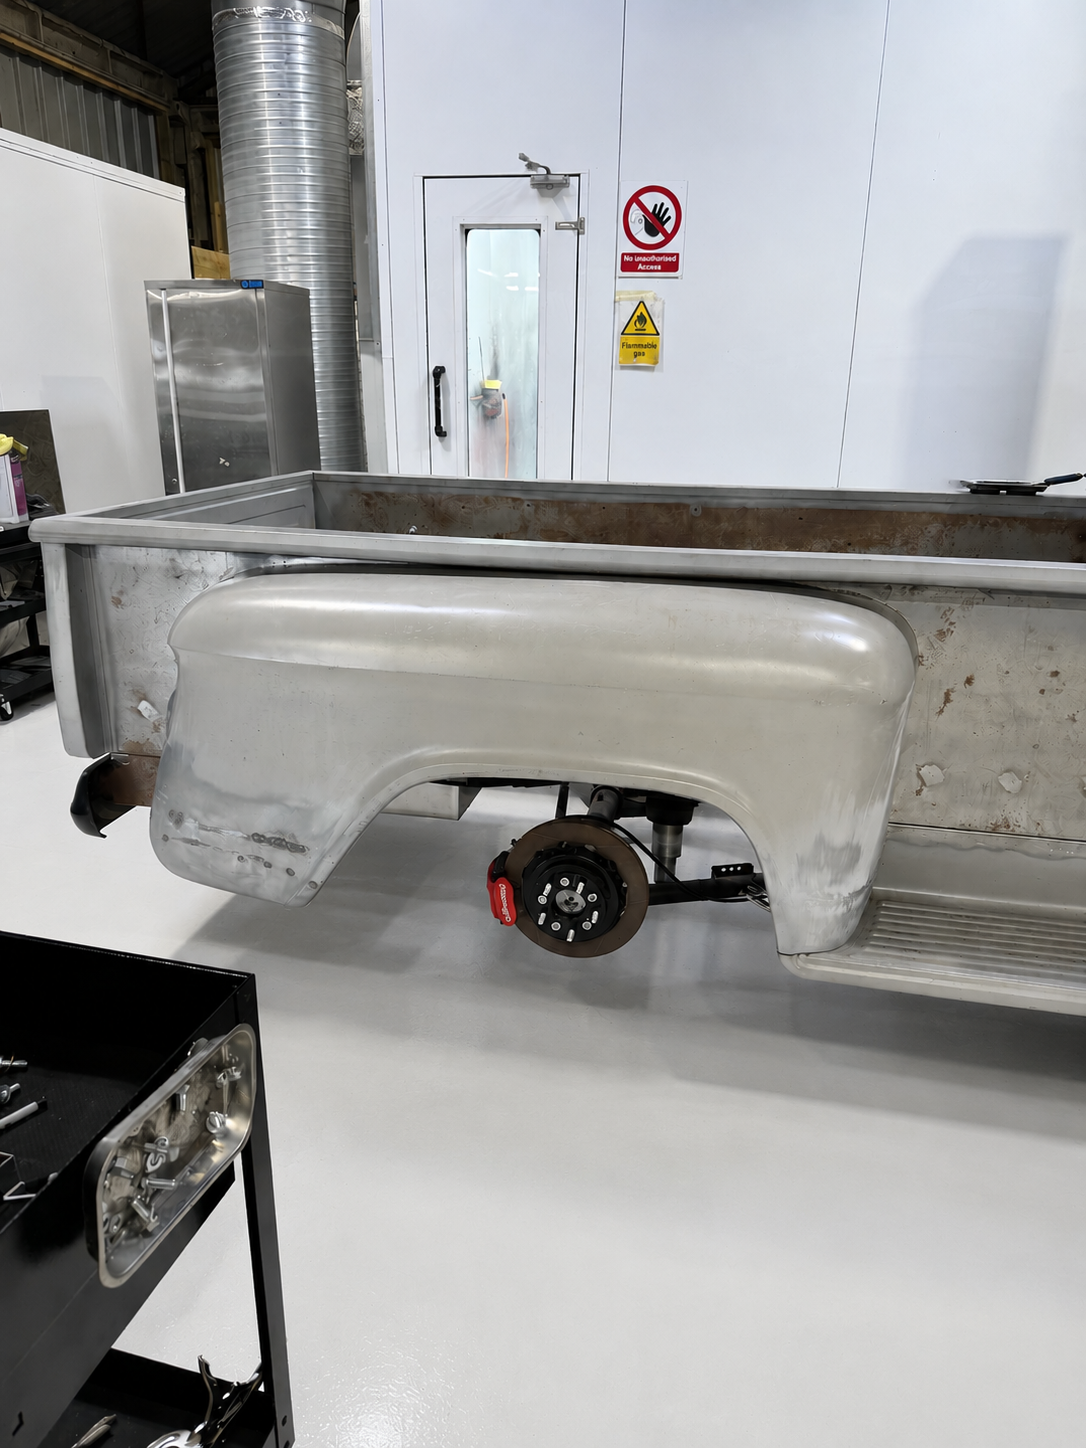
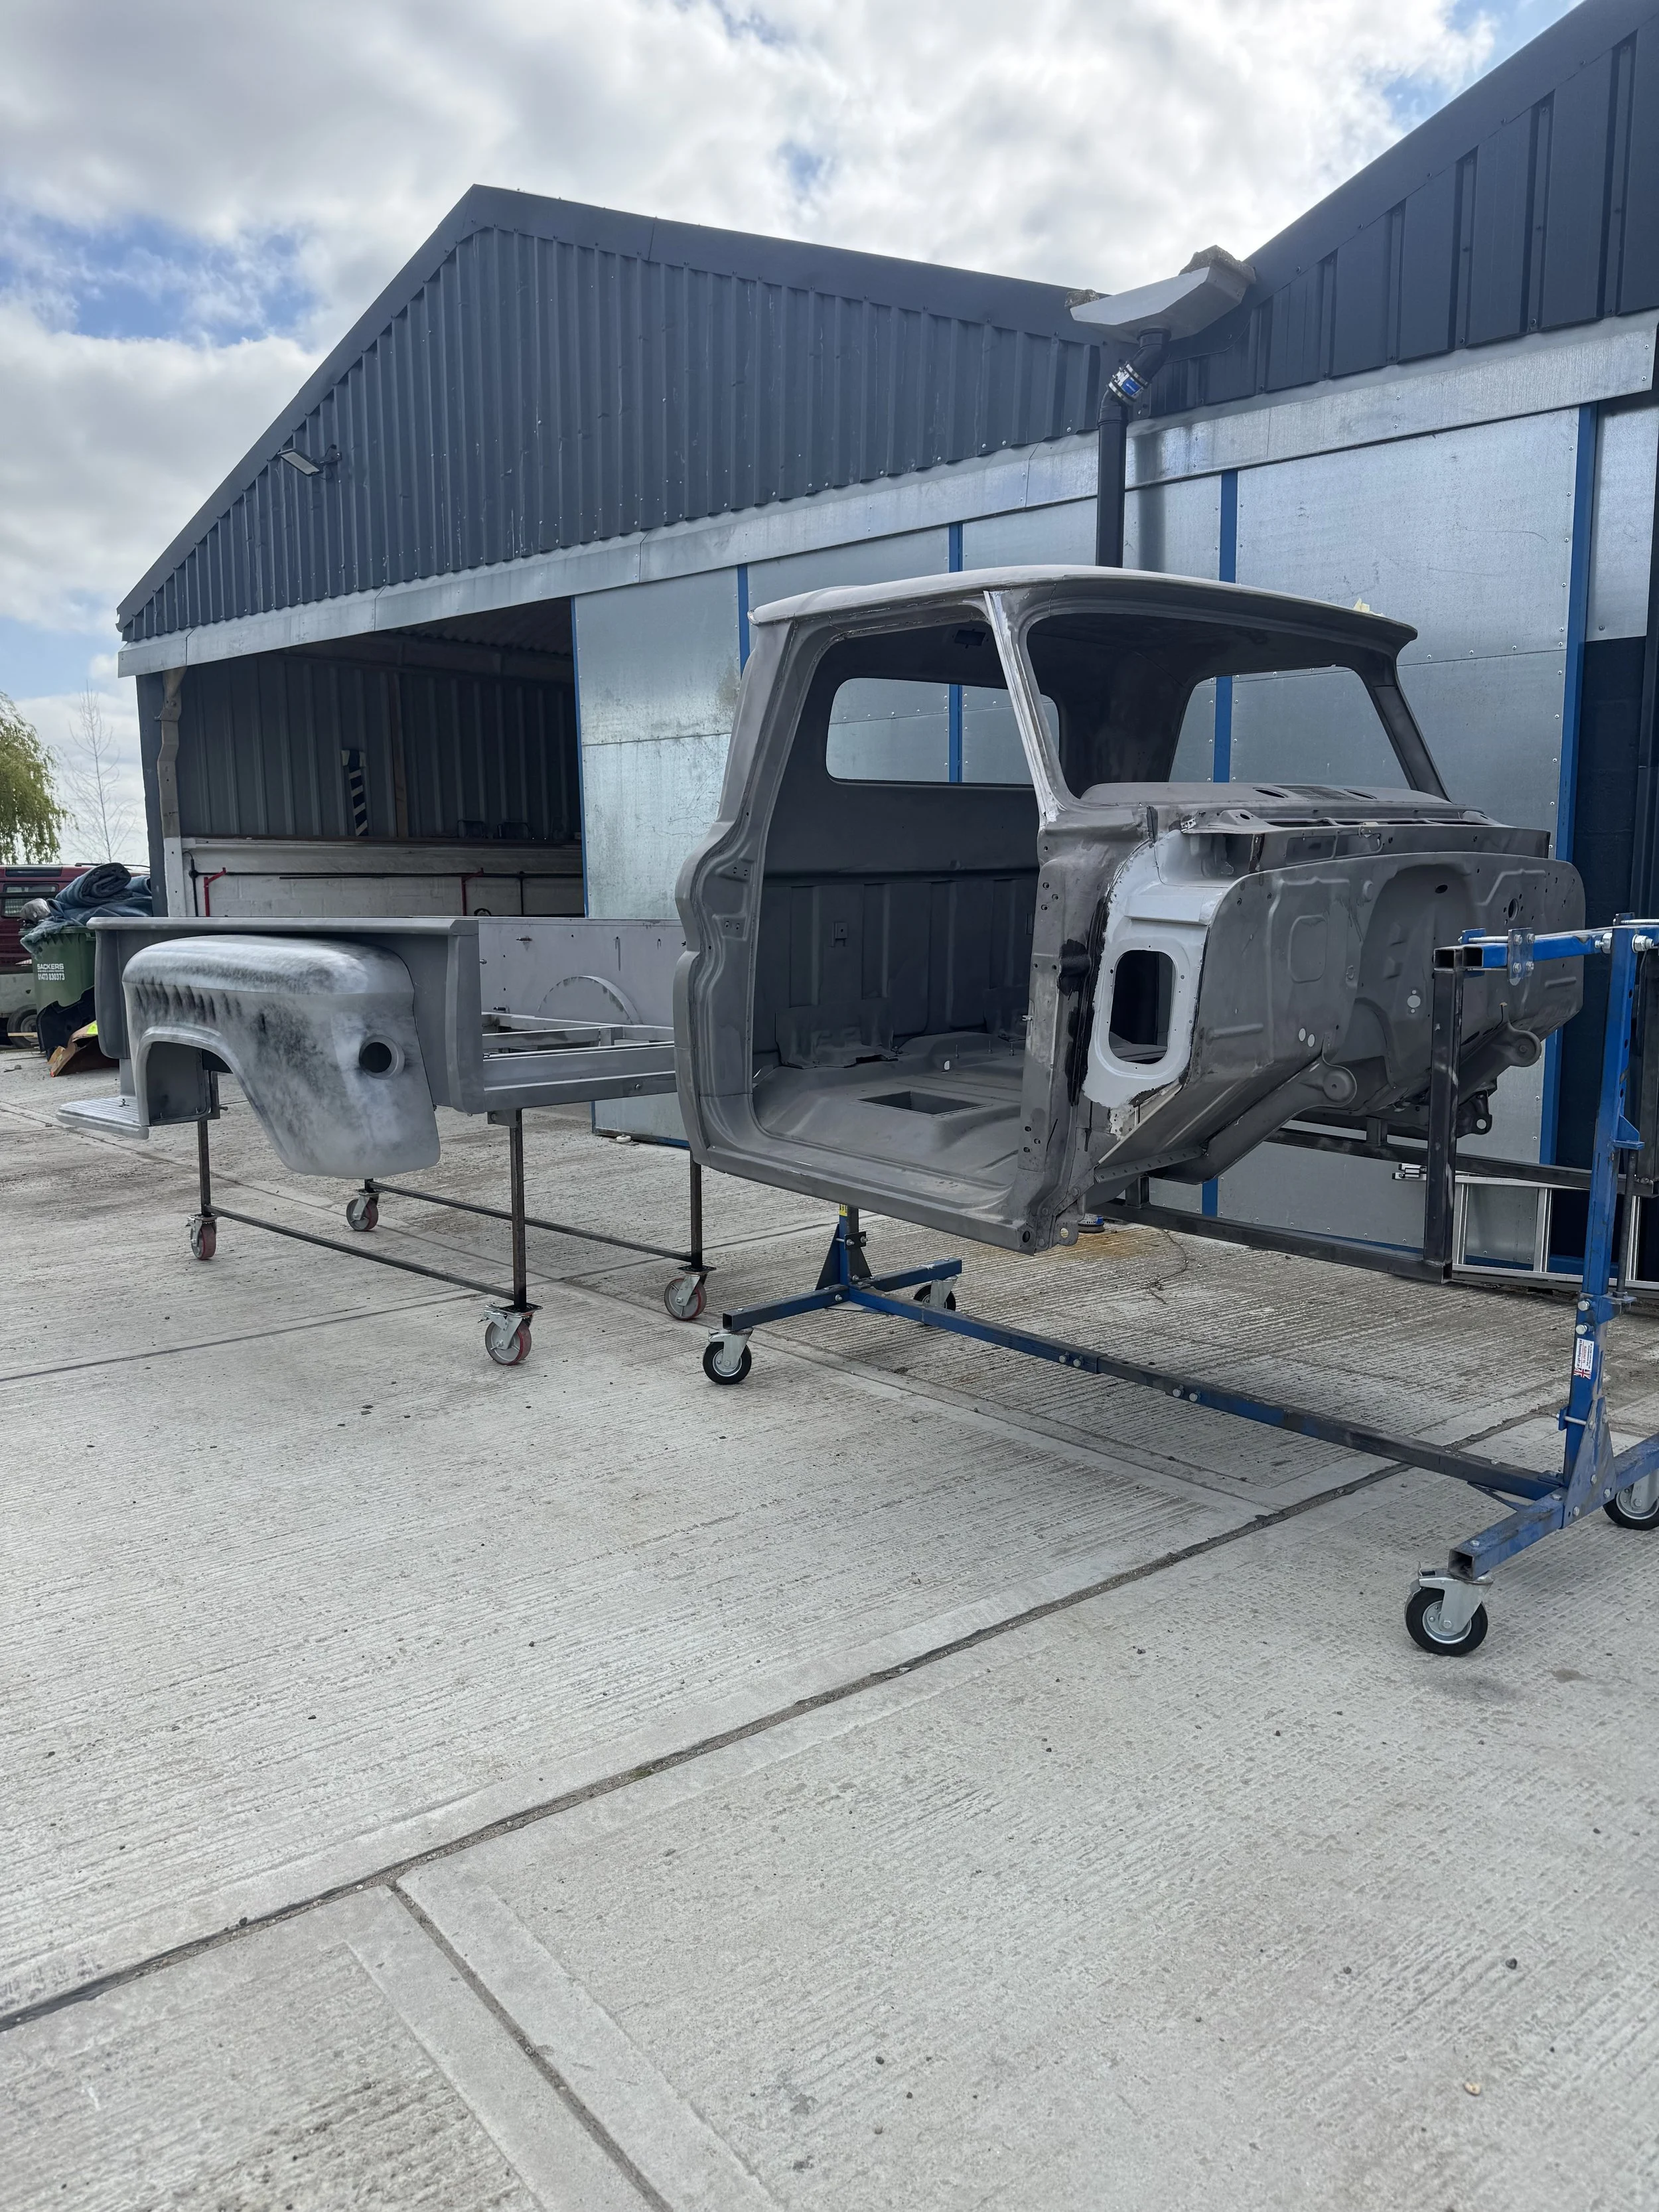
With the chassis, cab and bed returned from the sandblasters, the true extent of the metalwork became visible. Stripping every component back to bare steel provided an honest assessment of the truck's condition, exposing previous repairs, corrosion and fatigue that had been hidden beneath decades of paint and filler. This clean foundation allowed every repair to be completed correctly, ensuring the C10 would be structurally sound for many years to come.
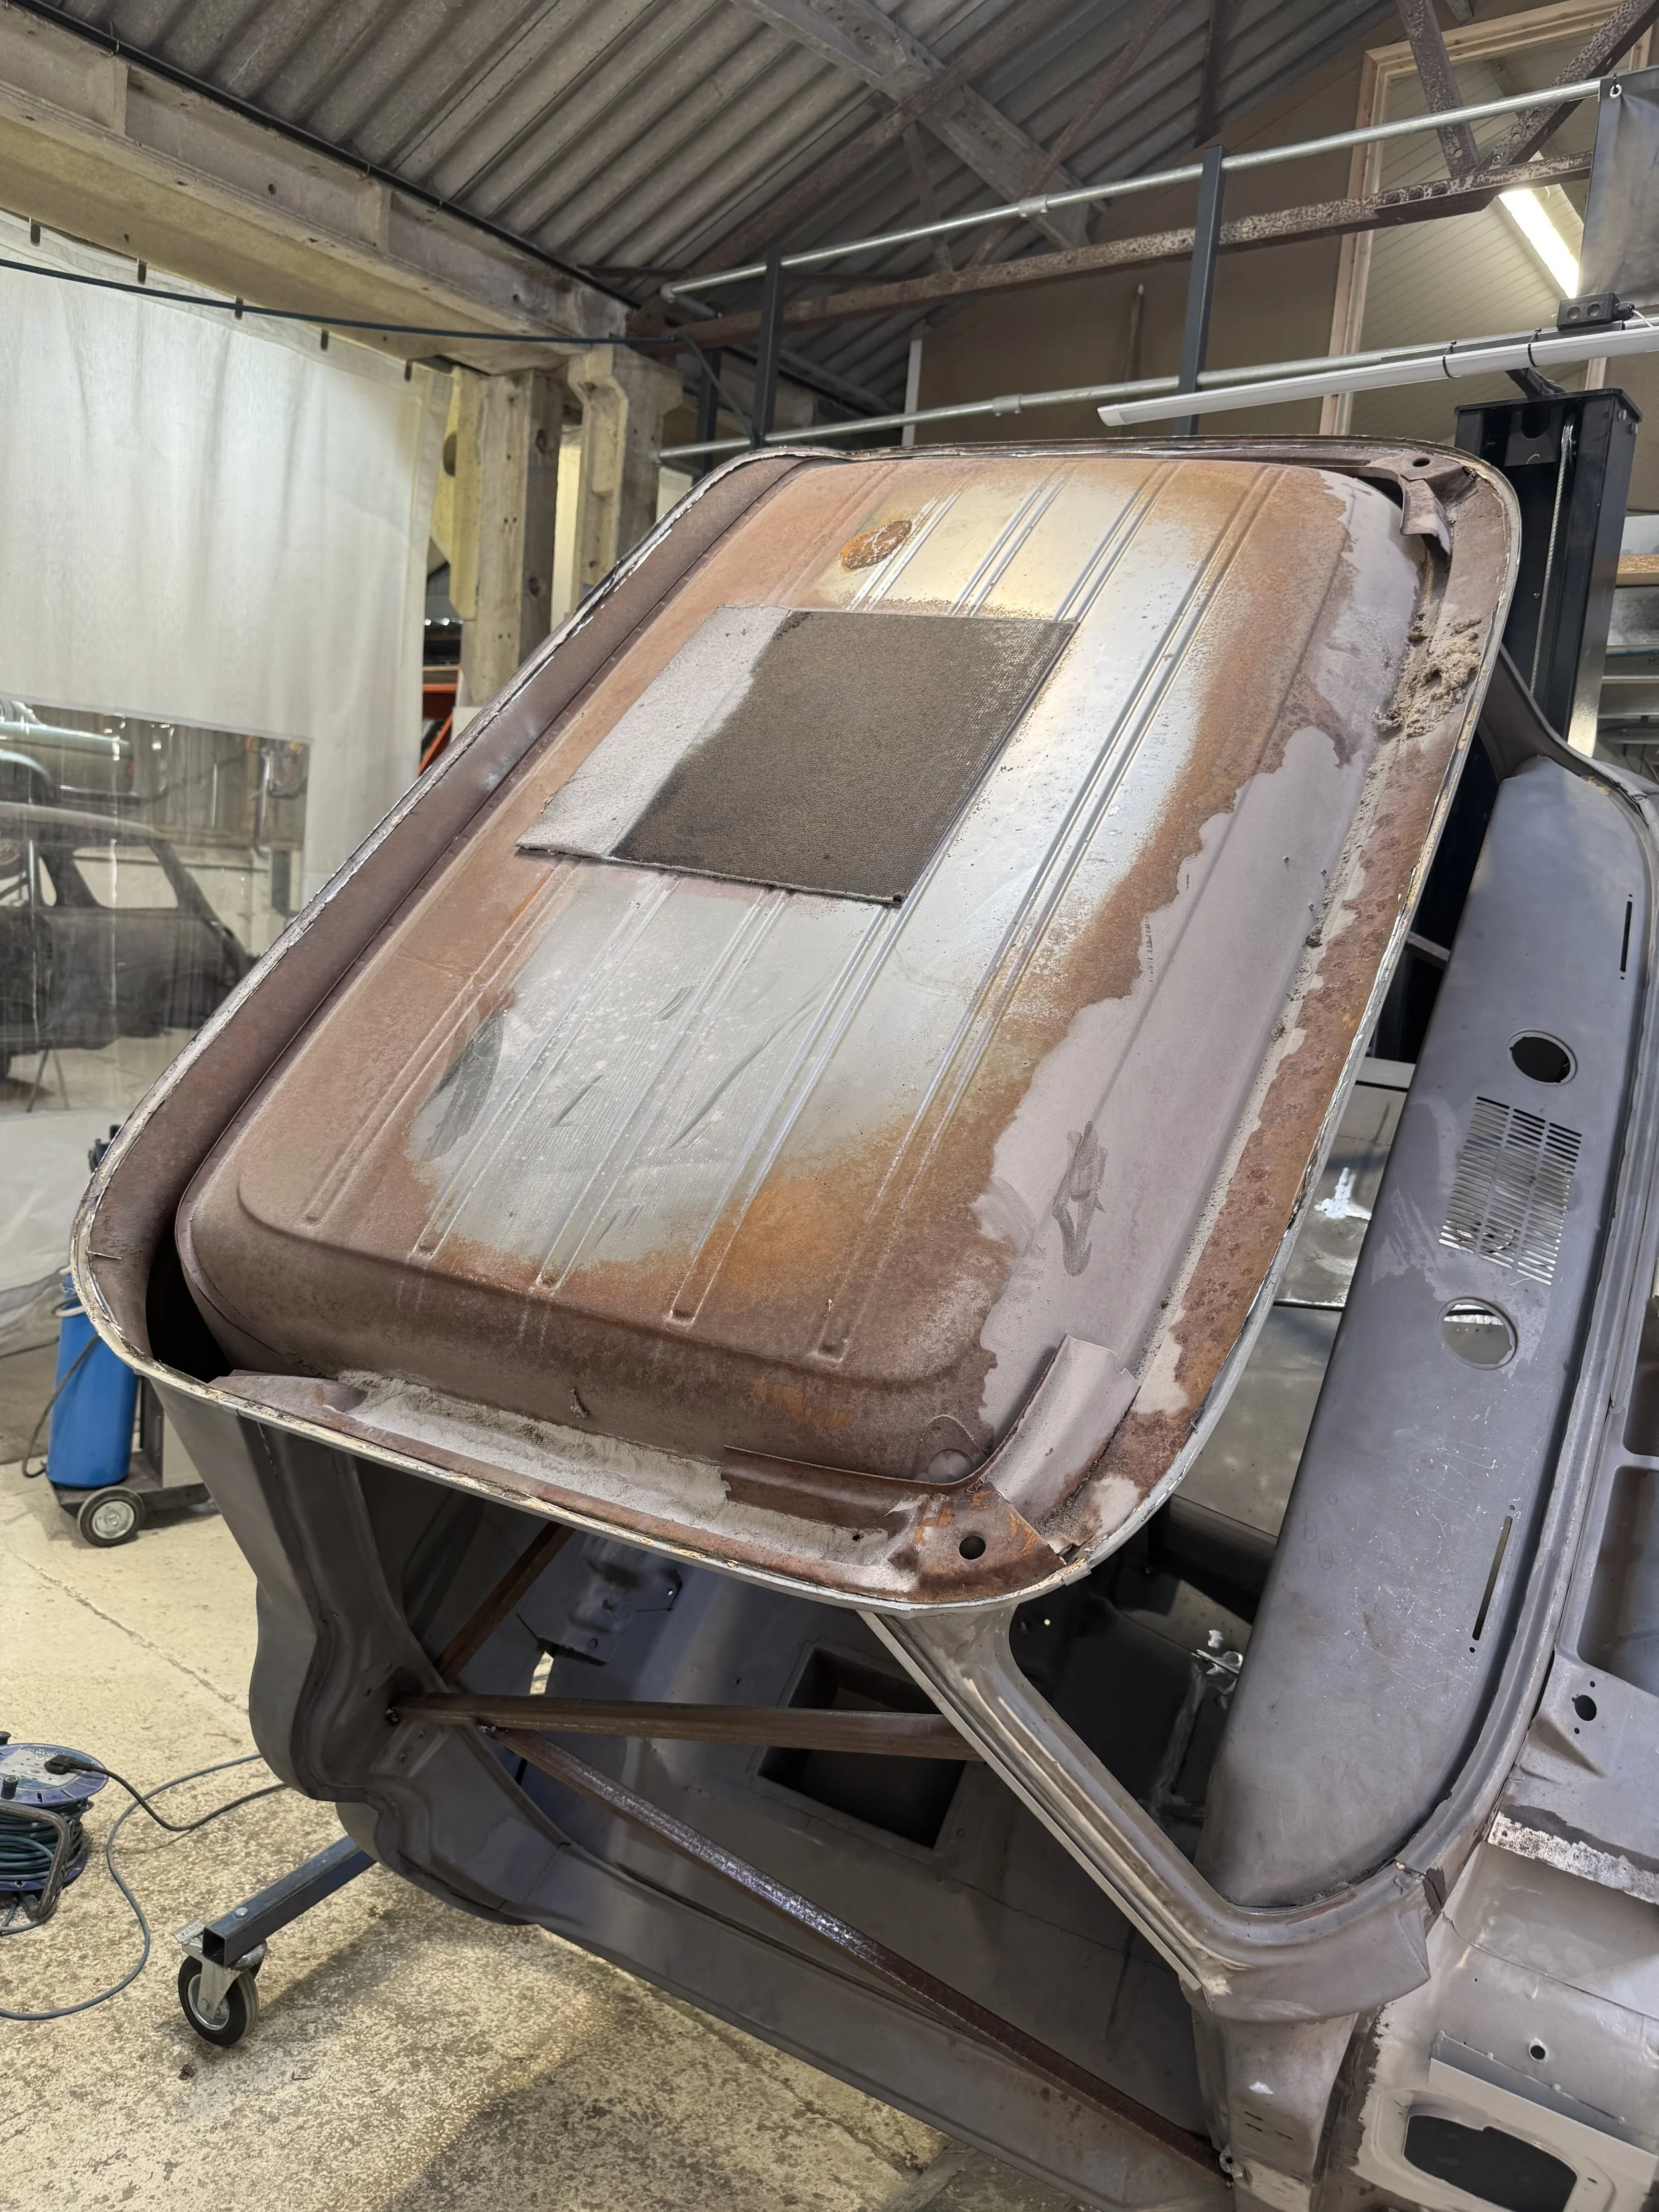
One of the most significant elements of this phase was the complete replacement of the roof skin. A new genuine replacement panel was sourced and imported from the United States before being carefully prepared and fitted to the cab. The original roof was removed without compromising the surrounding structure, allowing the new skin to be precisely aligned before being welded into position - with careful removal of a rodents nest before hand. Particular care was taken to maintain the factory contours and panel dimensions, ensuring the replacement became indistinguishable from the original body.
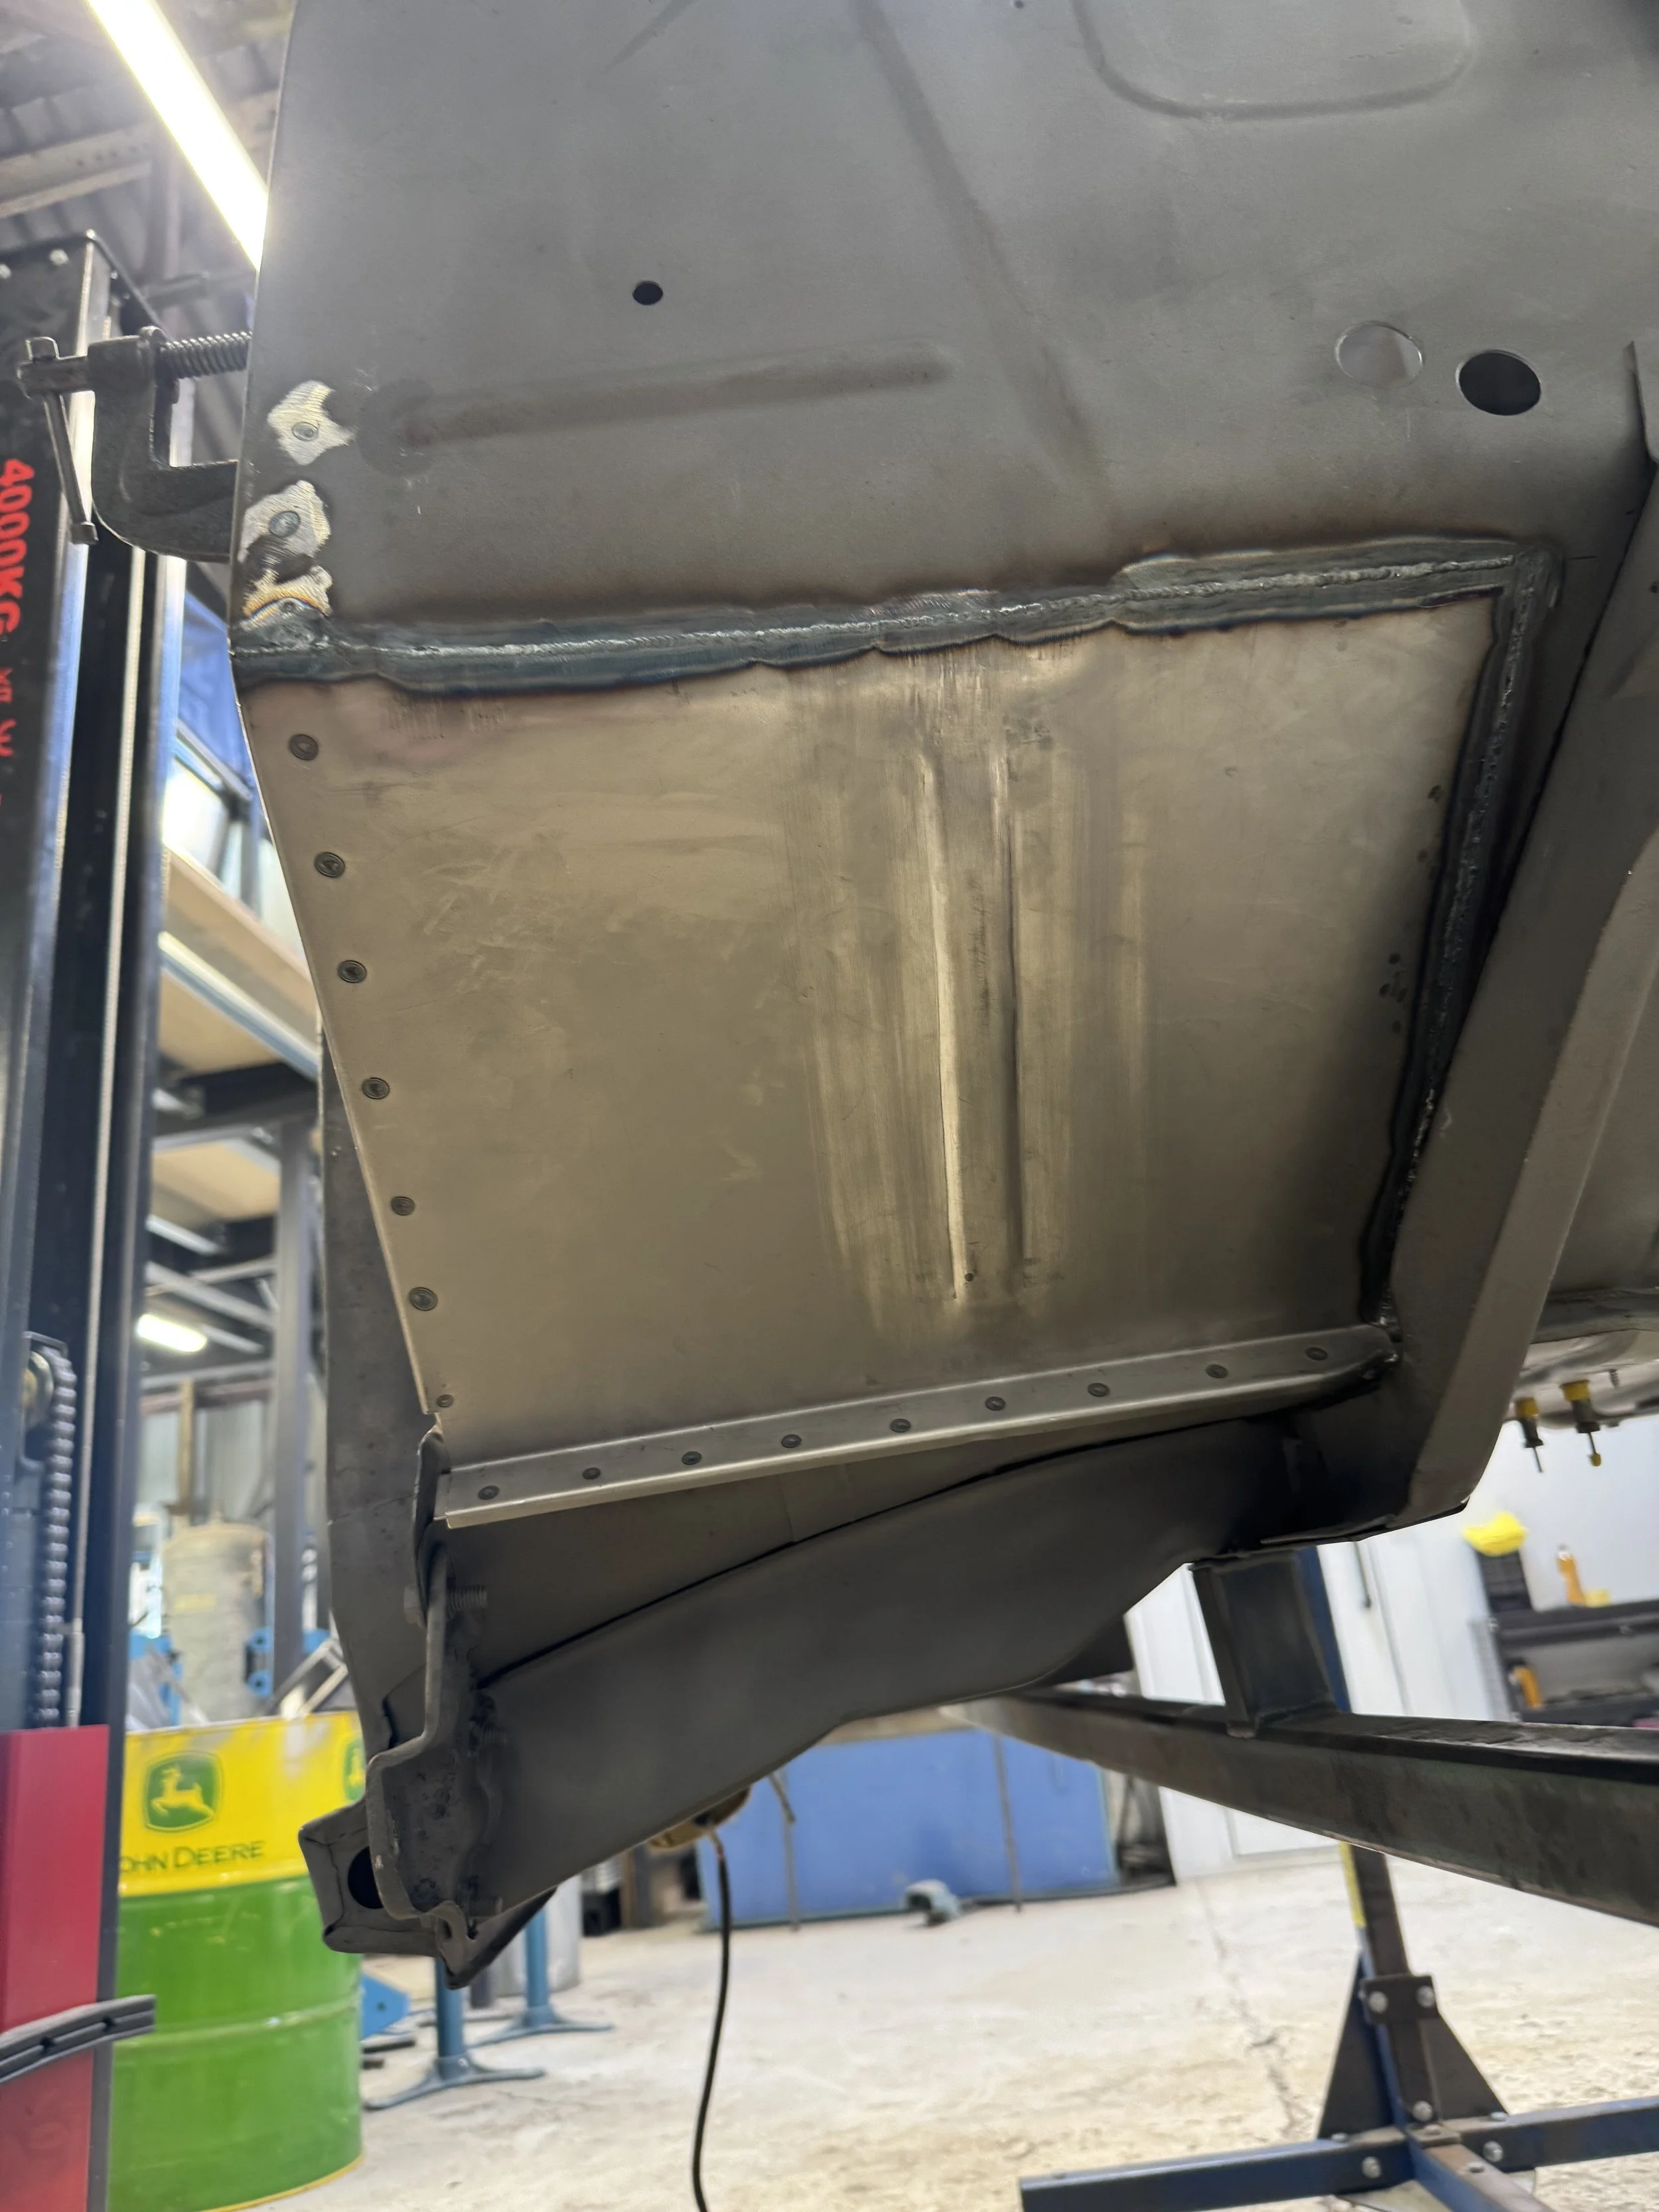
Attention then turned to the cab floor, where extensive corrosion required sections to be completely remanufactured. Rather than relying on aftermarket repair panels, new floor pan sections were hand-fabricated in-house from fresh steel, allowing every pressing, flange and profile to be recreated specifically for this truck. Once trial-fitted, each section was carefully welded into place before being dressed and metal finished to restore both the strength and appearance of the cab.
The windscreen surround and roof gutter assemblies also required significant reconstruction. Corroded sections were carefully removed before replacement pieces were fabricated and installed, restoring the integrity of these critical structural areas while ensuring the windscreen aperture and rain channels retained their original dimensions and fit.
Further structural repairs were carried out to the rear of the cab. A new outer rear cab panel was sourced from the United States, while the inner floor support section behind it was manufactured entirely in-house. This allowed us to replicate the original construction while improving structural rigidity where required. Both components were carefully aligned and welded together, ensuring the rear of the cab was returned to a factory-correct standard.
Additional repairs were completed to the bulkhead using replacement sections imported from the United States. Each repair panel was accurately trimmed, trial-fitted and butt welded into position before being metal finished, restoring the structural integrity of the firewall while maintaining the original factory pressings and appearance.
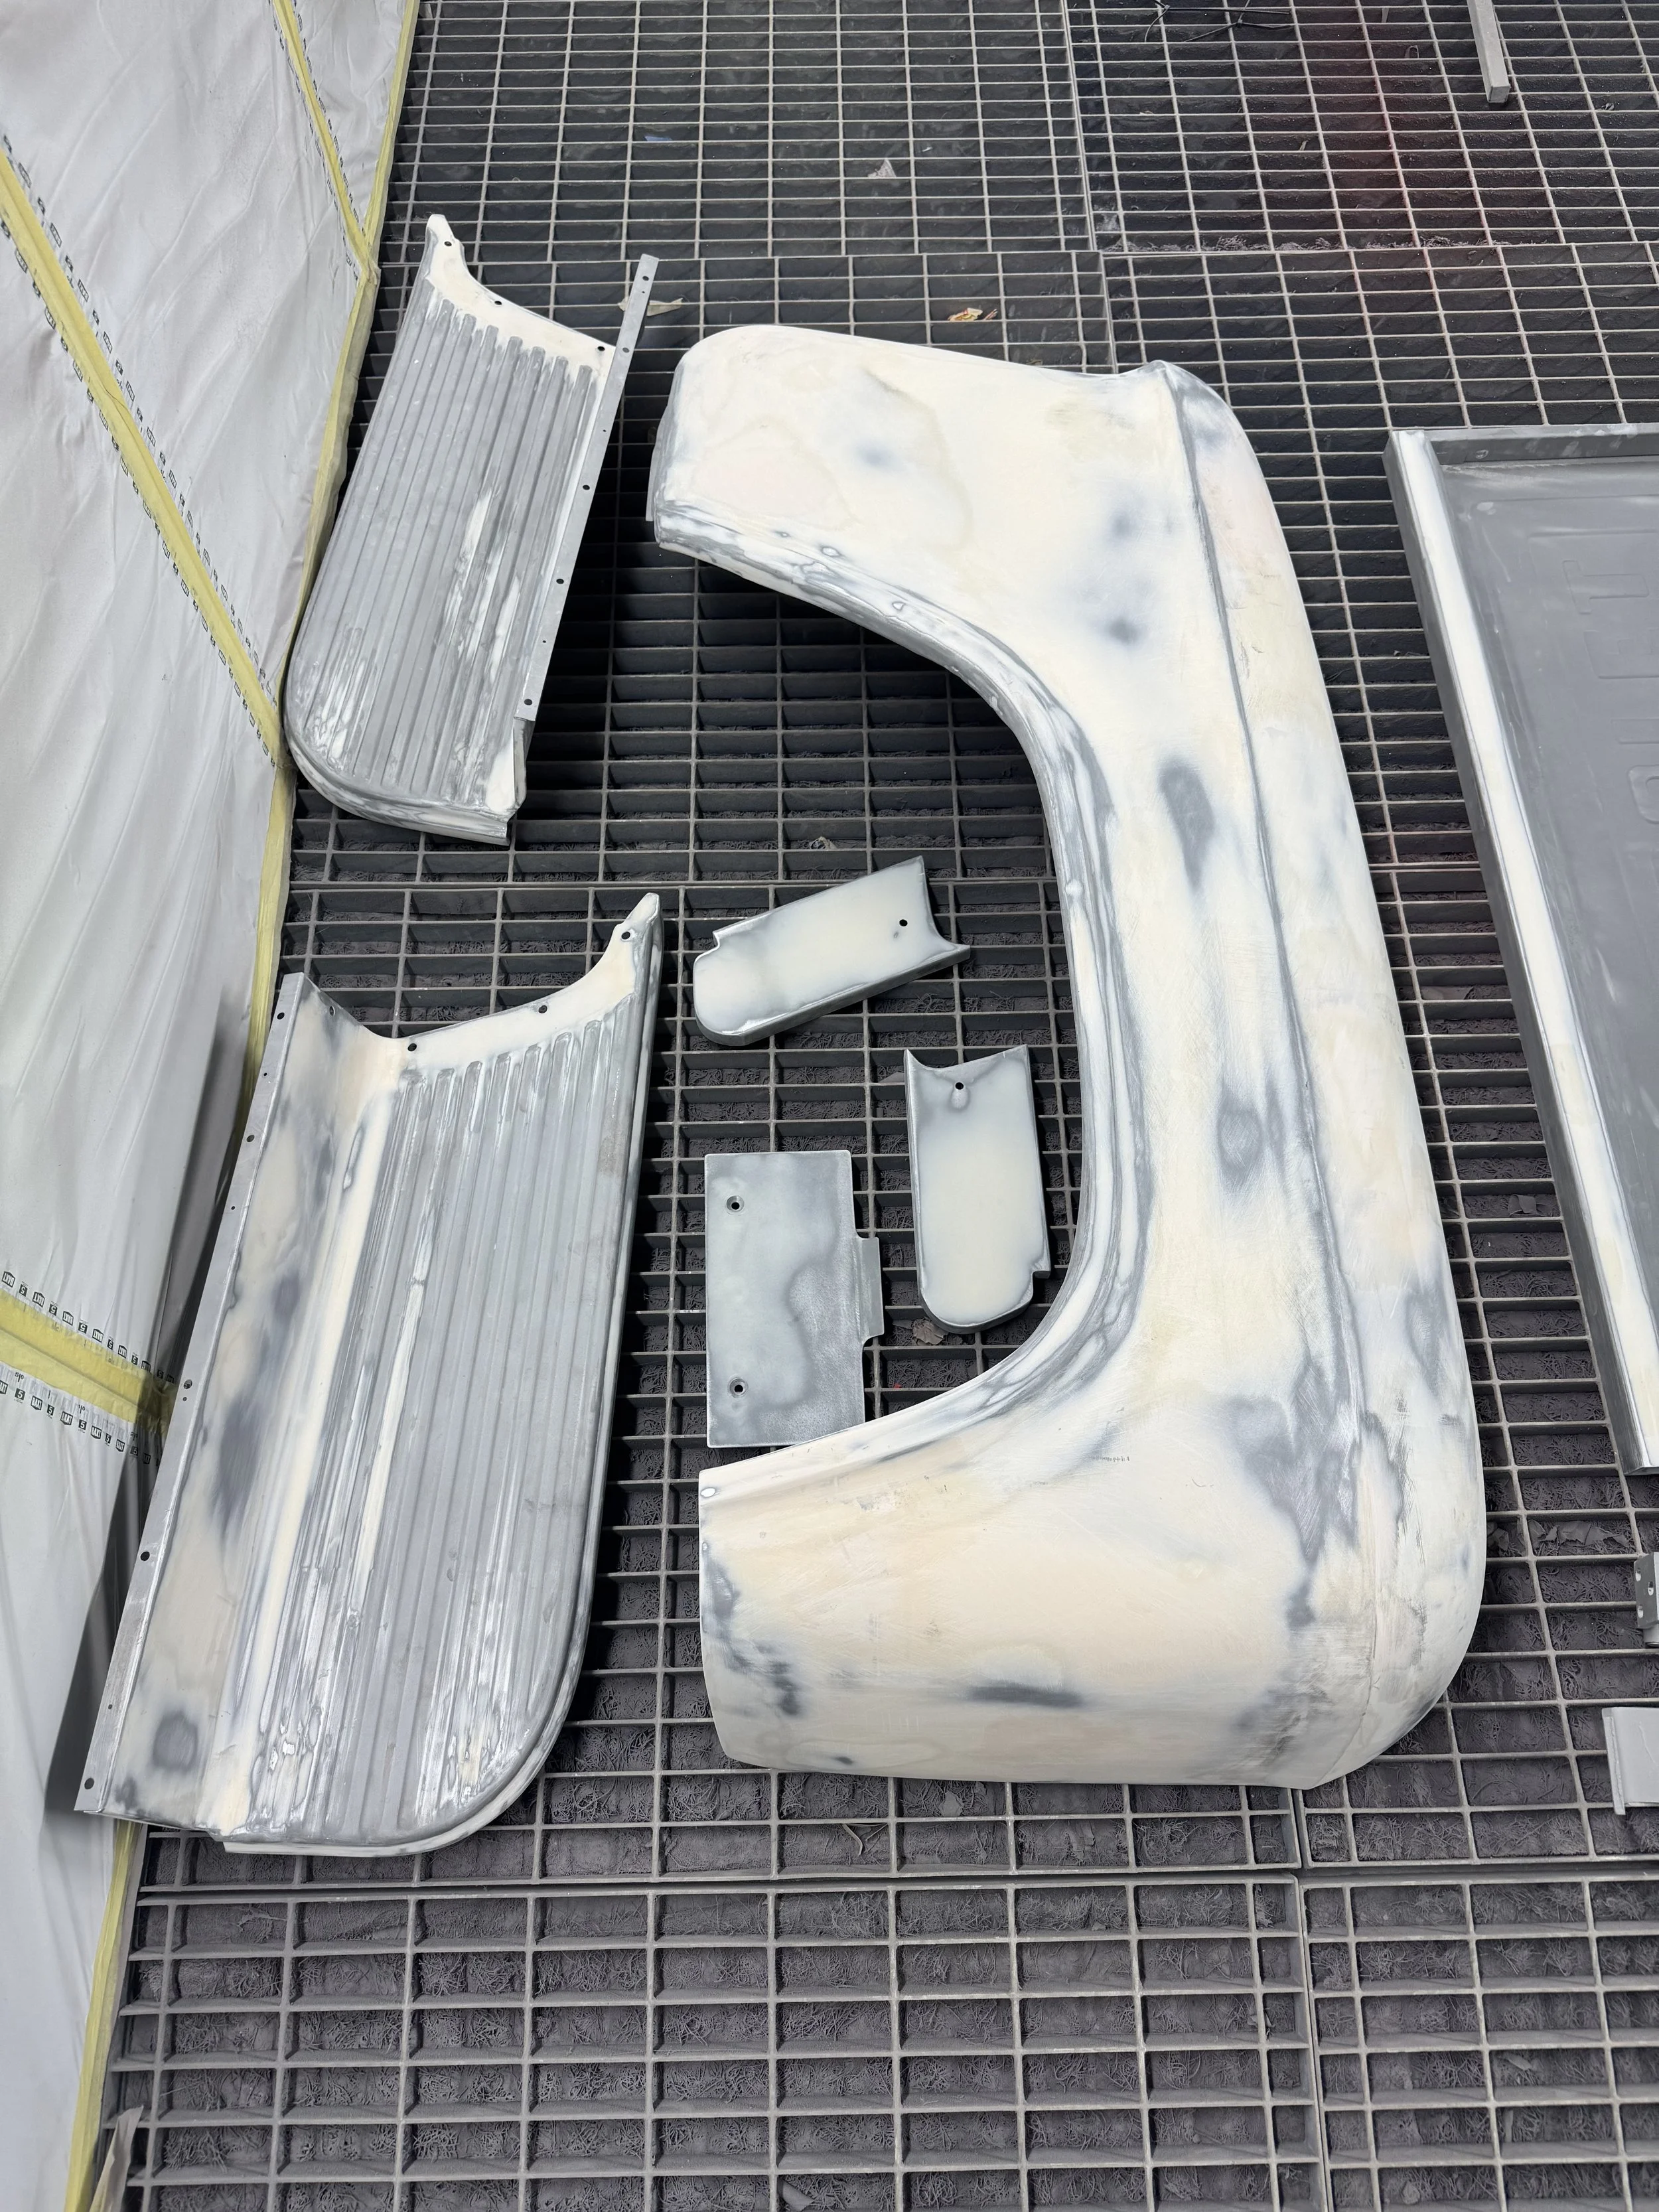
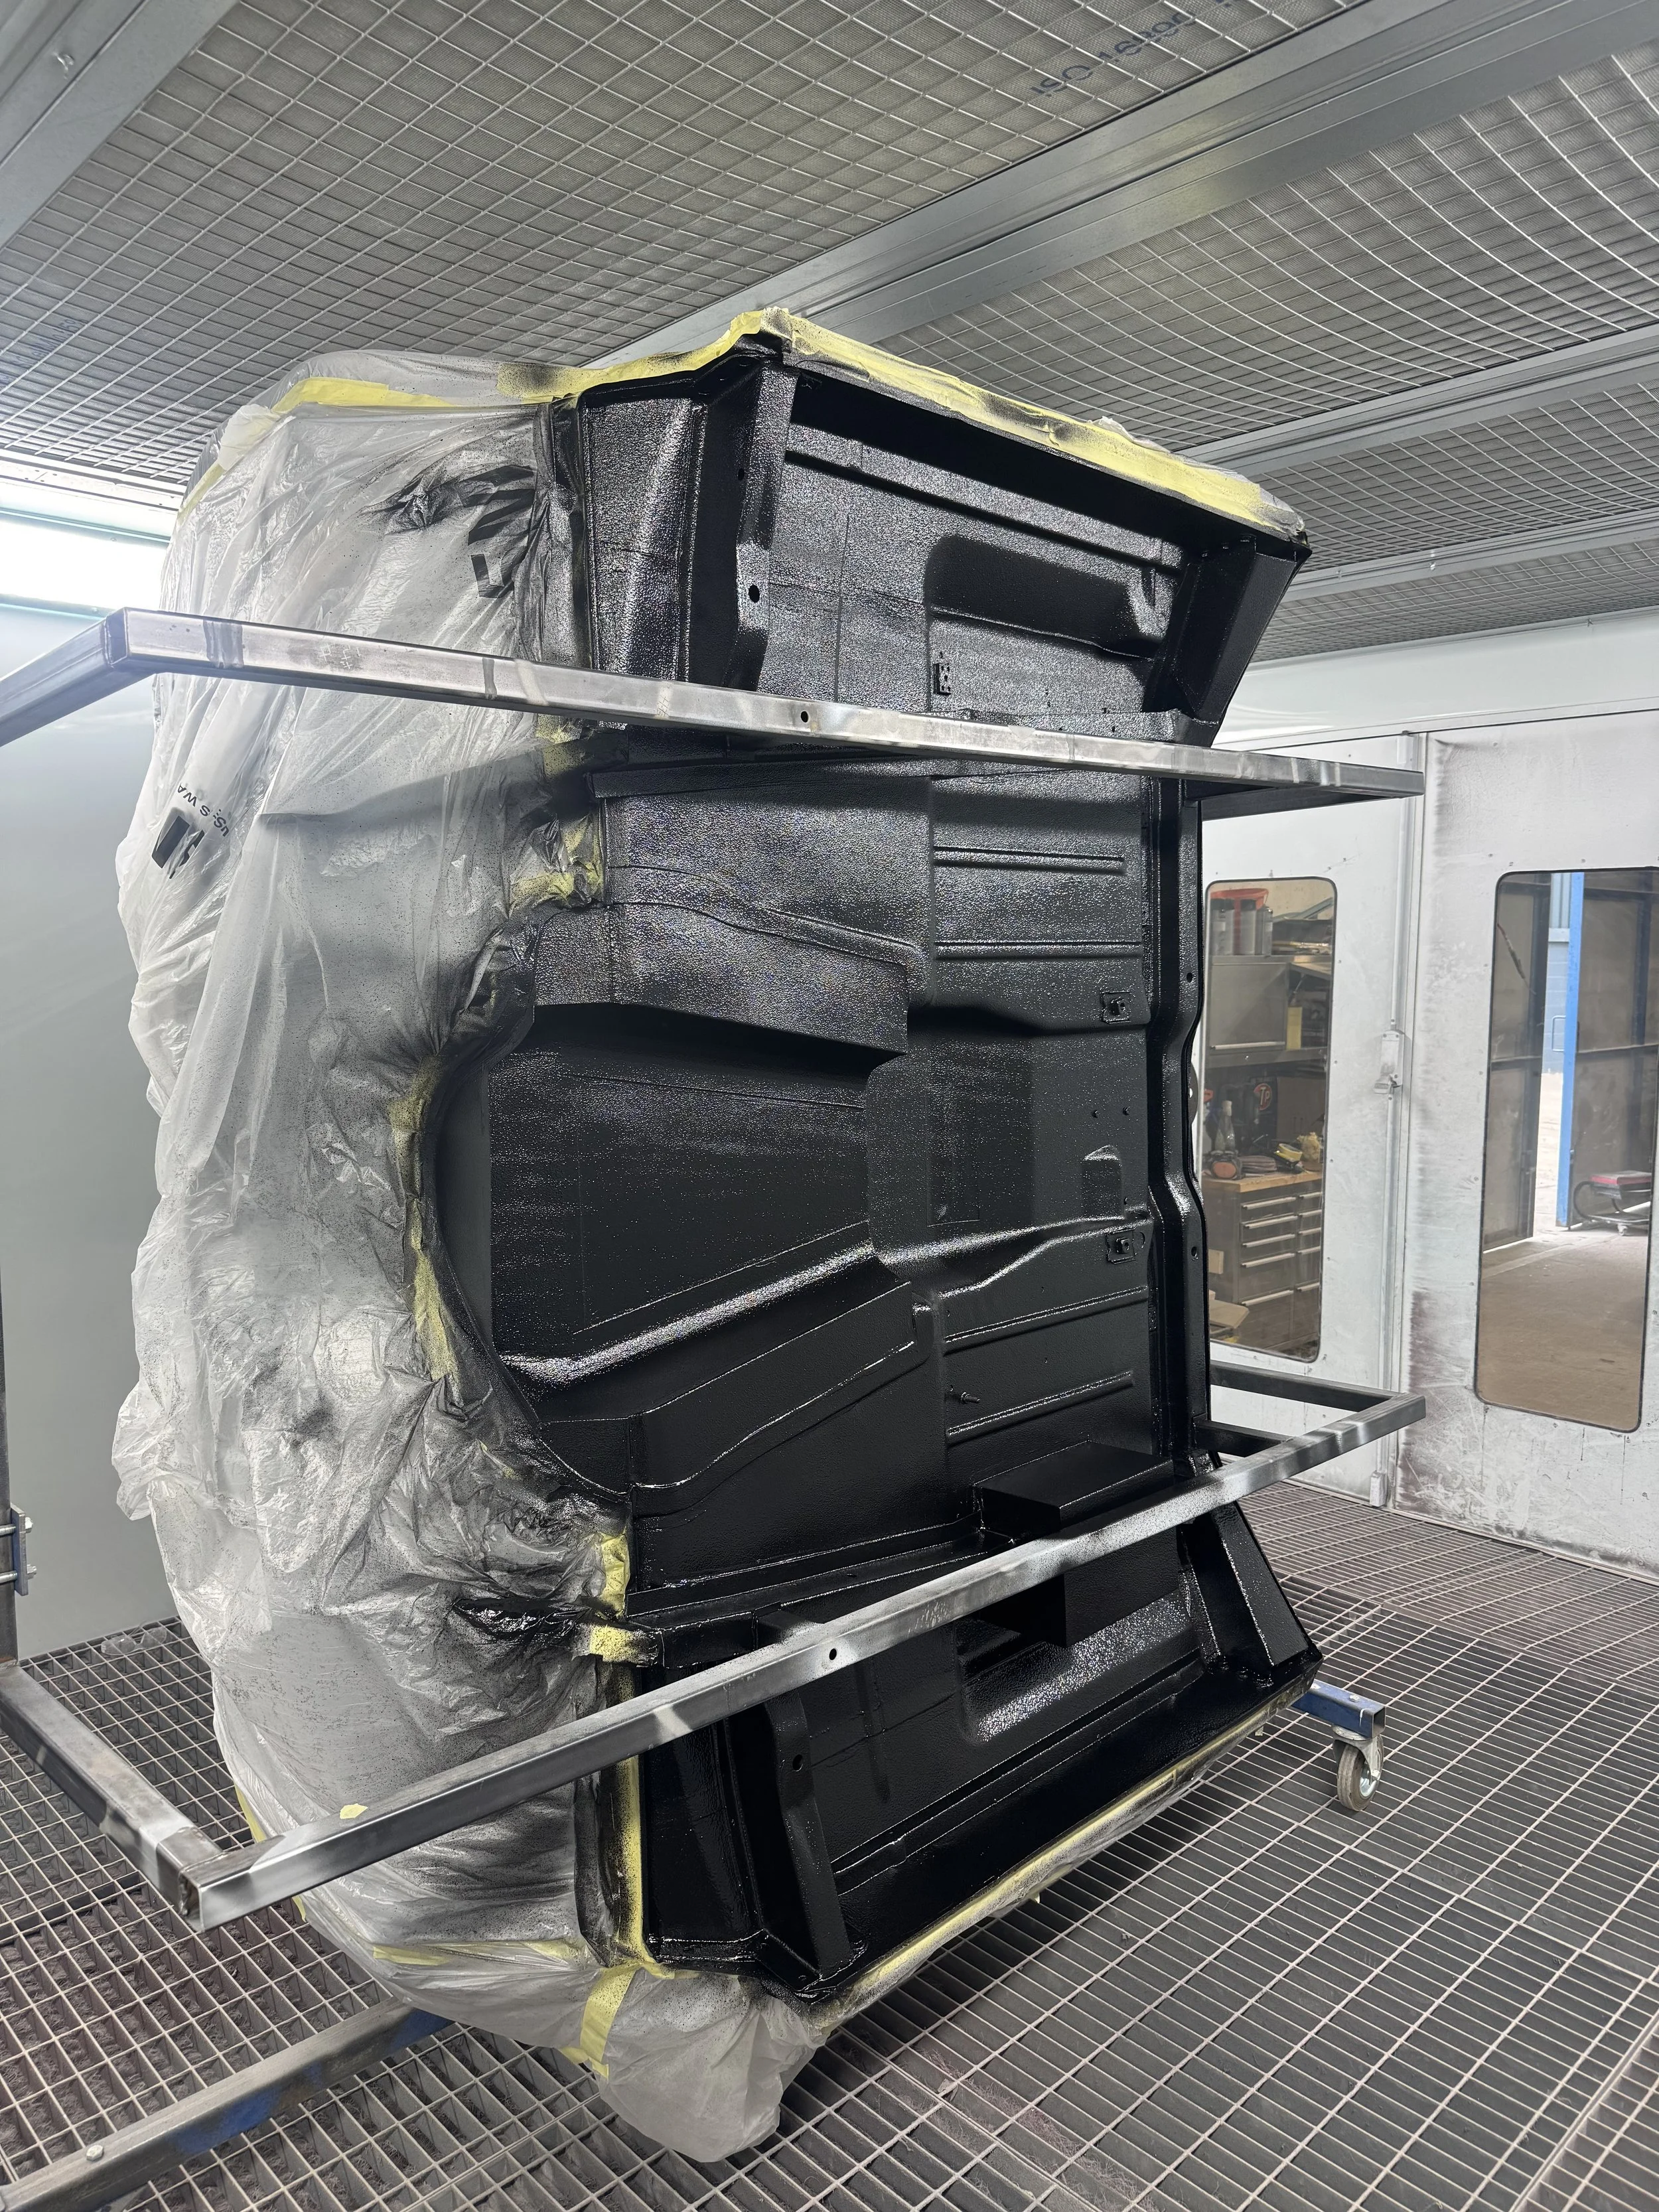
Following the completion of all welding and fabrication, every repaired area was thoroughly cleaned, dressed and treated to prevent future corrosion. Welds were finished, bare steel was chemically prepared and all exposed metal received the appropriate corrosion protection before the entire assembly was sealed beneath coats of high-build epoxy primer. This created a durable, moisture-resistant foundation for the bodywork and paint stages while ensuring every fabricated repair remained protected for the lifetime of the vehicle.
Primer, Protective Coatings & Chassis Protection
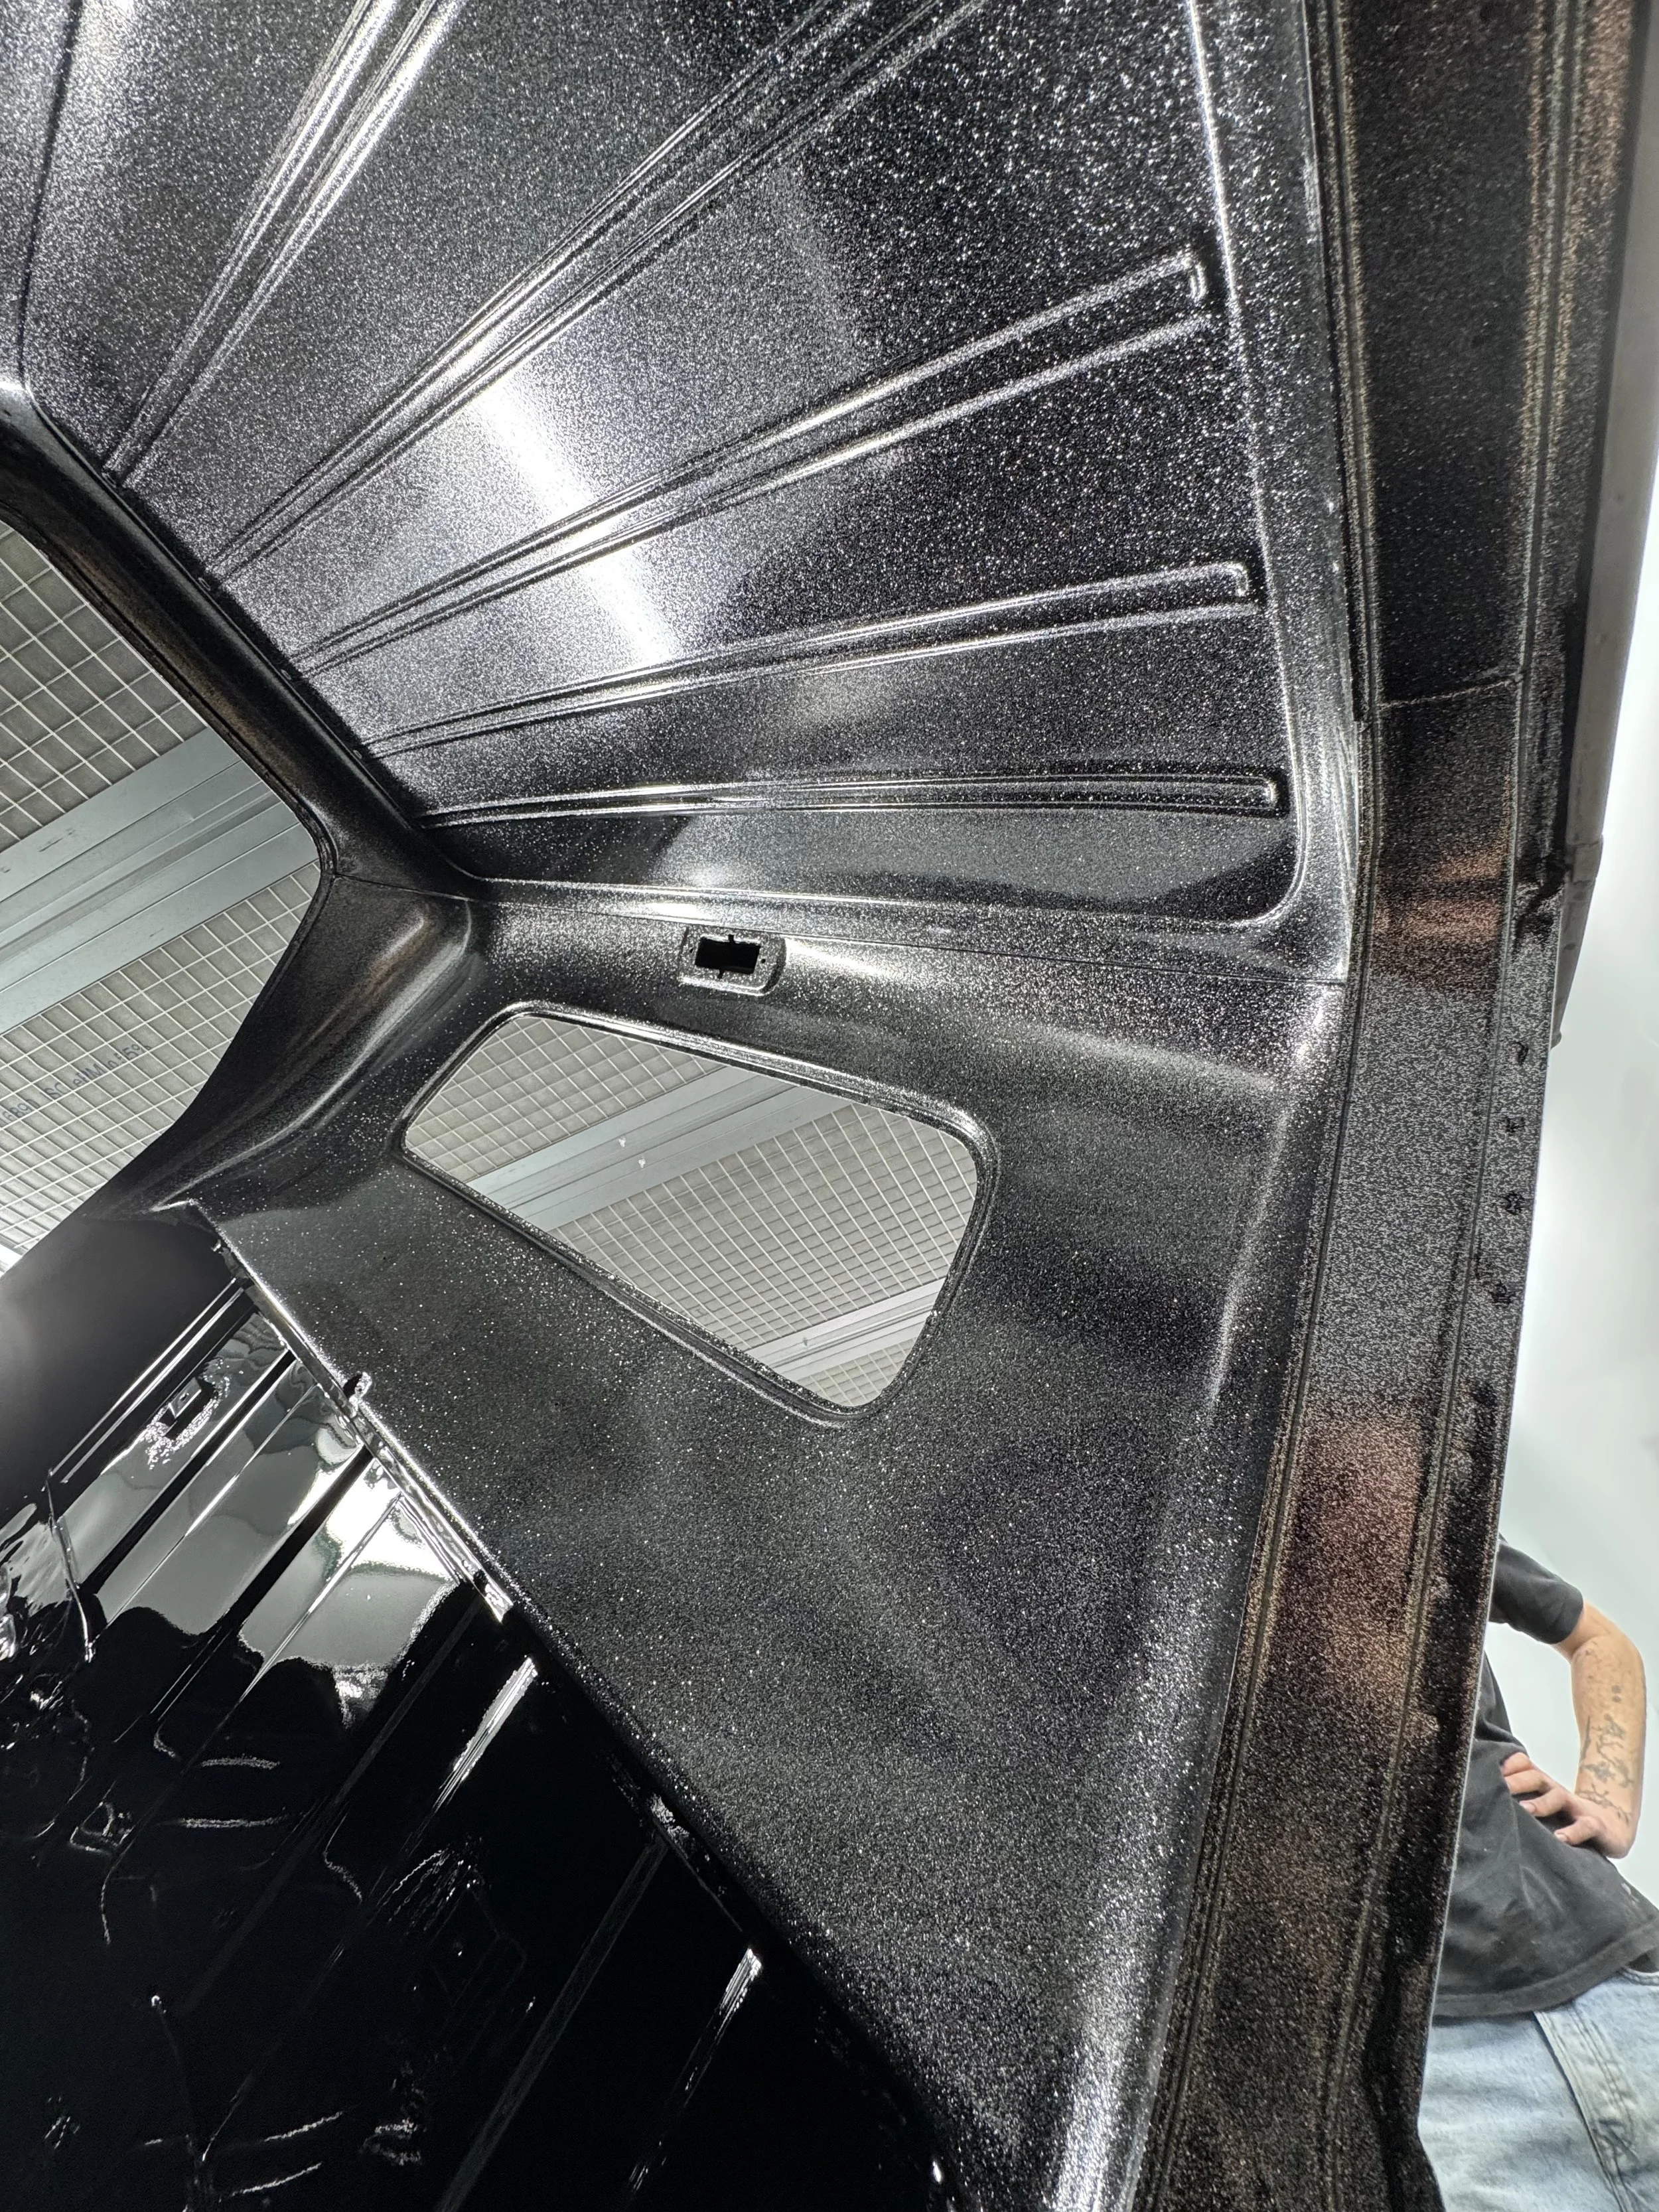
With the epoxy primer fully cured, preparation continued on the areas requiring additional protection and a durable factory-quality finish. Components destined to receive a gloss black finish were carefully prepared before being primed with high-build 2K primer, providing an exceptionally smooth and stable substrate for the topcoat.
The front radiator support panel, along with the lower section of the cab interior, received multiple coats of 2K primer before being meticulously flatted to remove any imperfections. Once the desired finish had been achieved, these components were refinished in a high-quality gloss black coating, producing a durable finish that not only enhances the appearance of the engine bay and interior but also offers excellent long-term protection against wear and corrosion.
Attention then turned to protecting the hidden areas of the truck that are continually exposed to moisture, road debris and stone impact. Every factory seam, welded joint and fabricated section was professionally seam sealed to prevent moisture ingress and ensure the longevity of the body structure. This process also recreated the appearance and protection of the original factory seams while significantly improving corrosion resistance.
Following seam sealing, the underside of the cab was coated with Cobra stone chip and underbody protection. The coating was applied evenly to create a robust yet attractive finish capable of withstanding the harsh conditions experienced beneath the vehicle. The same treatment was extended to other vulnerable areas, including the reverse sides of the front wings, inner wheel arches and wheel wells, providing comprehensive protection against stone chips, water and road contamination.
Completing these protective processes at this stage ensured the C10 was not only prepared for its final paintwork but also safeguarded against corrosion for years to come. Every hidden surface received the same level of care and attention as the visible exterior, reinforcing our commitment to producing a build that is as durable underneath as it is striking on display.
Pre-Dry Build & Bespoke Metal Fabrication
Before the vehicle entered its dry build phase, our attention turned to one of the defining aspects of the project—completely reimagining the rear of the C10 through bespoke metal fabrication. Rather than modifying existing panels to simply fit, our objective was to improve the overall proportions of the truck, creating a more cohesive and purposeful design that looked as though it could have left the factory that way.
The rear wings became the focal point of this transformation. After carefully assessing the truck's original body lines, it became clear that extending the lower sections of the rear wings would create a far smoother visual transition into the rear of the vehicle. Using traditional coachbuilding techniques, each wing was cut, reshaped and hand-fabricated before being metal finished to produce a continuous flow that complemented the truck's long, sweeping profile.
To ensure every modification remained perfectly symmetrical, the body was repeatedly laser measured throughout the fabrication process. Every body line, return edge and panel profile was referenced from side to side, allowing us to maintain absolute consistency while refining the new design. This level of precision ensured the modifications enhanced the original styling rather than distracting from it.
With the revised rear wings complete, attention turned to the rear bumper. Rather than adapting the factory component, we designed and fabricated an extended rear bumper that echoed the new bodywork, filling the visual gap beneath the truck and creating a far stronger connection between the rear quarters and the tail of the vehicle. The result was a cleaner, more balanced appearance that dramatically improved the overall proportions of the C10.
To accurately develop the new rear profile, a bespoke hand-built buck was produced in-house. This allowed each fabricated section to be formed, trial-fitted and refined with complete accuracy before final welding, ensuring every curve and transition flowed naturally into the surrounding bodywork. The buck also enabled both sides of the vehicle to be replicated with exceptional precision, something that would have been impossible through estimation alone.
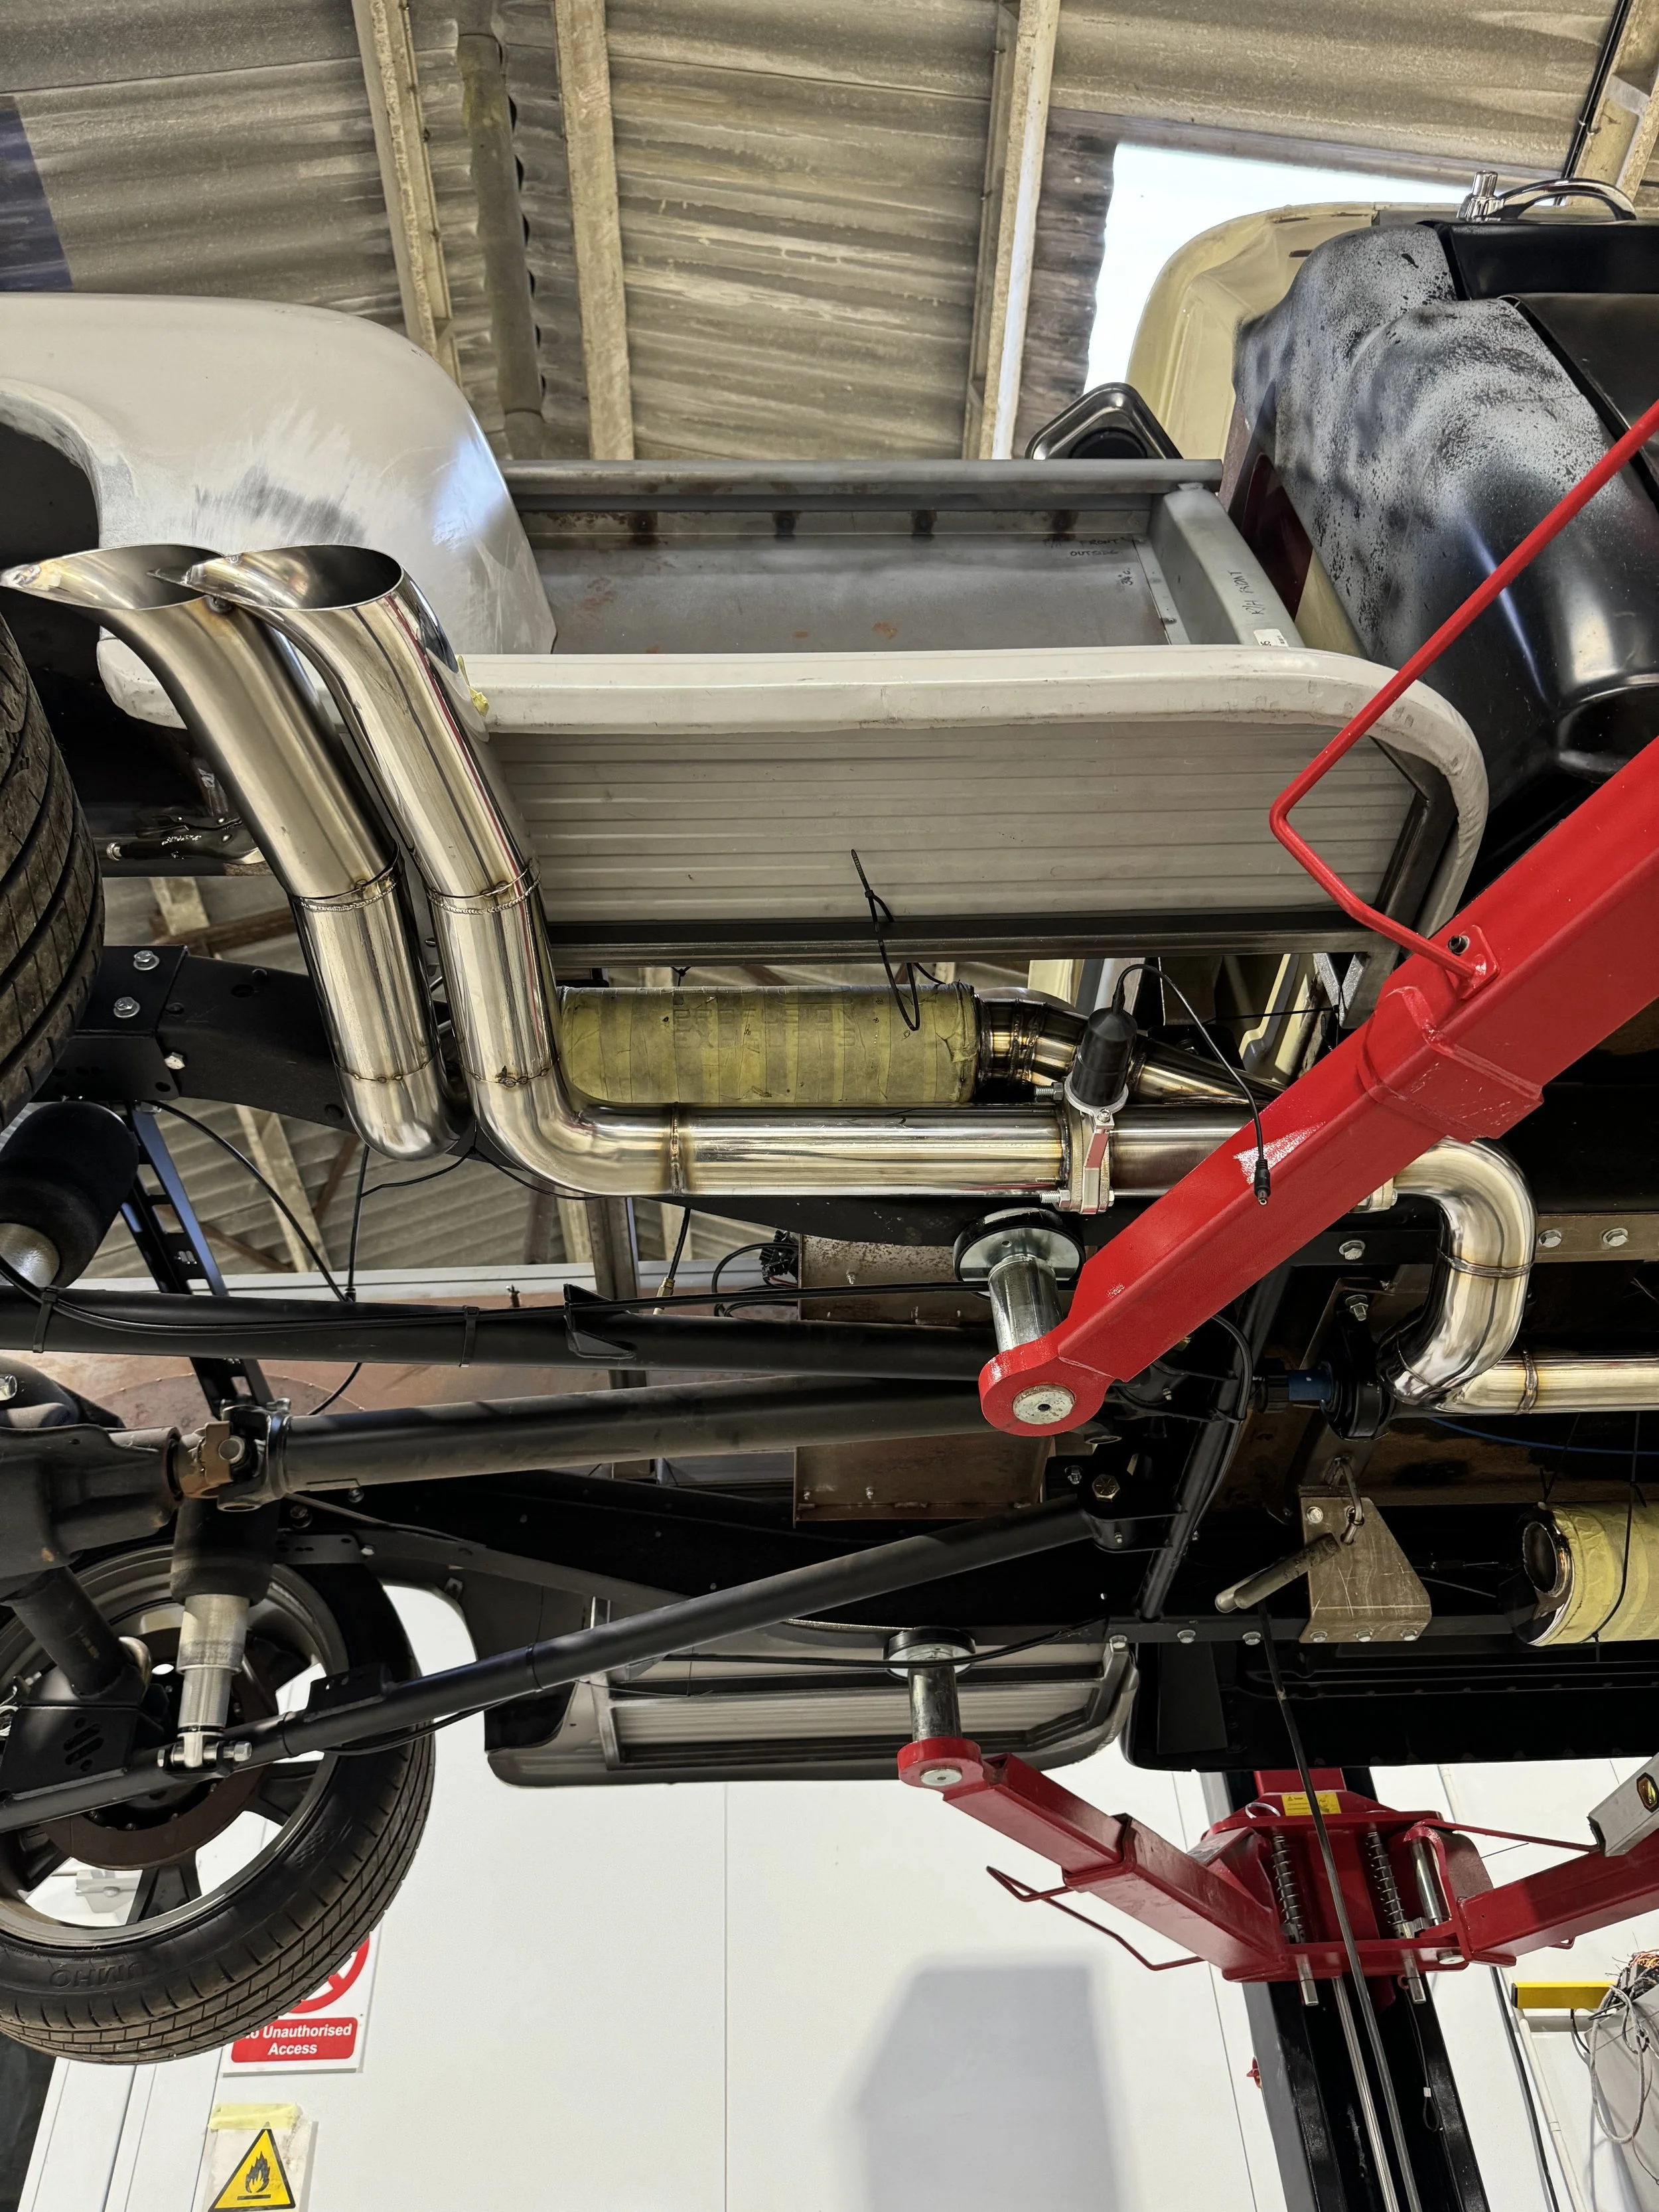
Alongside the body modifications, we also designed and manufactured a completely bespoke stainless steel exhaust system. Fabricated entirely in-house, the system was engineered specifically around the truck's chassis and drivetrain, incorporating a custom valved arrangement that provides refined cruising characteristics when closed while delivering an unmistakable V8 soundtrack when opened. Every section was hand-fabricated, TIG welded and carefully routed to maximise both performance and ground clearance.
This entire phase was completed before the vehicle entered its dry build. By investing the time to perfect the truck's most significant fabrication work beforehand, we established the exact body profile that every subsequent stage of the build would be based upon, ensuring the C10's unique styling was engineered with the same level of precision as the rest of the project.
Dry Build, Mechanical Installation & Initial Start-Up
With the principal fabrication work completed, the C10 progressed into its full dry-build phase. This stage brought the major mechanical, electrical and chassis systems together for the first time, allowing every component to be installed, tested and refined before the truck was dismantled again for final bodywork and paint.
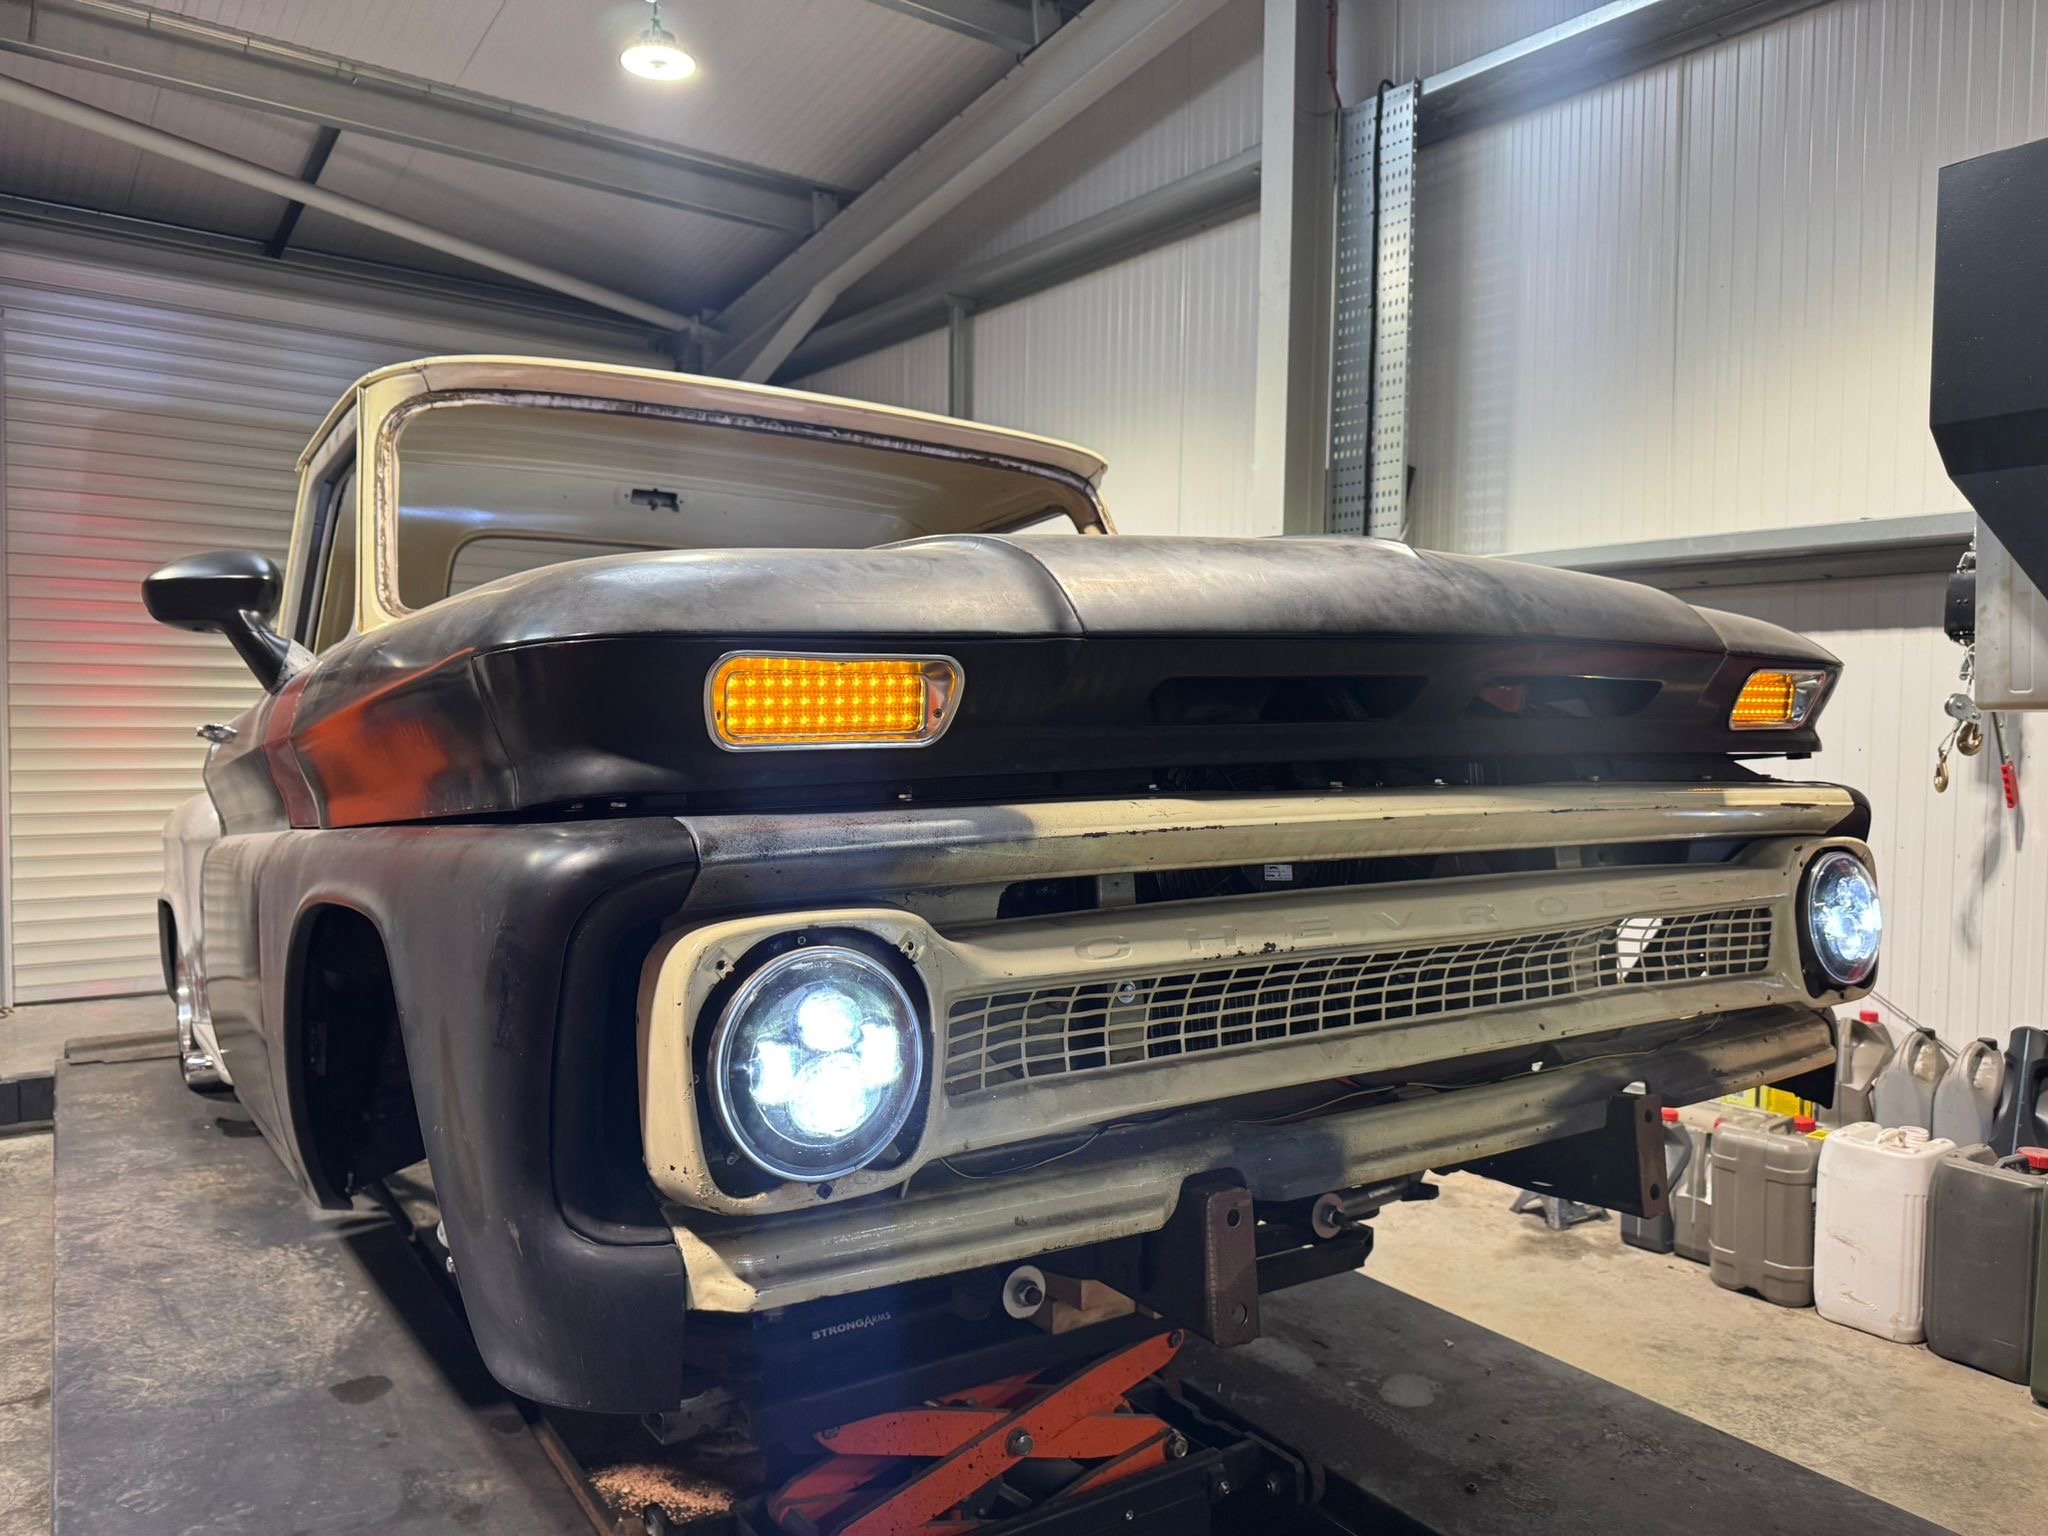
The engine and gearbox were carefully installed into the chassis, with mounting positions, driveline angles and clearances checked throughout. Particular attention was given to the relationship between the drivetrain, chassis, suspension and exhaust system, ensuring the complete assembly worked as one cohesive package without compromising accessibility or future maintenance.
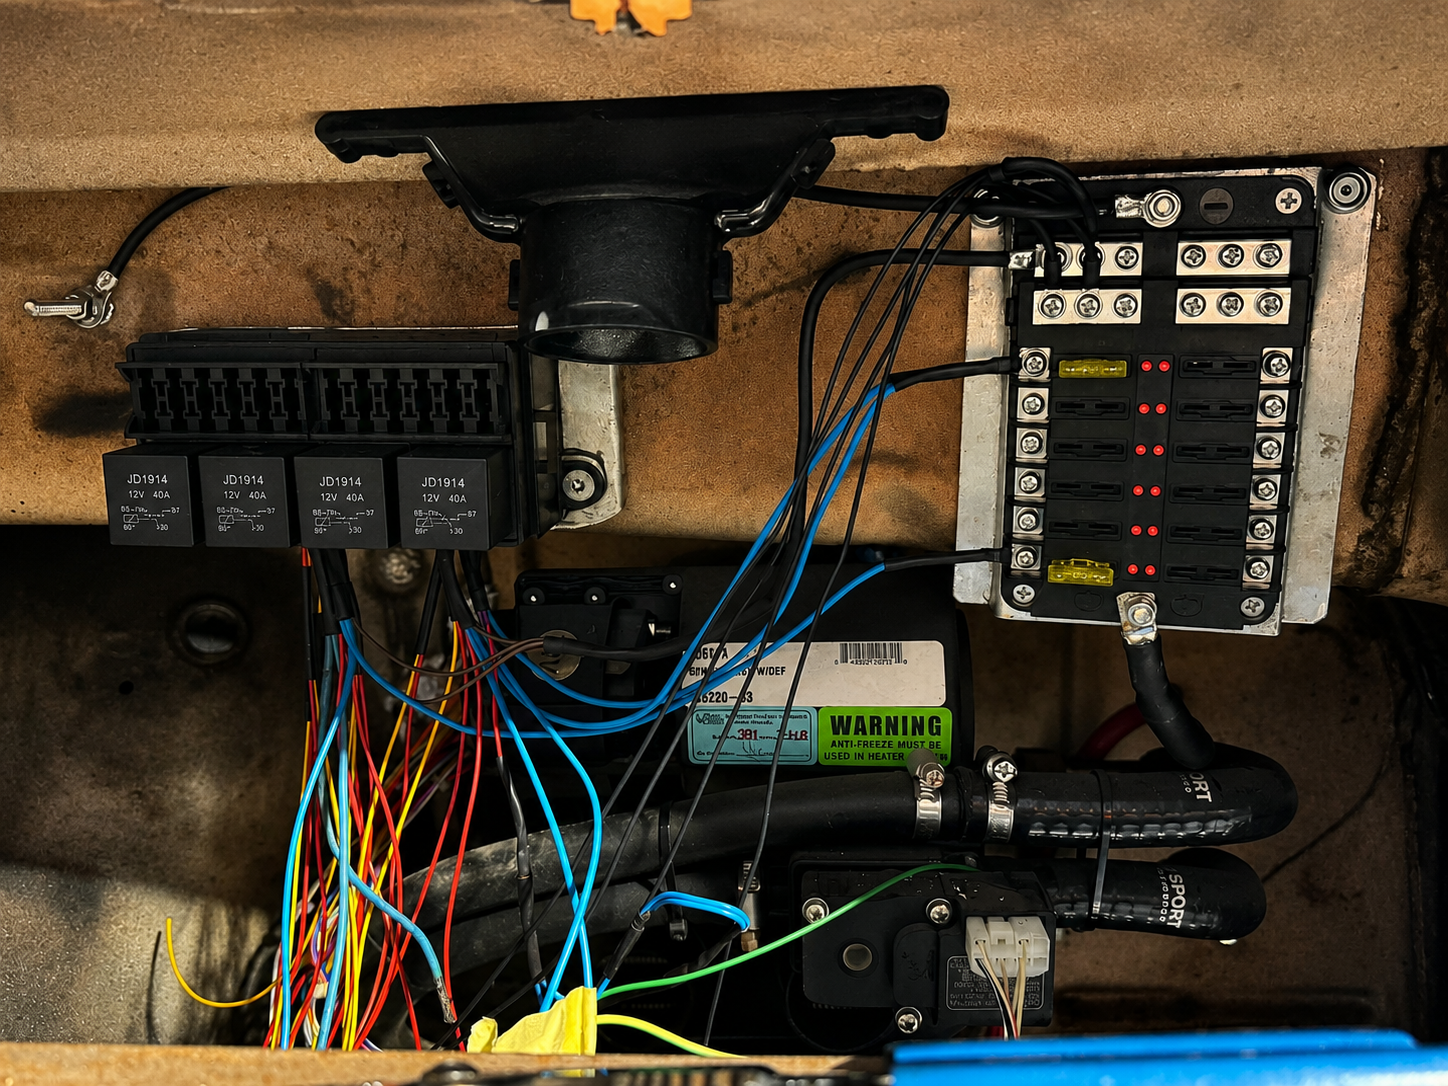
The engine management system was then installed and integrated into the vehicle. This included ECU fitment, diagnostic communication, wiring development and the connection of the required sensors, relays and control systems. The wiring was routed methodically to provide a clean installation while allowing the engine and supporting systems to be tested properly during the dry build.
All engine auxiliaries were fitted and connected, including the cooling, fuel, charging and intake systems. Pipework, hoses, brackets and mounting points were individually checked and adjusted to ensure suitable clearances, reliable operation and a professional final appearance.
The air-suspension system was also installed during this phase. The air lines were carefully routed and secured throughout the chassis, with the valves, tank, compressor and management components positioned to remain discreet while still being accessible for servicing. Once plumbed, the system was pressure-tested and operated through its full range of movement, allowing us to assess ride height, suspension travel, wheel clearance and overall stance.
The braking system was assembled, inspected and prepared for operation. Brake components were correctly aligned and shimmed where necessary before the complete hydraulic system was filled and thoroughly bled. Pedal operation, line routing and component clearances were then checked to ensure the braking system performed consistently and safely.
Before the first start-up, all required fluids and filters were replaced or installed. The engine-oiling system was primed, the cooling system was filled and checked, and the fuel system was inspected for correct pressure and operation. The gearbox, differential and braking systems were also filled with the appropriate fluids before a complete pre-start inspection was undertaken.
The engine was then started for the first time in its new configuration. During the initial start-up, we monitored oil pressure, coolant temperature, fuel pressure, charging voltage and live ECU data while inspecting the complete installation for leaks, unusual noises or faults. Diagnostic checks and initial calibration adjustments were carried out as the engine reached operating temperature, confirming that the drivetrain and supporting systems were functioning correctly.
Completing this process during the dry build allowed us to identify and resolve any mechanical, electrical or packaging issues before the vehicle entered the finishing stages. By proving the engine, gearbox, air suspension, braking system and electronics at this point, we could move forward knowing that the truck’s principal systems had already been successfully installed, operated and tested.
Strip Down, Chassis Separation & Sandblasting
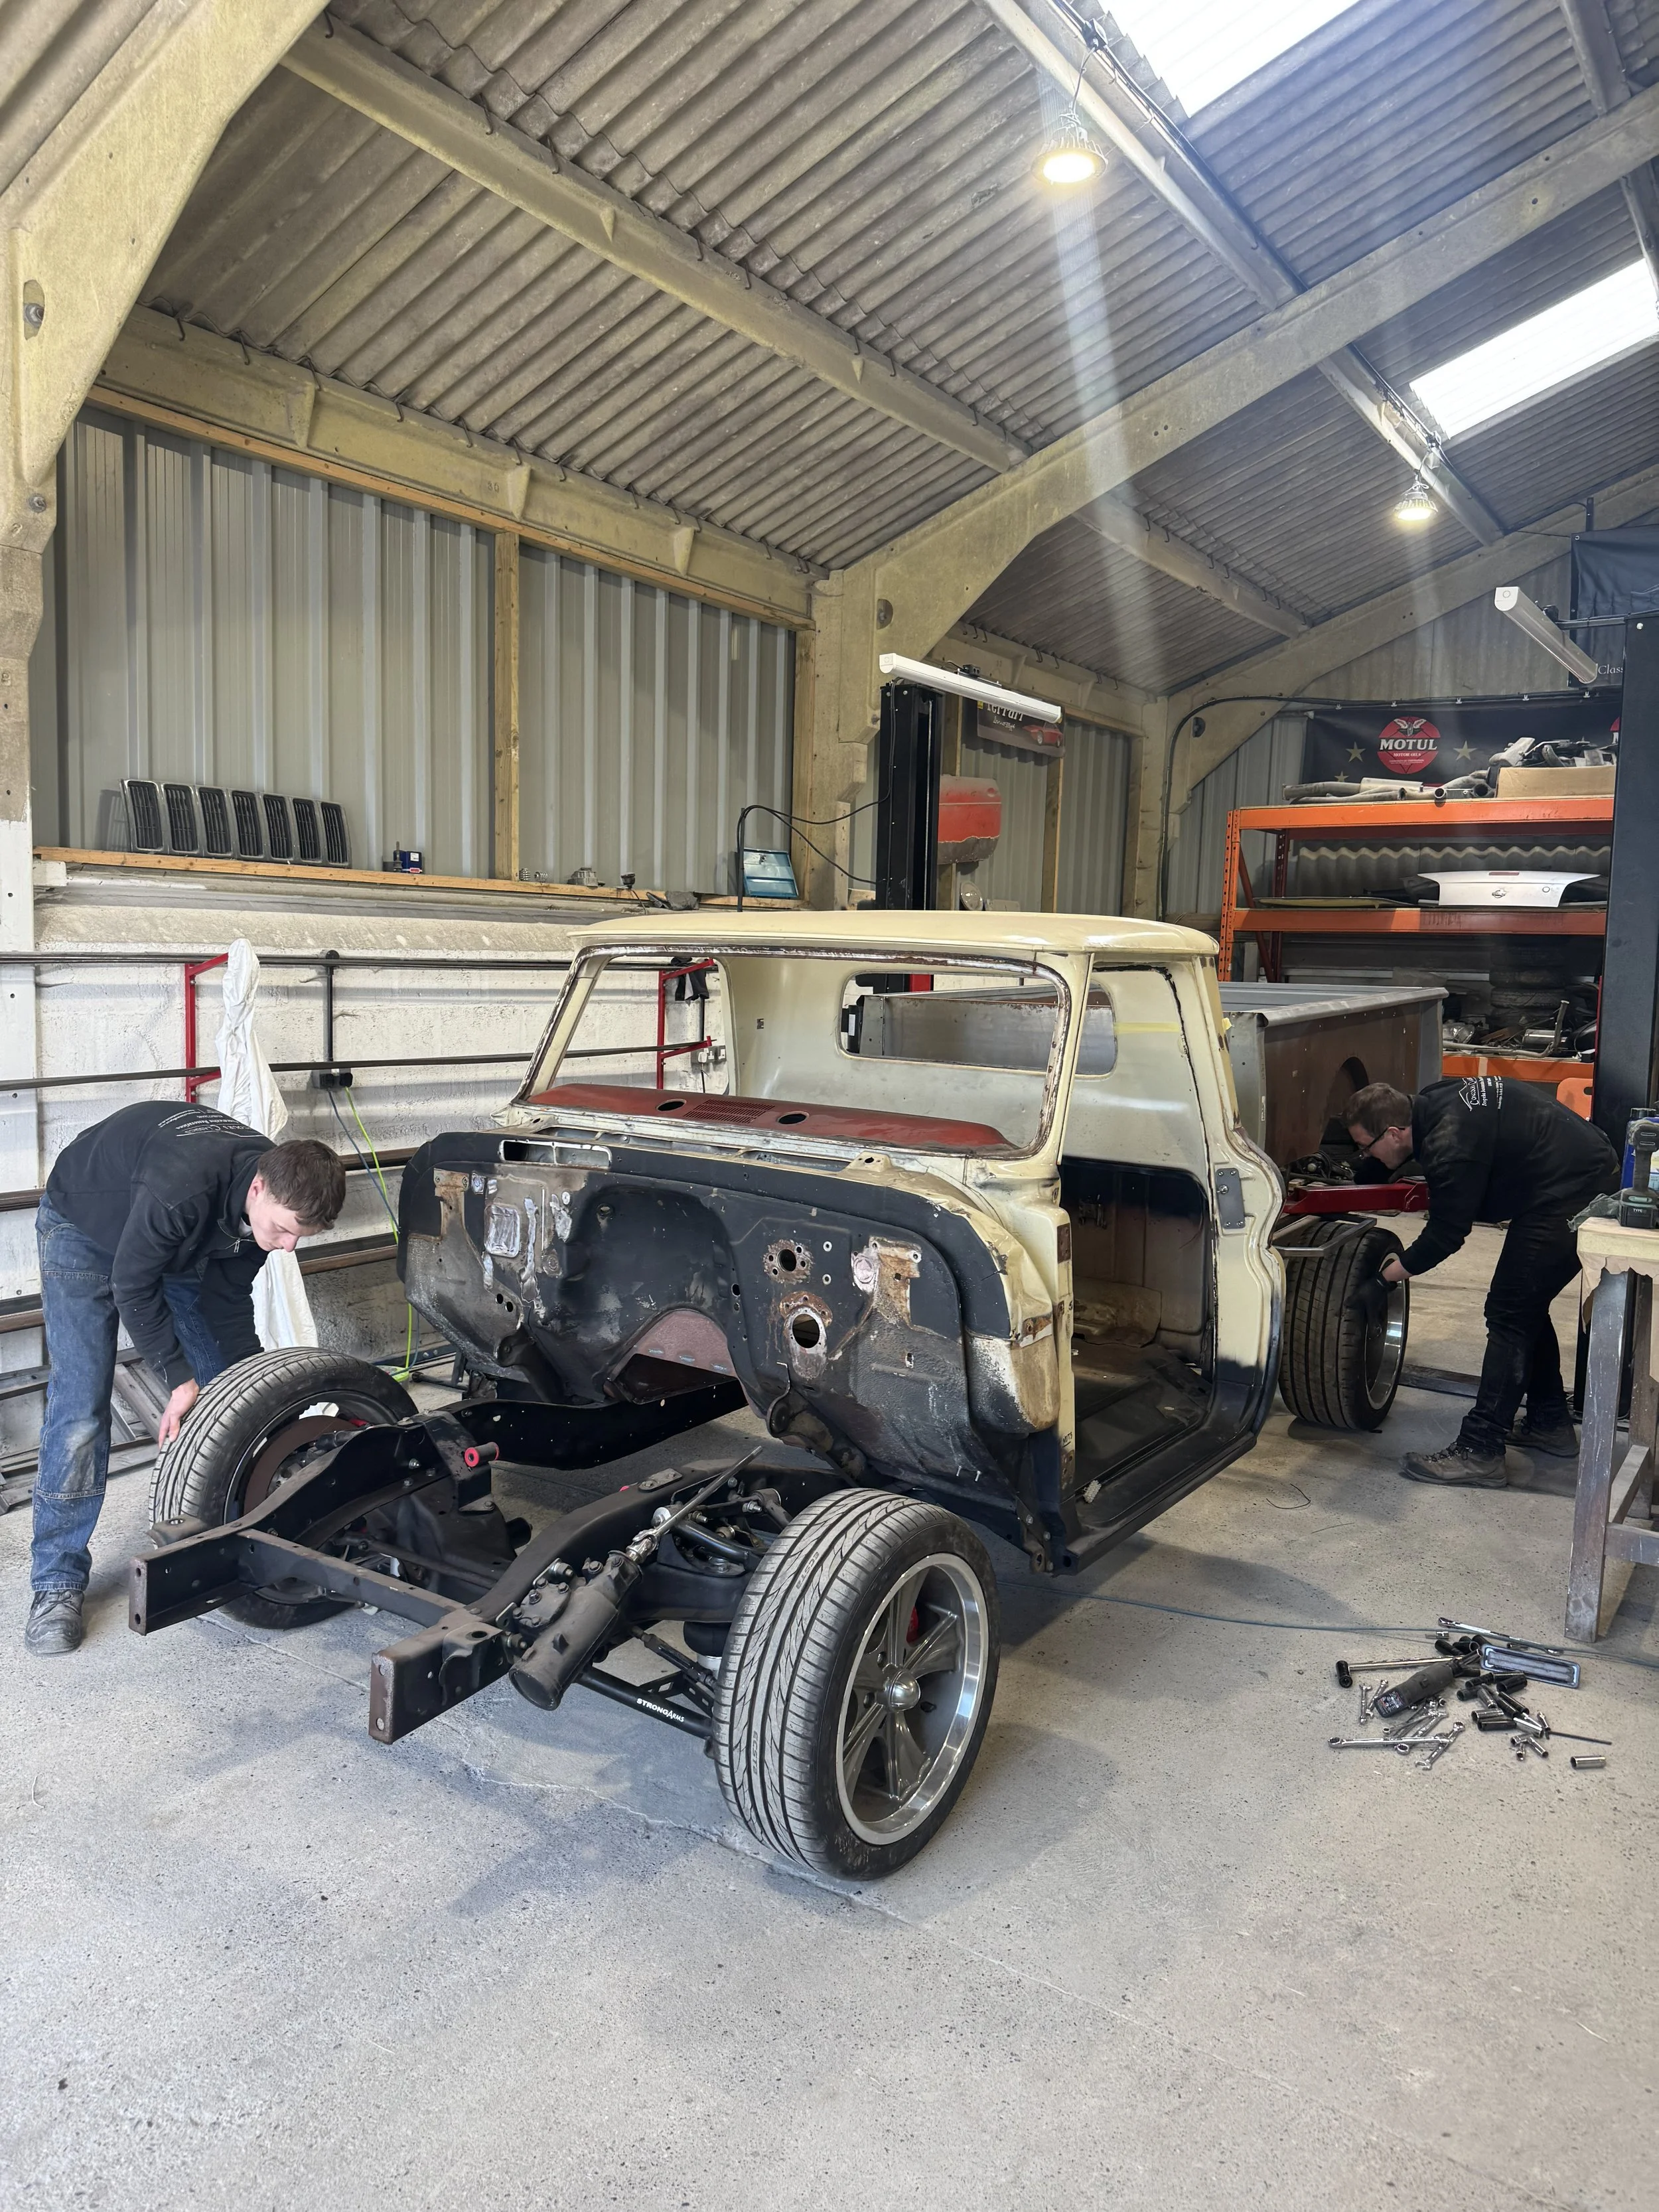
With the dry build successfully completed and every major system tested, the C10 was carefully stripped back down in preparation for the body and paint stages. Having already proven the fitment and operation of the vehicle's mechanical and electrical systems, every component could now be removed with confidence, knowing any future assembly would be straightforward and precise.
The disassembly process was carried out methodically, with every panel, fixture, fixing and fabricated component removed in a controlled manner. Doors, front panels, interior components, trim and ancillary parts were carefully dismantled, catalogued and stored to ensure they remained protected and could be accurately refitted during the final assembly. This meticulous approach also allowed each individual component to be prepared and refinished to the same standard as the vehicle itself.
Once the body had been stripped, the cab and rear bed were separated from the chassis. Both assemblies were then mounted onto purpose-built transport frames, providing a secure platform that prevented movement or distortion while allowing unrestricted access to every surface during the restoration process. The chassis was also prepared independently, enabling each section of the vehicle to undergo restoration without compromise.
With the vehicle separated into its individual assemblies, the chassis, cab and bed were transported to our trusted sandblasting specialists. Abrasive blasting removed decades of paint, corrosion, surface contamination and previous repair materials, exposing clean bare metal throughout. This process provided an honest assessment of the condition of every component, revealing any hidden corrosion or previous repairs that would require attention before refinishing.
Returning the C10 to bare metal established the perfect foundation for the next stage of the project, ensuring every subsequent repair, fabrication detail and paint finish would be applied to a clean, stable and properly prepared surface capable of delivering a long-lasting, concours-quality result.
Body Alignment, Panel Gapping & Epoxy Priming
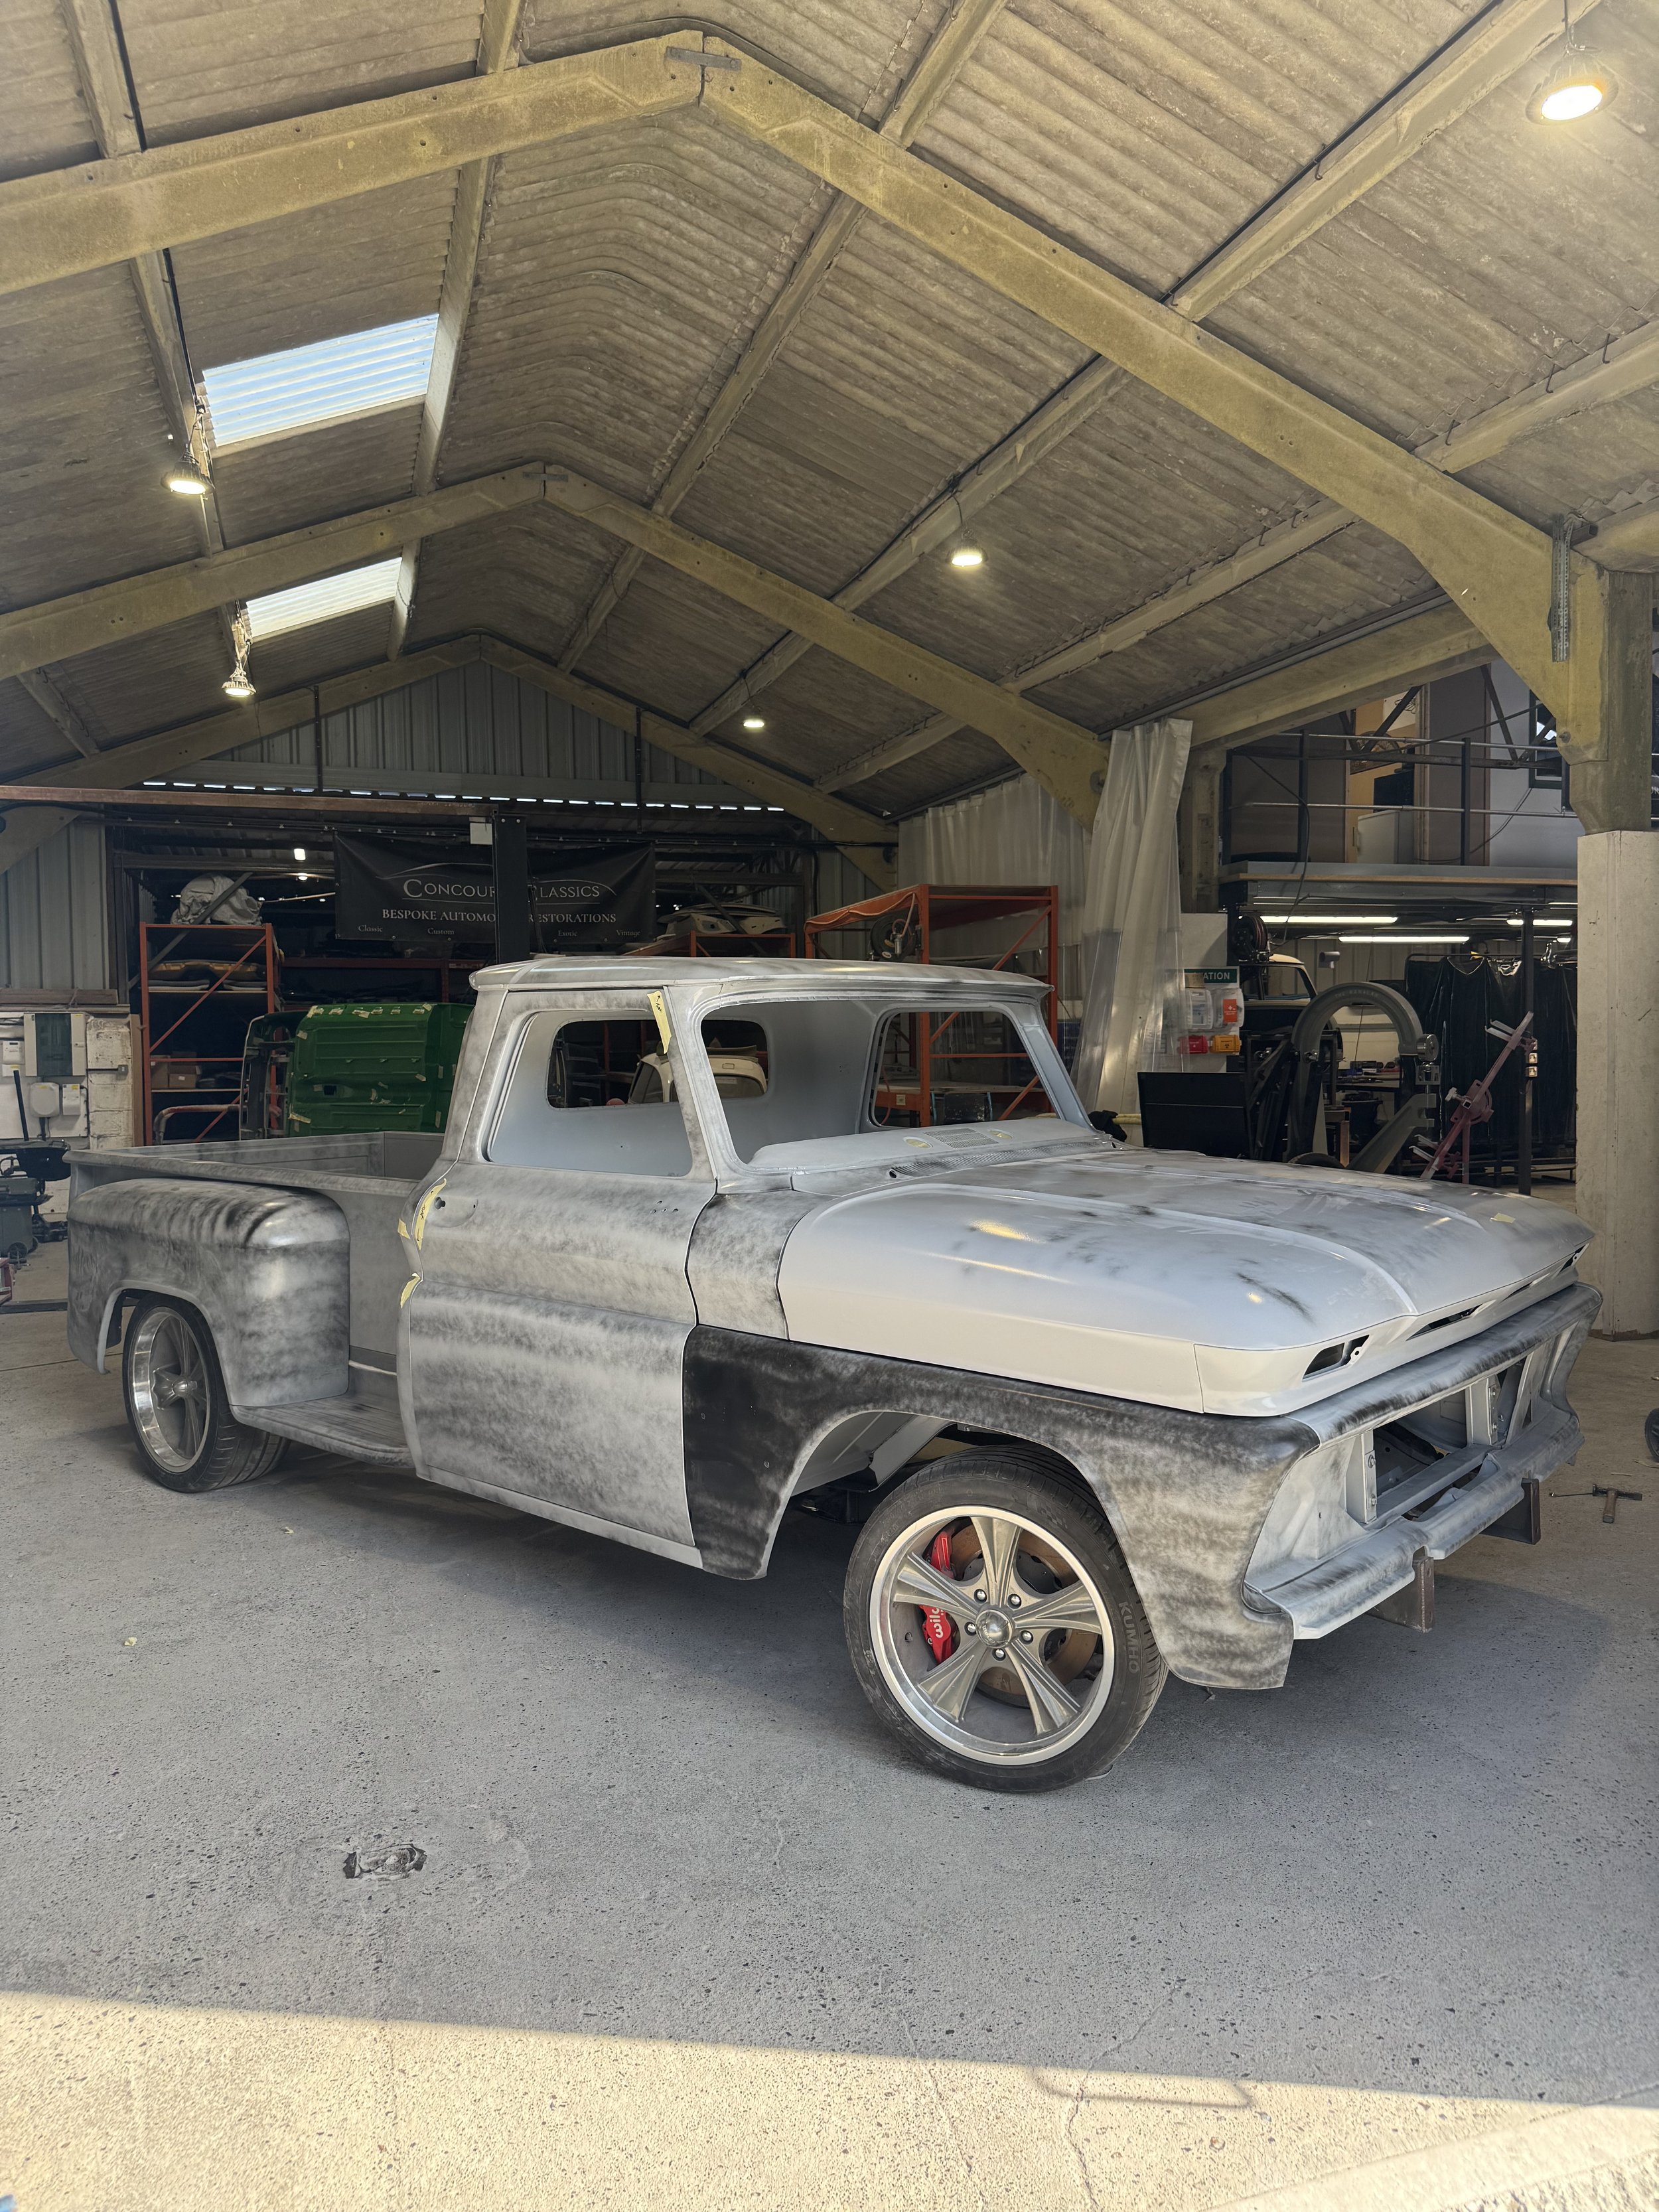
Following the completion of the structural welding and fabrication, the cab, bed, wings, doors and remaining body panels were carefully reassembled onto the chassis. Rebuilding the truck at this stage allowed the complete body to be assessed as a single unit, ensuring every panel related correctly to the next before any final finishing work began.
With the body fully mounted, extensive time was invested in establishing consistent panel gaps, accurate shut lines and uninterrupted body lines throughout the truck. Each panel was repeatedly adjusted, aligned and secured until the overall fit was correct. Particular attention was given to the transitions between the cab, doors, front panels, bed and modified rear wings, ensuring the extensive custom work flowed naturally across the complete vehicle.
Once the panel fitment had been established, the bodywork and filler work commenced. Each repaired and fabricated area was carefully refined to remove minor surface variations while preserving the correct shape of the original panels and custom modifications. The filler was applied only where necessary before being progressively shaped and block sanded using long, rigid blocks to produce flat, consistent surfaces.
The truck remained assembled throughout this process so the panels could be worked together rather than in isolation. This made it possible to carry body lines across adjoining panels, refine edge profiles and continually check that the gaps remained uniform. The complete vehicle was repeatedly guide-coated and block sanded, allowing high and low areas to be identified and corrected until the bodywork met the required standard.
Once the panel gaps, shut lines, contours and body lines had been finalised, the C10 was carefully disassembled once again. The cab, bed and individual panels were separated from the chassis so every face, return edge, underside and concealed section could be accessed without compromise.
Each component was then thoroughly cleaned, prepared and masked before being coated in epoxy primer. Applying the epoxy primer to the panels individually ensured complete coverage across both the visible exterior surfaces and the areas that would become difficult to reach after final assembly. The primer sealed the bare metal and completed bodywork beneath a durable, moisture-resistant coating, creating a stable and consistent foundation for the next stages of preparation and paint.
The Custom Metal Flake Paint Process Begins
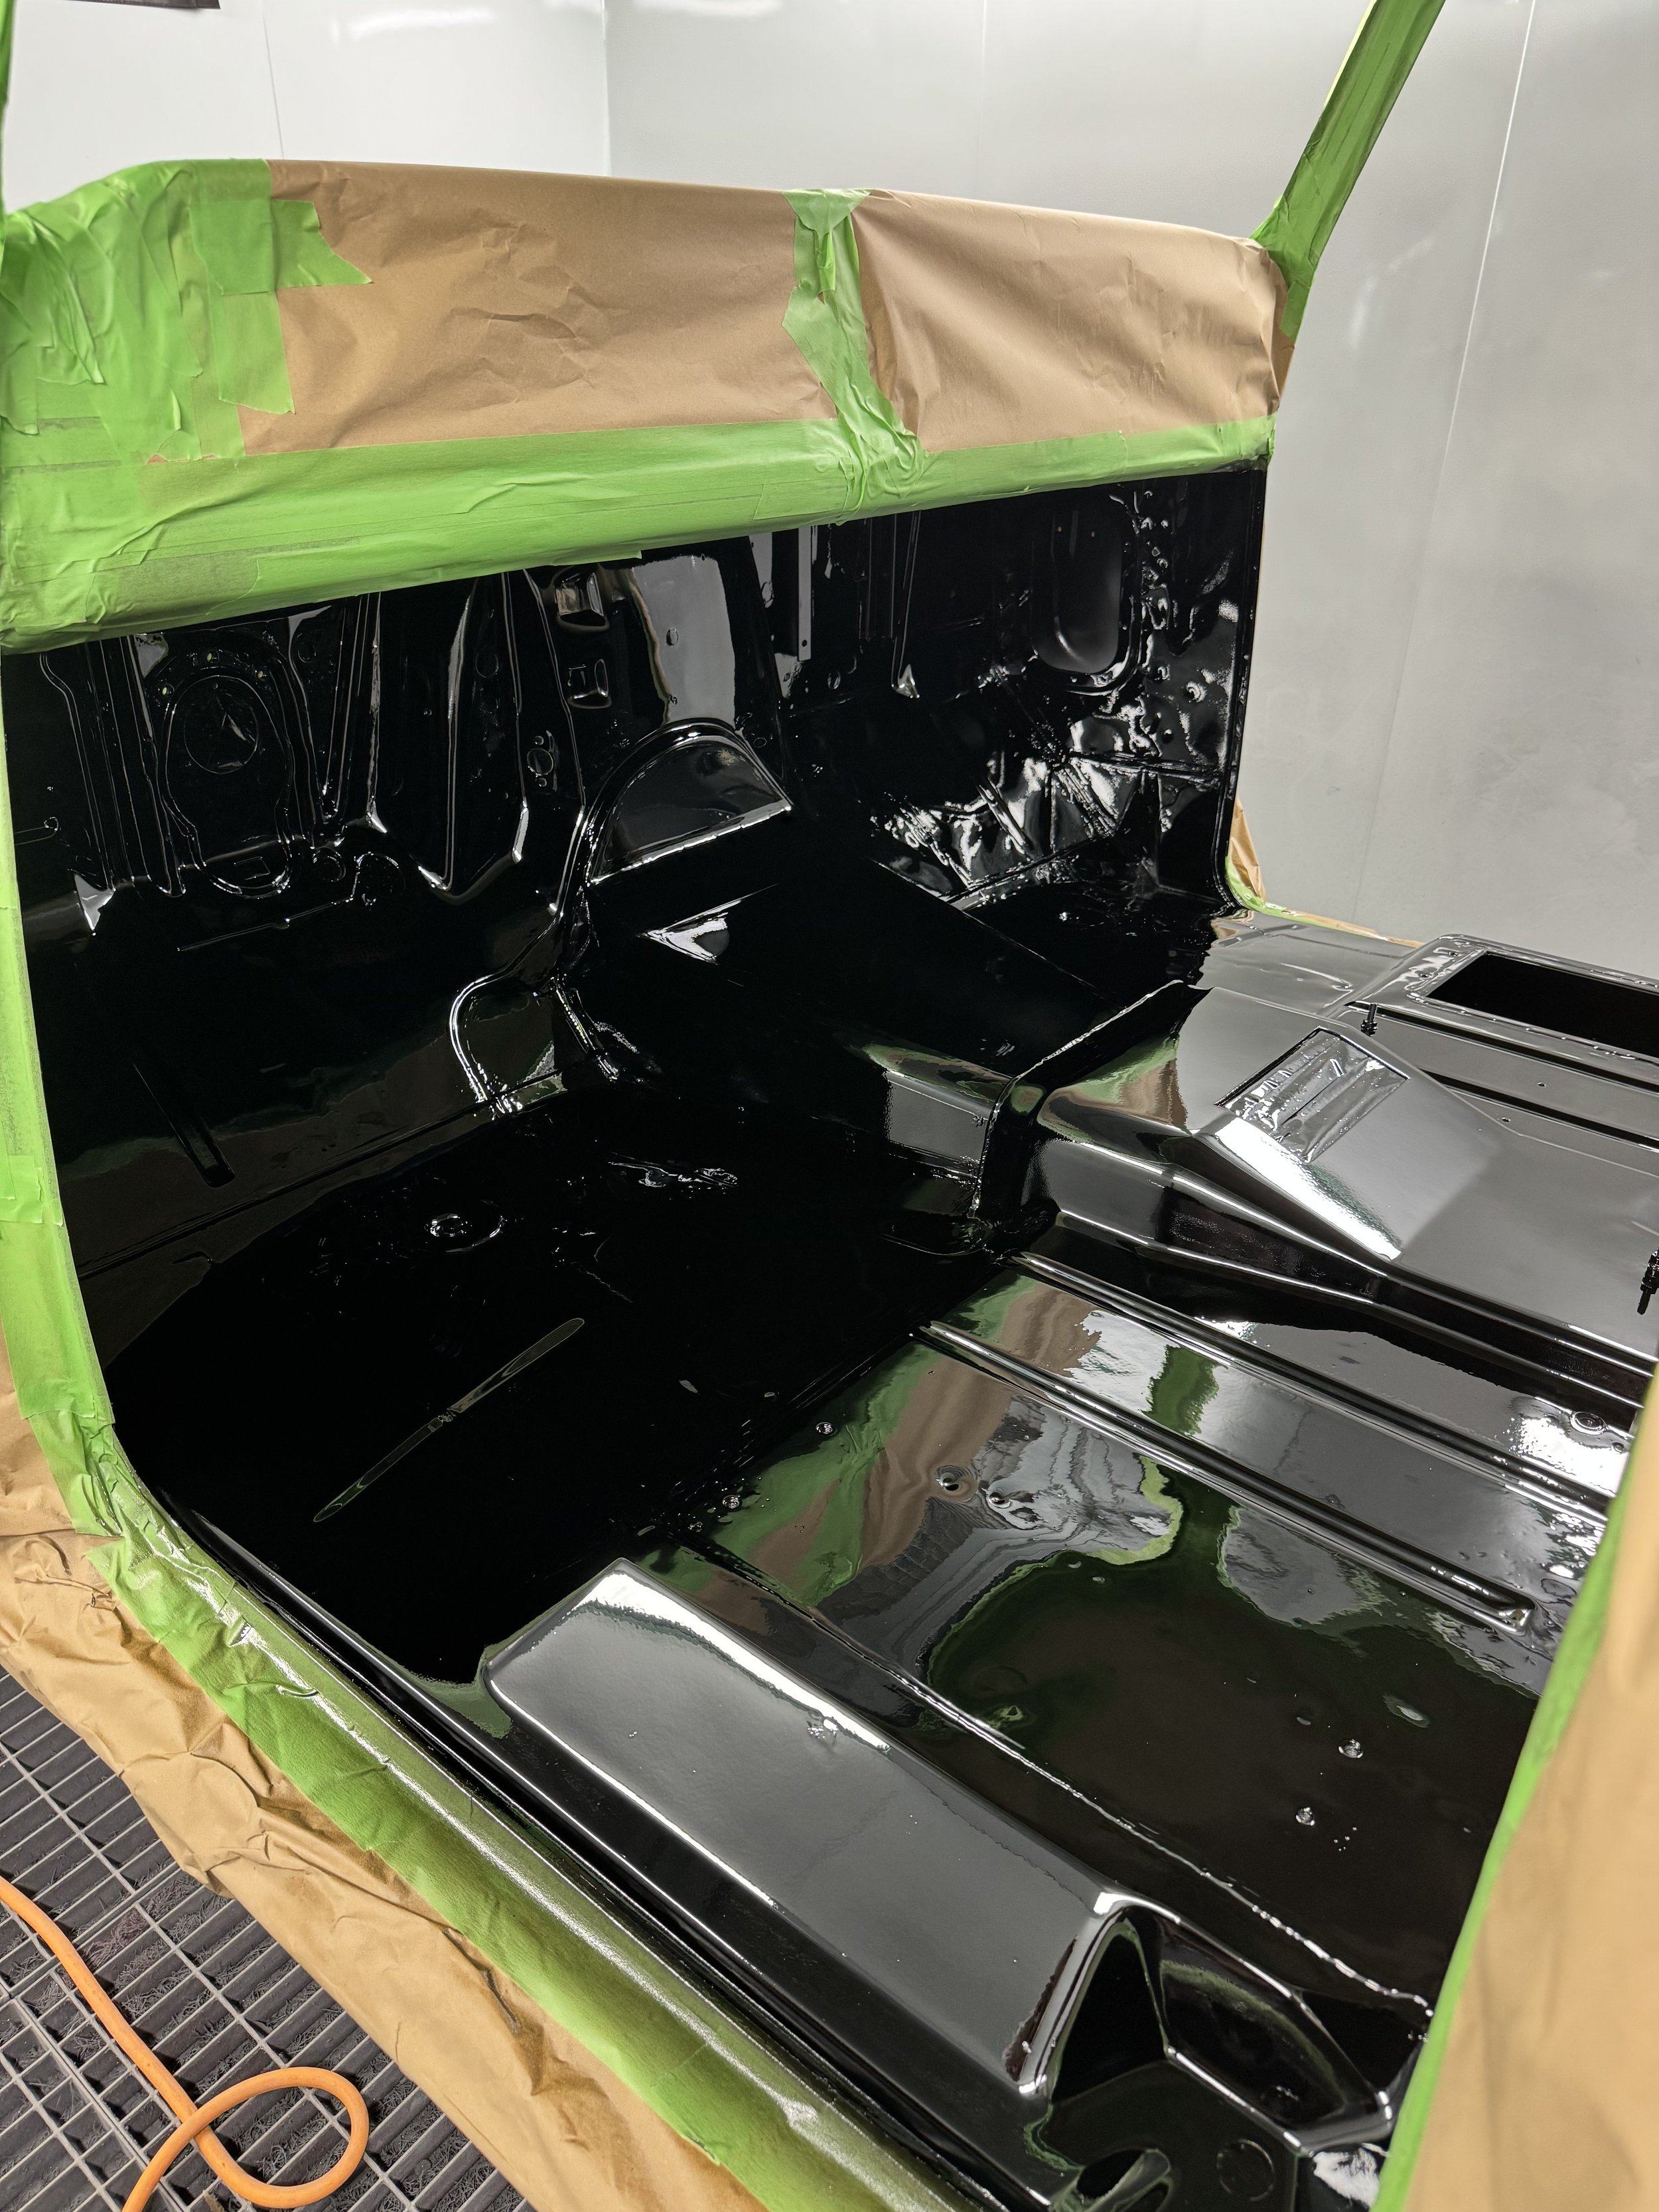
All preparation work complete, the project reached one of its most anticipated milestones—the beginning of the paint process. The interior was the first area to enter the spray booth, marking the moment the C10 finally began to transform from a carefully fabricated shell into the striking custom truck we had envisioned from the very beginning.
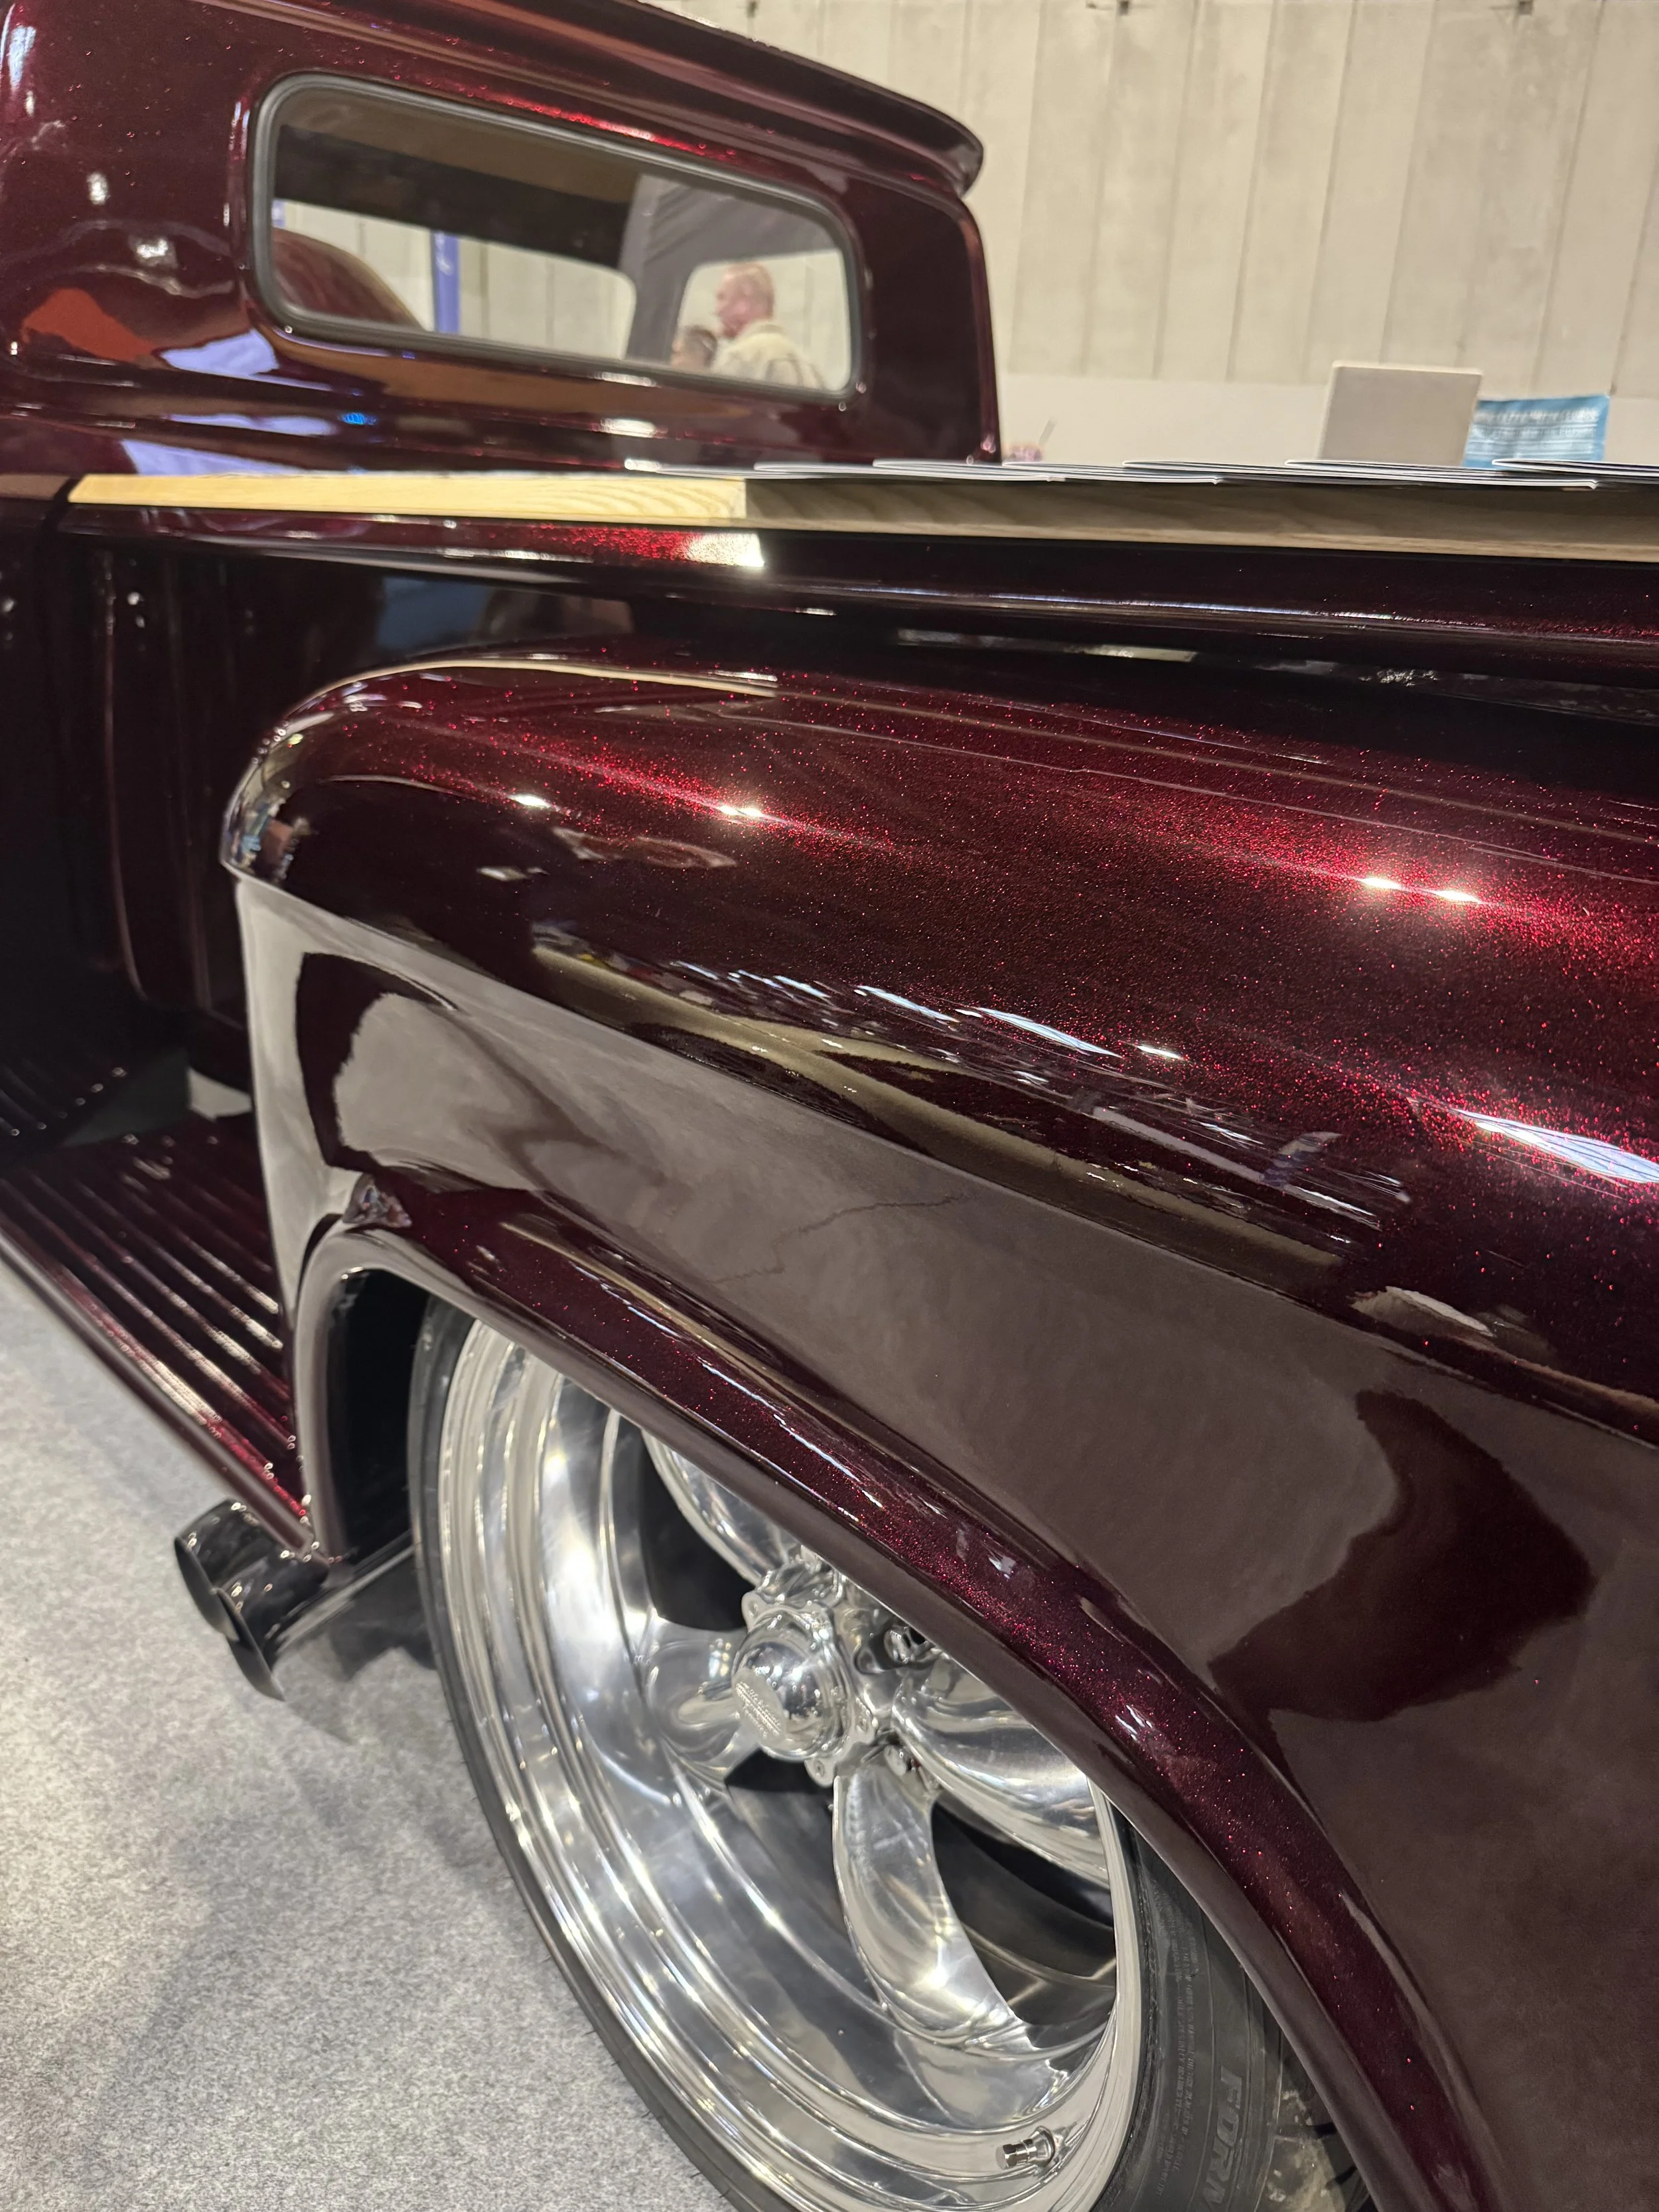
From the outset, this was never intended to be an ordinary paint finish. Jason wanted something truly unique—something that would stand apart from conventional custom paintwork while showcasing the truck's bold styling. The result was a highly complex five-stage multi-coat candy metal flake finish that demanded absolute precision throughout every stage of application. Unlike a standard solid colour, each individual layer would contribute to the final appearance, meaning consistency and control were critical from start to finish.
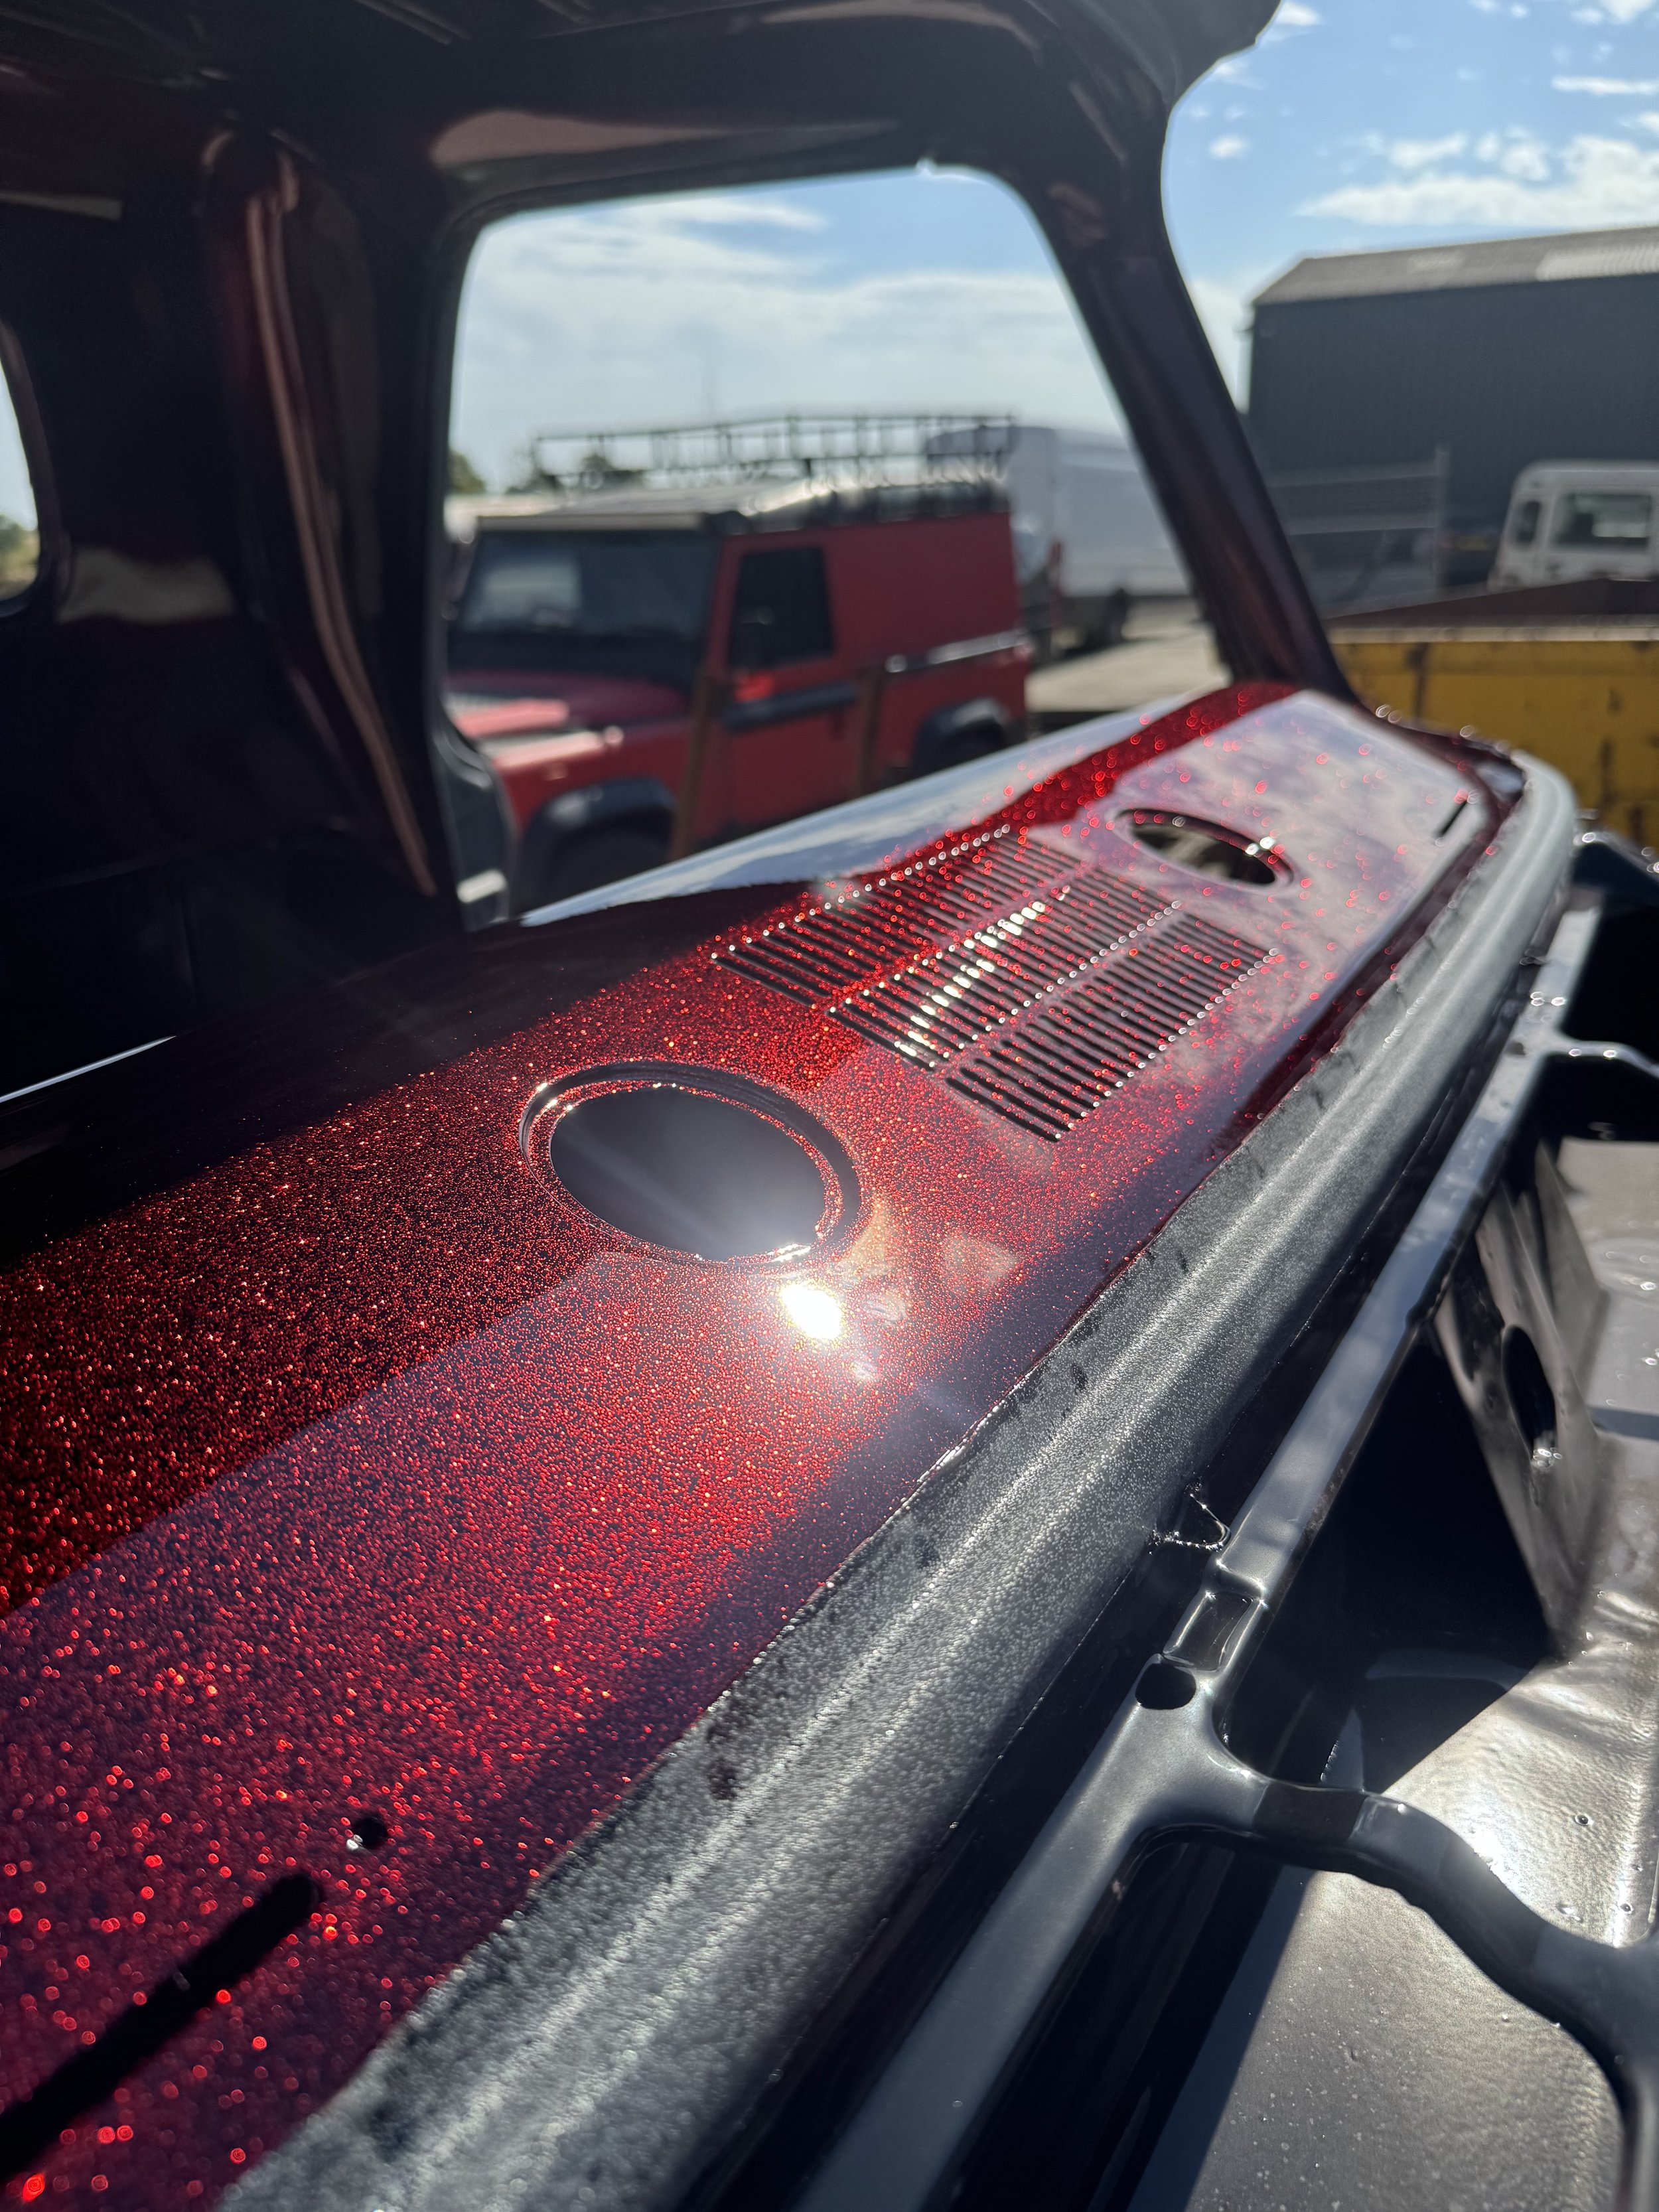
The process began with a deep black base coat, providing the perfect foundation for the layers that would follow. Once cured and inspected, two coats of 0.2 chrome metal flake was applied evenly across the surface. This stage introduced incredible depth and reflectivity, ensuring the paint would sparkle under natural light while creating the illusion of movement across the bodywork.
The metal flake was then encapsulated beneath a carefully applied clear coat. Locking the flake beneath clear not only protected it but also created a perfectly smooth surface for the candy layer, ensuring maximum clarity and depth in the finished paintwork.
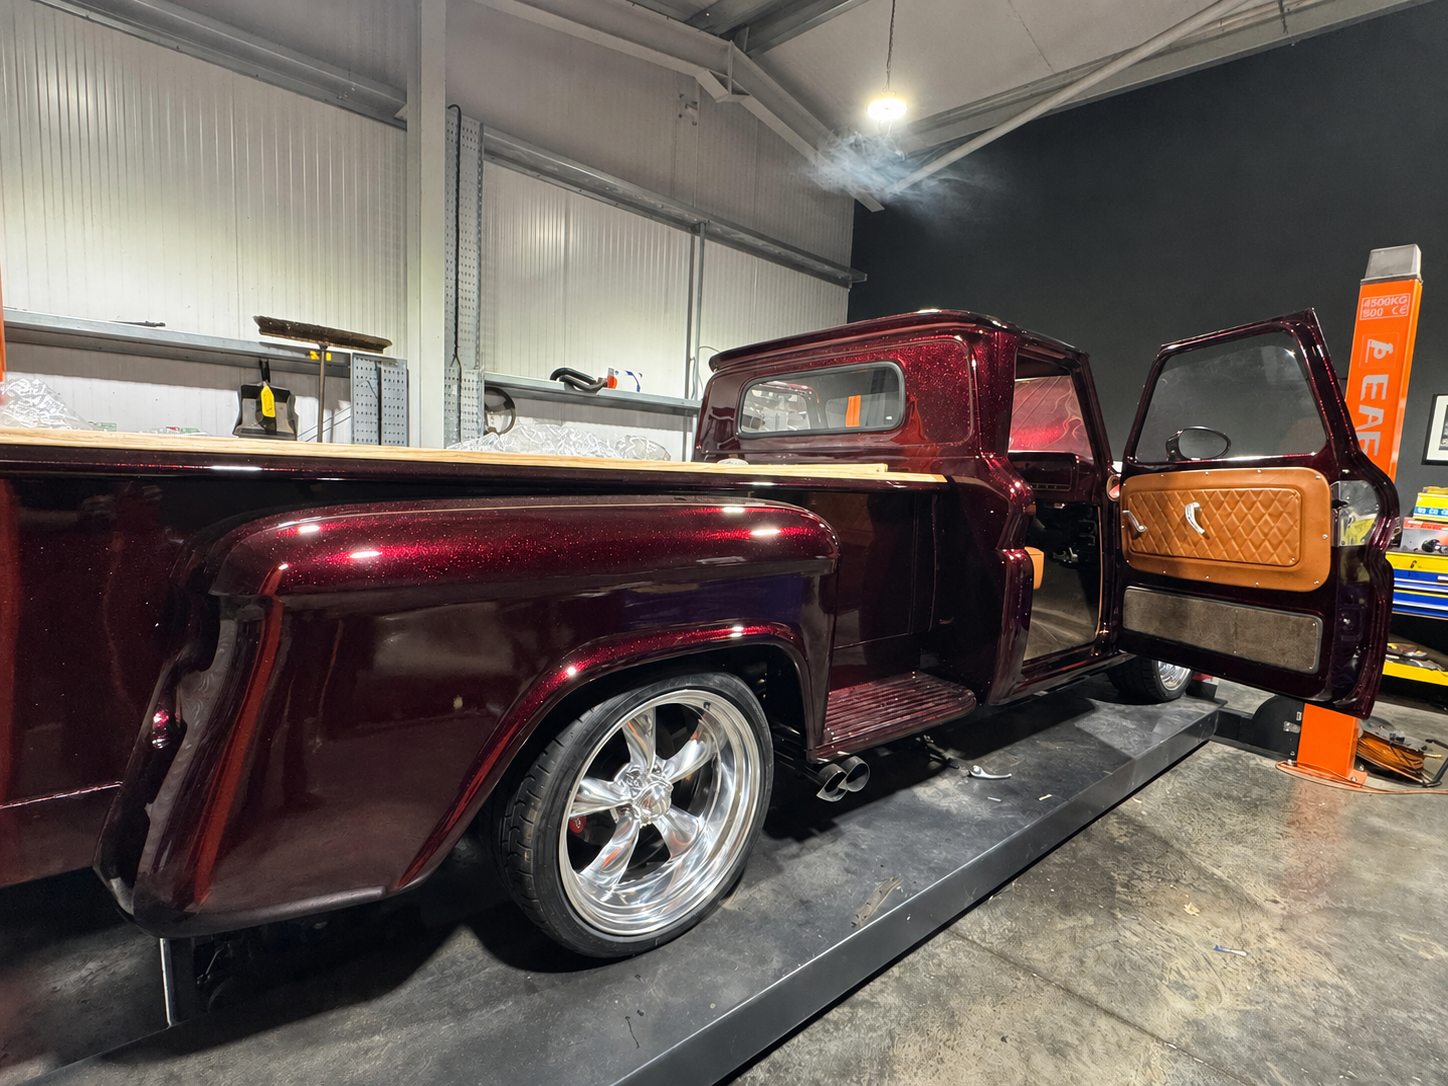
With the foundation complete, the truck received its vibrant candy cherry red coat. Unlike conventional paint, candy colours are translucent, allowing the metallic layer beneath to shine through while creating remarkable depth and richness. As each coat was applied, the colour intensified, producing a finish that appeared to glow from within. Depending on the light, the paint shifted from a rich deep crimson to a brilliant cherry red, with the chrome flake beneath delivering exceptional sparkle and dimension.
The final stage was to seal the entire finish beneath additional coats of high-quality clear coat, adding gloss, depth and long-term protection while enhancing the dramatic visual effect created by the previous layers.
It was at this point that the C10 truly came to life. After months of design, fabrication and meticulous preparation, the vision that had existed only in drawings and discussions was finally standing in front of us. The depth of the candy, the brilliance of the chrome flake and the mirror-like gloss combined to create a finish unlike anything else—a paint system that perfectly reflected the ambition and individuality of the build itself.
Handcrafted Caramel Leather Interior & Oak Pickup Bed
With the exterior and mechanical elements of the Chevrolet C10 restomod nearing completion, attention turned to two areas that would give the finished truck much of its individual character: a completely bespoke caramel leather interior and a handcrafted oak pickup bed. Both were designed specifically for the C10, combining traditional materials and craftsmanship with the quality of finish required throughout the rest of the build.
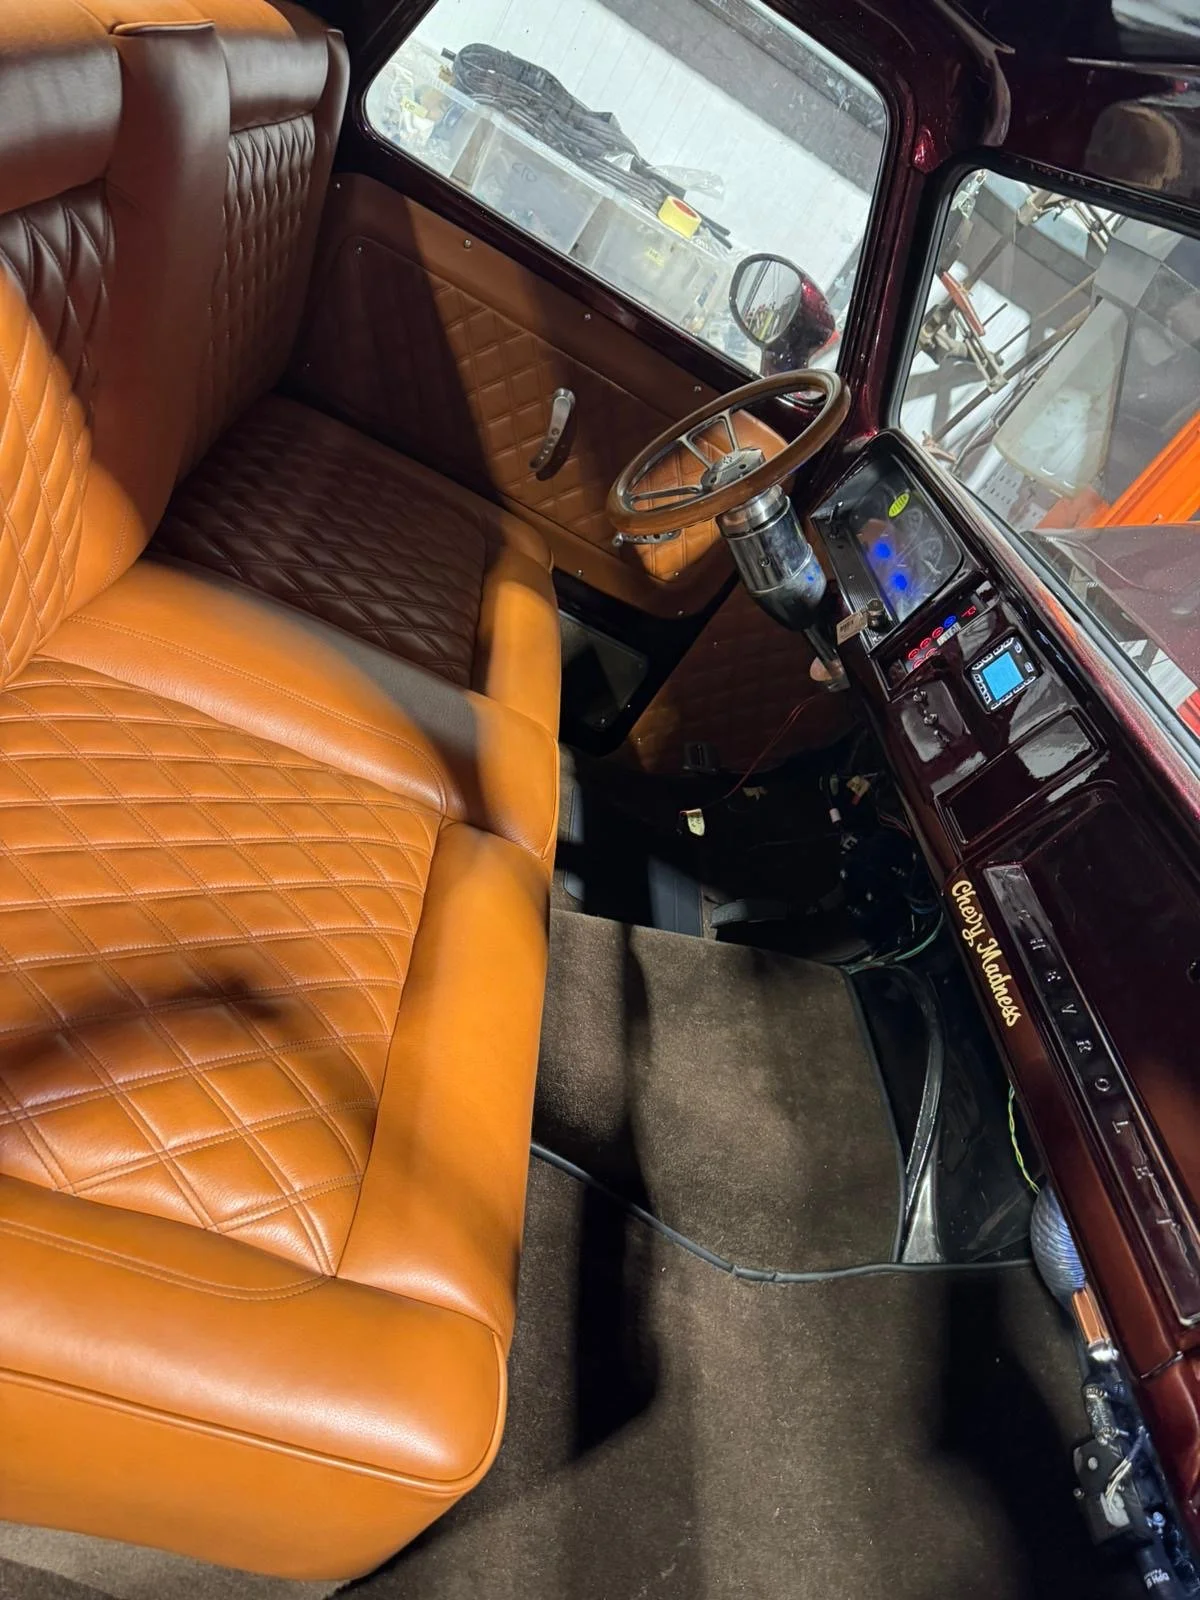
The interior was created from the ground up rather than relying on an off-the-shelf trim package. Caramel leather was selected to provide a warm contrast against the C10's deep custom exterior paintwork and polished chrome, while retaining the timeless character associated with a classic American pickup.
The seats were individually trimmed by hand, with the same material and design language carried through the wider cabin. Door cards, interior panels and surrounding trim were carefully considered to create a cohesive finish throughout, ensuring the interior felt like an integral part of the overall build rather than a separate addition at the end of the project.
Considerable attention was given to the smaller details, including stitching, seams, panel transitions and the way each upholstered component fitted against the restored and refinished cab. The objective was to create a custom classic truck interior that felt luxurious and beautifully finished without losing the simplicity and character of the original Chevrolet C10.
The caramel leather also provides an important link between the traditional appearance of the truck and the modern engineering hidden beneath it. While the C10 now benefits from an LS3 V8 drivetrain, modern engine and gearbox management, upgraded electrical systems and contemporary instrumentation, the interior retains the warmth and craftsmanship expected from a hand-built classic vehicle.
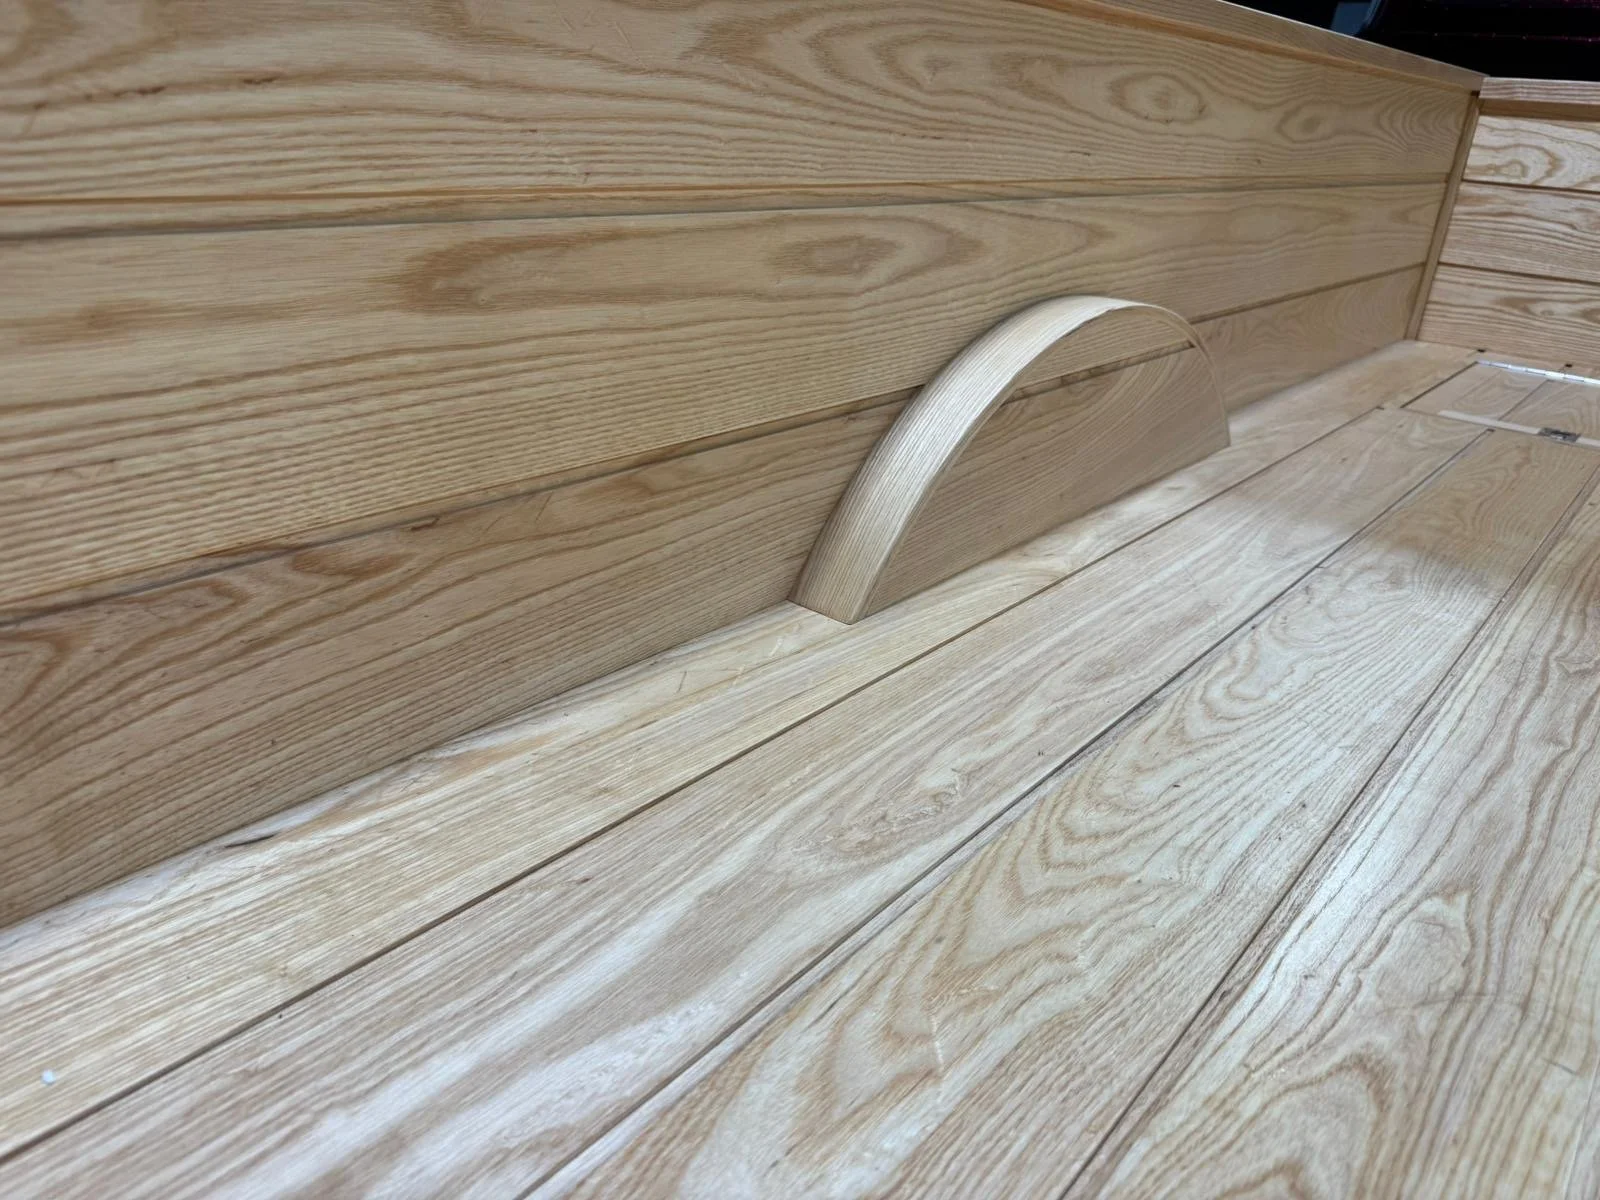
Behind the cab, the same approach was taken with the C10's pickup bed. Rather than using a conventional replacement bed floor, a completely bespoke oak buck was designed and handcrafted specifically for the truck.
Each section of oak was individually prepared, shaped and fitted by hand to follow the dimensions and proportions of the modified C10 bed. Achieving the correct fit required careful measurement and repeated trial fitting, ensuring consistent spacing and a precise relationship between the timber, surrounding metalwork and bespoke rear bodywork.
The natural grain and warmth of the hand-finished oak provides a striking contrast against the highly polished exterior paint and chrome detailing. It also introduces a traditional coachbuilding influence to an otherwise extensively modernised American pickup, giving the rear of the truck a feature that is both functional and visually distinctive.
Rather than simply acting as a load floor, the oak bed became another major design element of the project. The timber was selected and arranged so that its grain, colour and finish complemented the caramel leather used inside the cab, creating a visual connection between the C10's interior and exterior details.
Both elements demonstrate the level of craftsmanship involved in this one-off Chevrolet C10 custom build.
Wiring, Ecu & Drivetrain Integration
Following the completion of extensive fabrication, bodywork and custom paintwork, the Chevrolet C10 entered one of the most significant stages of the build: final assembly and drivetrain integration. This phase brought together the mechanical, electrical and bespoke components developed throughout the project, transforming the freshly finished chassis and body into a functioning vehicle.
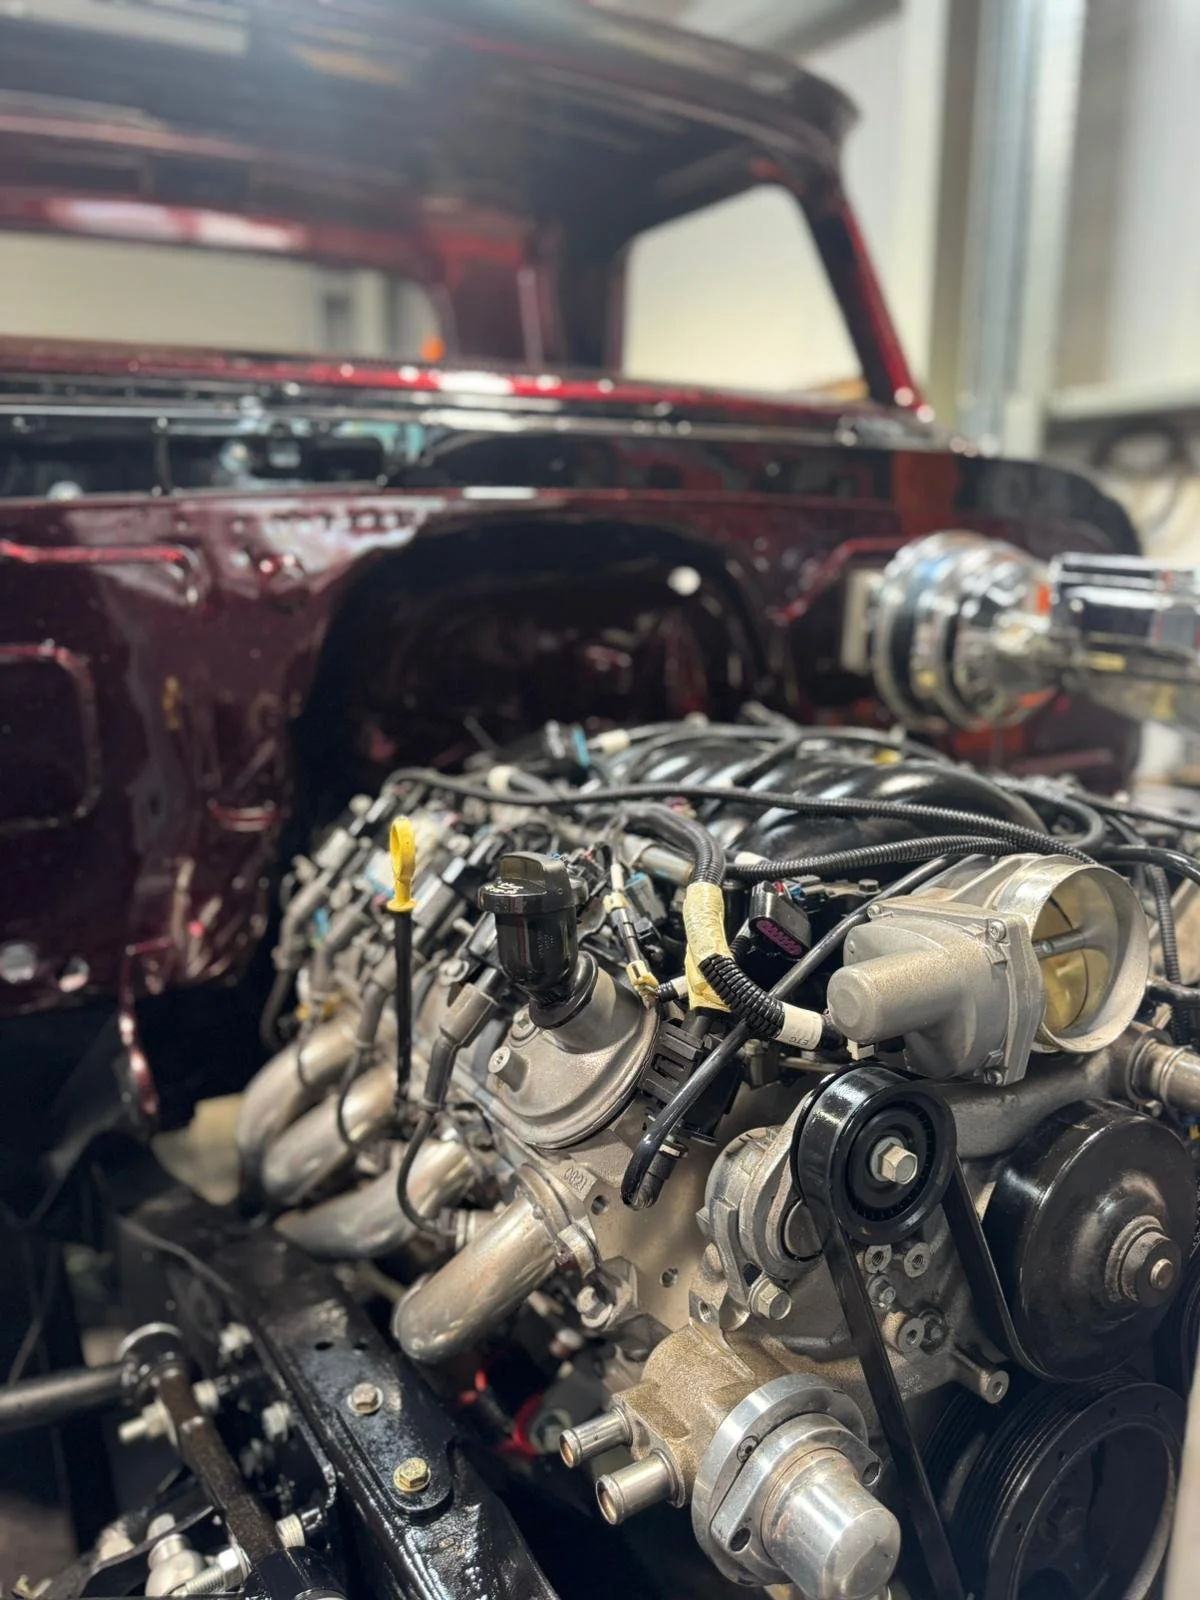
At the heart of the C10 is a modern LS3 V8 engine, chosen to deliver the performance, reliability and usability required from a high-quality restomod. The engine and automatic transmission were carefully installed into the prepared chassis, with attention given to component positioning, clearances, servicing access and the overall presentation of the engine bay.
With the drivetrain in position, work progressed onto the installation and integration of the engine and gearbox ECUs. Both control systems needed to work correctly with the wider vehicle, allowing the modern LS3 engine and transmission to operate as a complete package within a heavily modified classic Chevrolet platform.
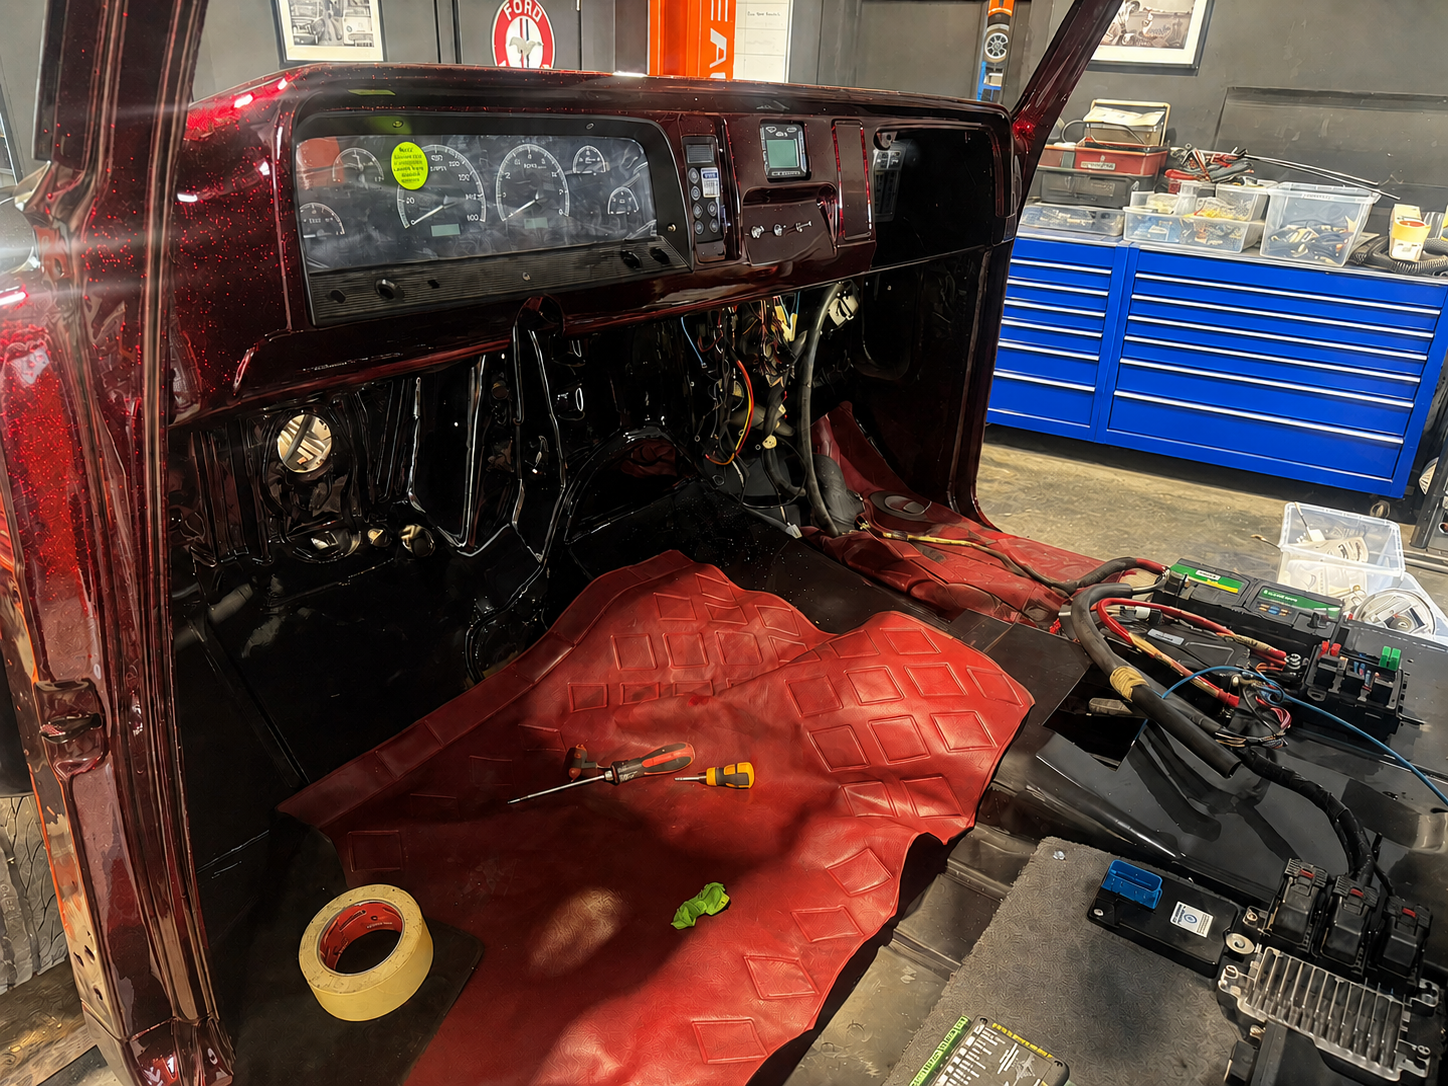
A substantial part of this stage involved the vehicle wiring and electrical installation. Rather than simply adapting the original electrical system, the C10 required wiring capable of supporting its modern drivetrain, control modules, instrumentation and additional electrical equipment. Wiring was carefully routed and integrated throughout the truck, with particular consideration given to reliability, accessibility and creating a clean finished appearance.
The dashboard was also brought to life with the installation of a modern gauge cluster, providing accurate information from the contemporary drivetrain while retaining a design appropriate for the C10's interior. The instrumentation was integrated with the vehicle's electrical and engine management systems, allowing key information from the LS3 and associated components to be displayed clearly to the driver.
This assembly stage also involved connecting and checking the numerous supporting systems required to turn the C10 from a collection of individually restored and fabricated components into a complete vehicle. Each system had to work alongside the next, making this a crucial stage in ensuring that the finished truck would offer more than impressive looks — it needed to be dependable, functional and genuinely enjoyable to use.
The result represents exactly what we aim to achieve with our bespoke classic car and restomod builds: retaining the unmistakable presence and character of a classic American pickup while incorporating modern V8 performance, electronic engine management, automatic transmission control and contemporary electrical systems.
With the LS3 engine installation, transmission, ECU systems, custom wiring and gauge cluster integrated, the C10 had reached a major milestone. After years of fabrication, restoration, bodywork and paint, the project was no longer simply being assembled — it was beginning to come alive.
Ghost Flames, Panel Fitment & Finishing
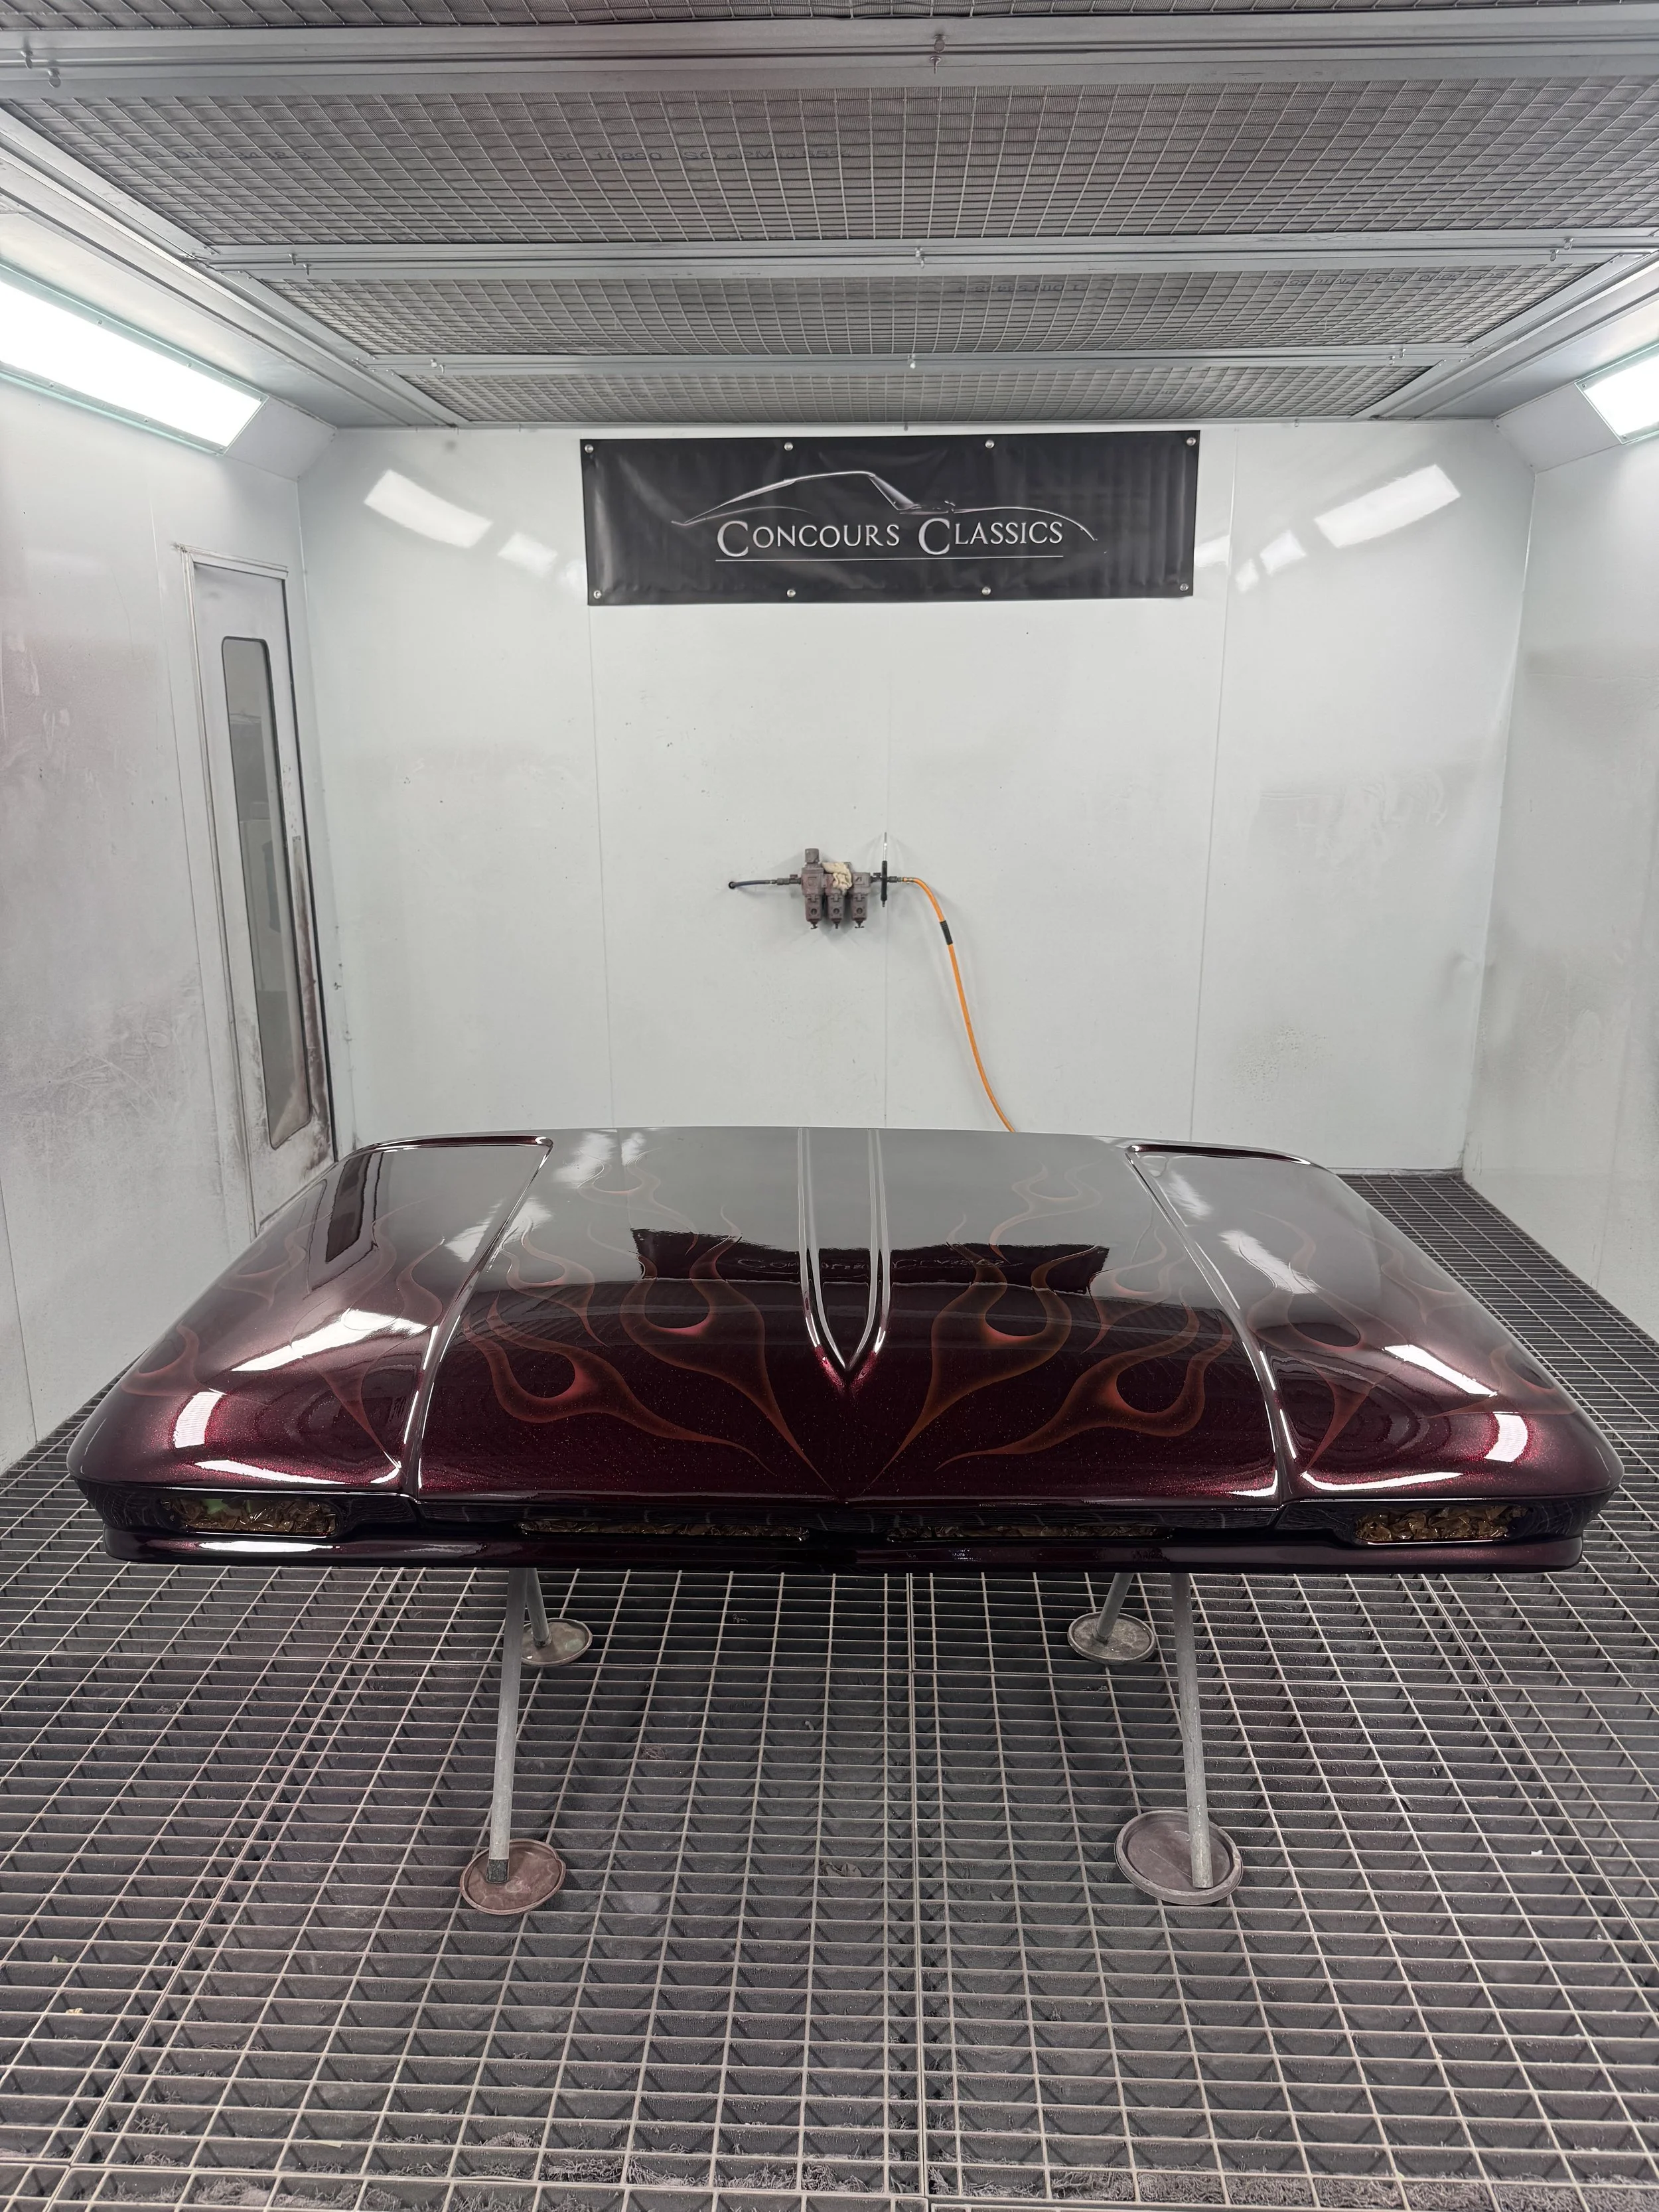
With the major mechanical and electrical systems installed, our bespoke Chevrolet C10 restomod progressed into the final stages of assembly. This phase focused on bringing together the countless details that define the finished truck, from precise panel fitment and body gaps to glass installation, exterior chrome and one of the build's most distinctive details — custom glow-in-the-dark ghost flames across the bonnet.
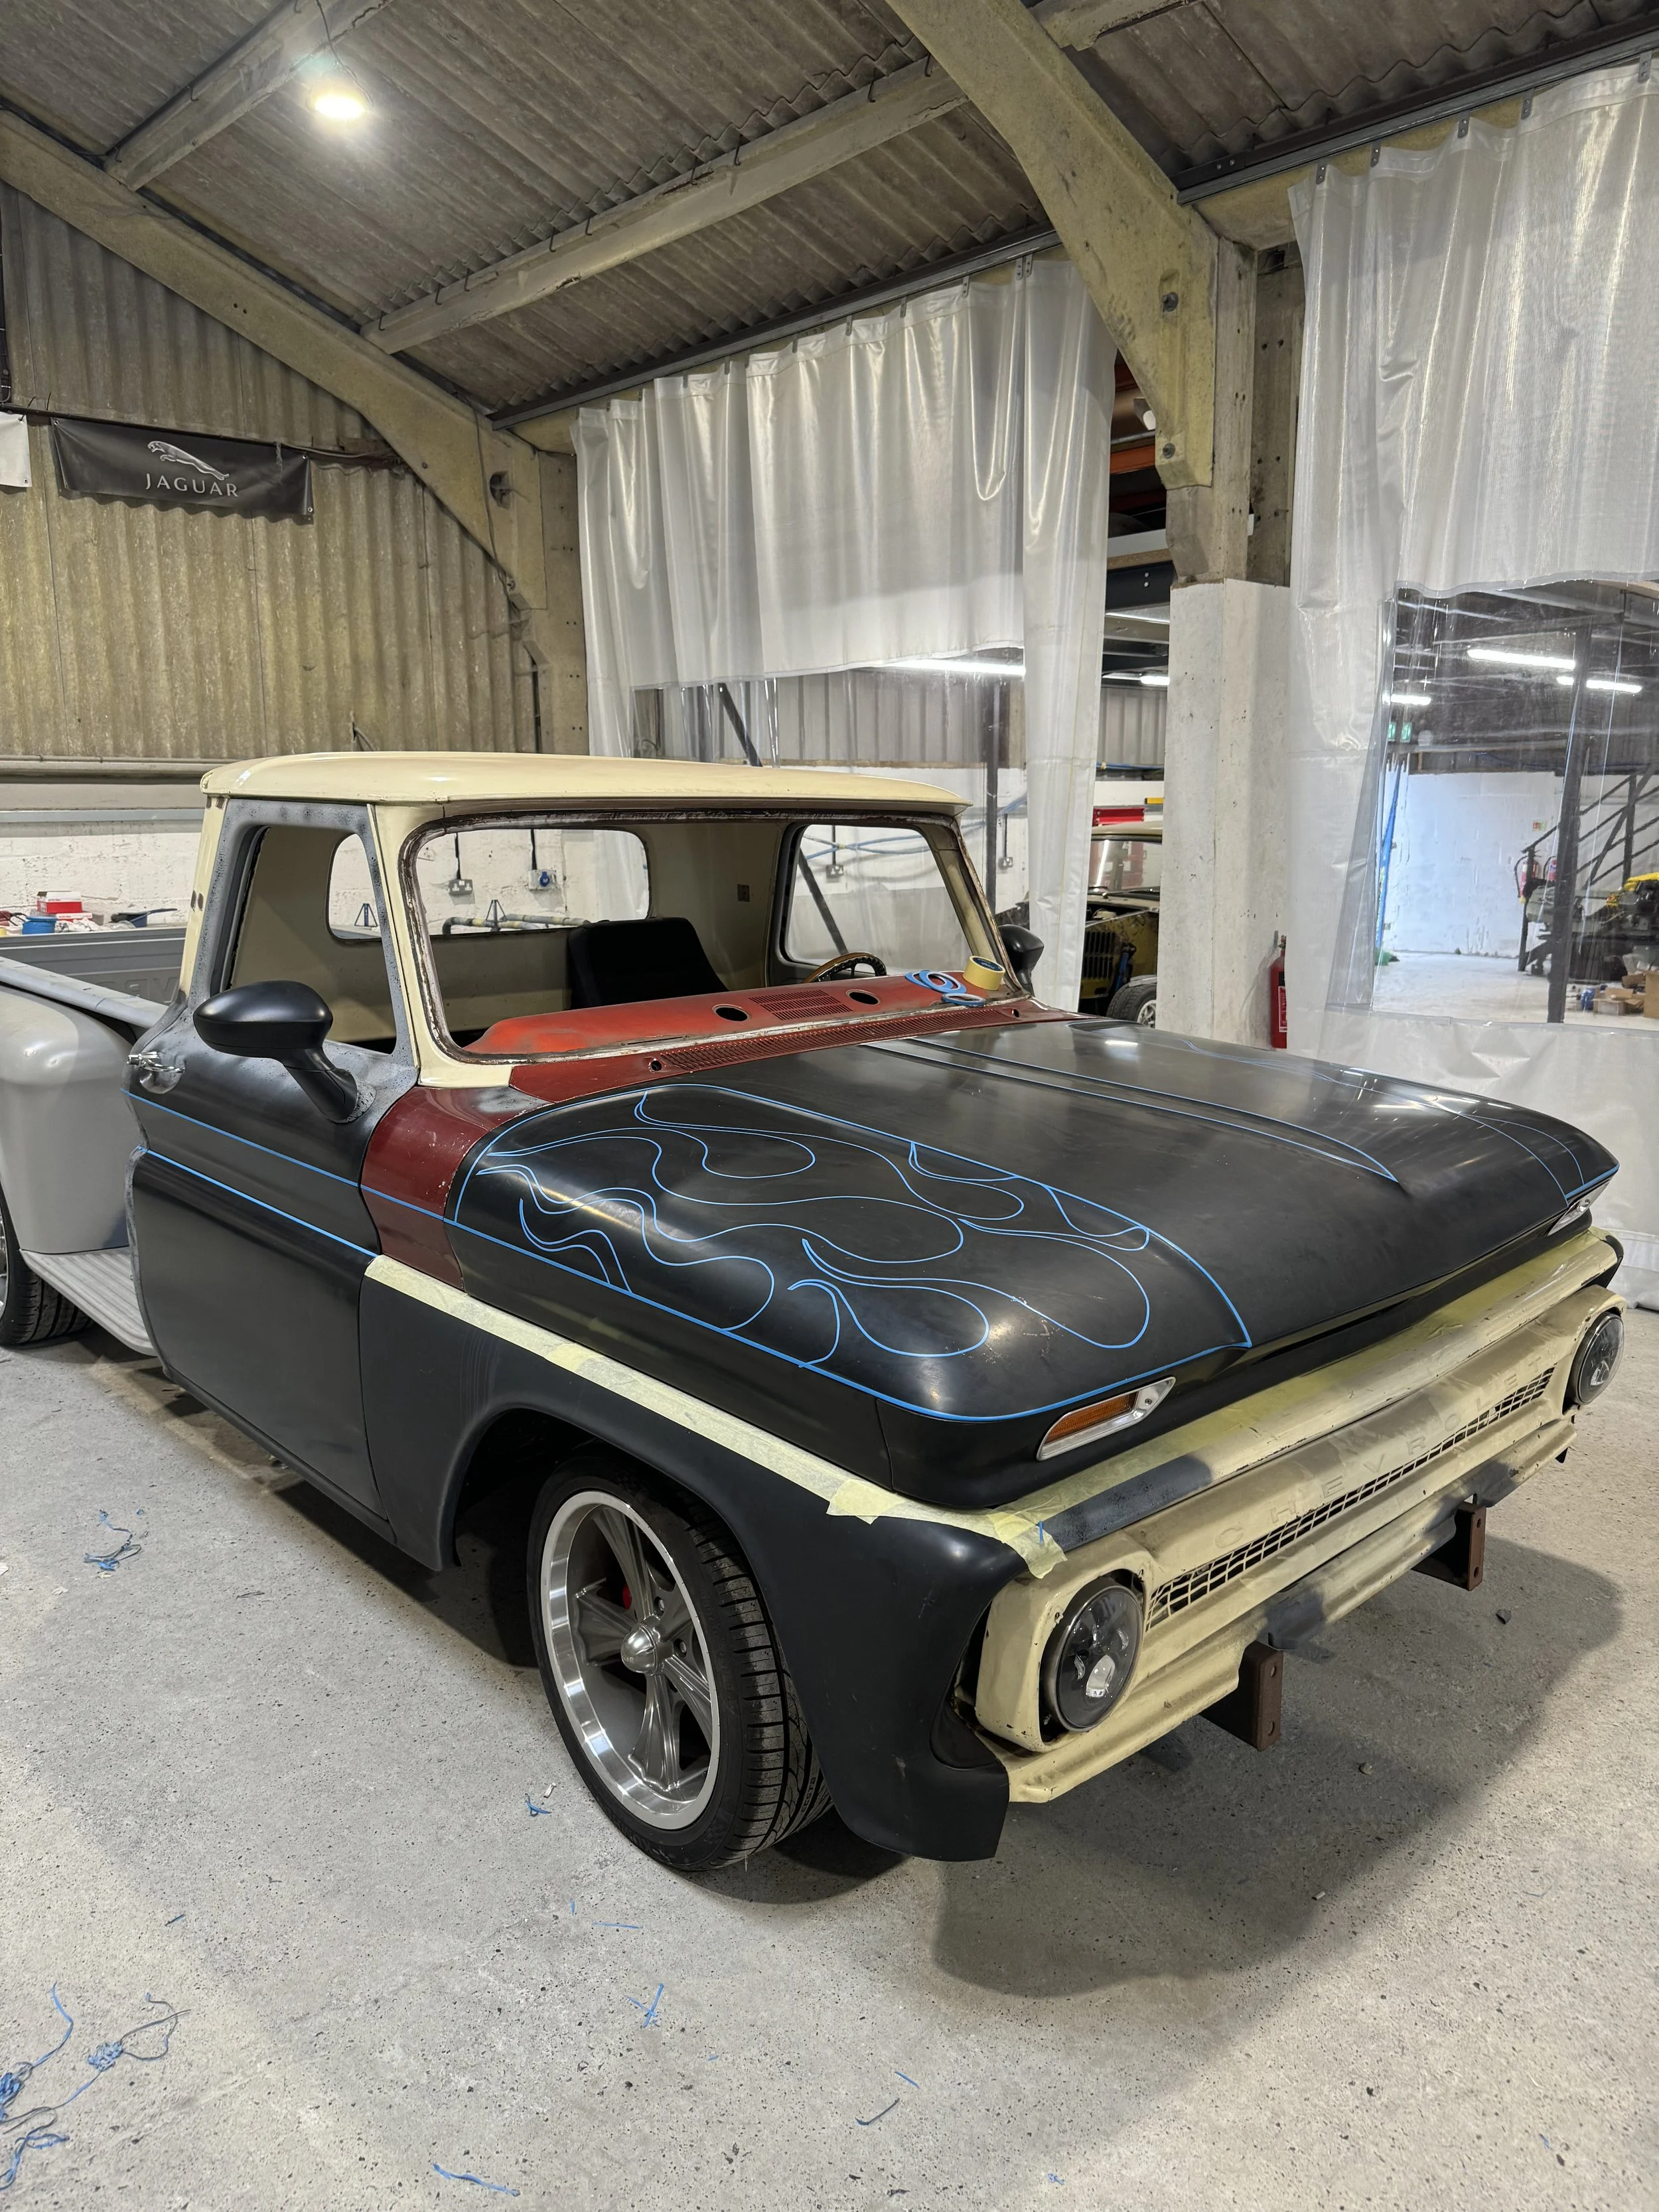
The bonnet received a completely bespoke ghost flame treatment, designed to remain deliberately subtle under normal lighting. Rather than overpowering the C10's dramatic custom paintwork, the flames sit discreetly within the finish, revealing another layer of detail as the lighting conditions change. Using glow-in-the-dark material within the flame design, the graphics become visible after exposure to light, creating an unexpected effect that reflects the individual nature of the entire build.
Alongside the custom paint detailing, considerable time was dedicated to the final fitment and alignment of the C10's body panels. On a heavily modified vehicle, achieving consistent panel gaps is far more involved than simply bolting the panels back into position. The doors, bonnet, front wings and surrounding panels were carefully fitted, adjusted and aligned to establish consistent gaps, clean body lines and smooth transitions between each section of the truck.
This was particularly important due to the extent of the bespoke fabrication carried out earlier in the project. With modified bodywork and numerous hand-finished components, the final panel setup had to complement the lines created throughout the fabrication and bodywork stages. Small adjustments at this point make a significant difference to the overall appearance of the finished vehicle.
The C10's chrome trim and exterior brightwork could then be installed. Each component was carefully fitted against the freshly finished paintwork, adding the traditional detailing that gives a classic Chevrolet pickup its unmistakable character. The contrast between the polished chrome, extensively modified body and deep custom paint finish helps retain the truck's classic identity despite the modern engineering underneath.
Installation of the windscreen, rear glass and remaining glazing formed another important part of the final assembly process. Glass, seals and associated trim were carefully installed and checked for correct fitment, completing the cab and allowing the exterior of the truck to begin taking on its finished appearance.
As assembly continued, attention turned increasingly towards the smaller finishing details — checking alignment, adjusting closures, fitting trim and ensuring that individual components worked together as intended. This level of attention is particularly important on a high-end custom restoration and restomod, where the quality of the final assembly can be just as significant as the fabrication and paintwork beneath it.
Chevrolet C10 Completion – From NEC Debut to Award Winner
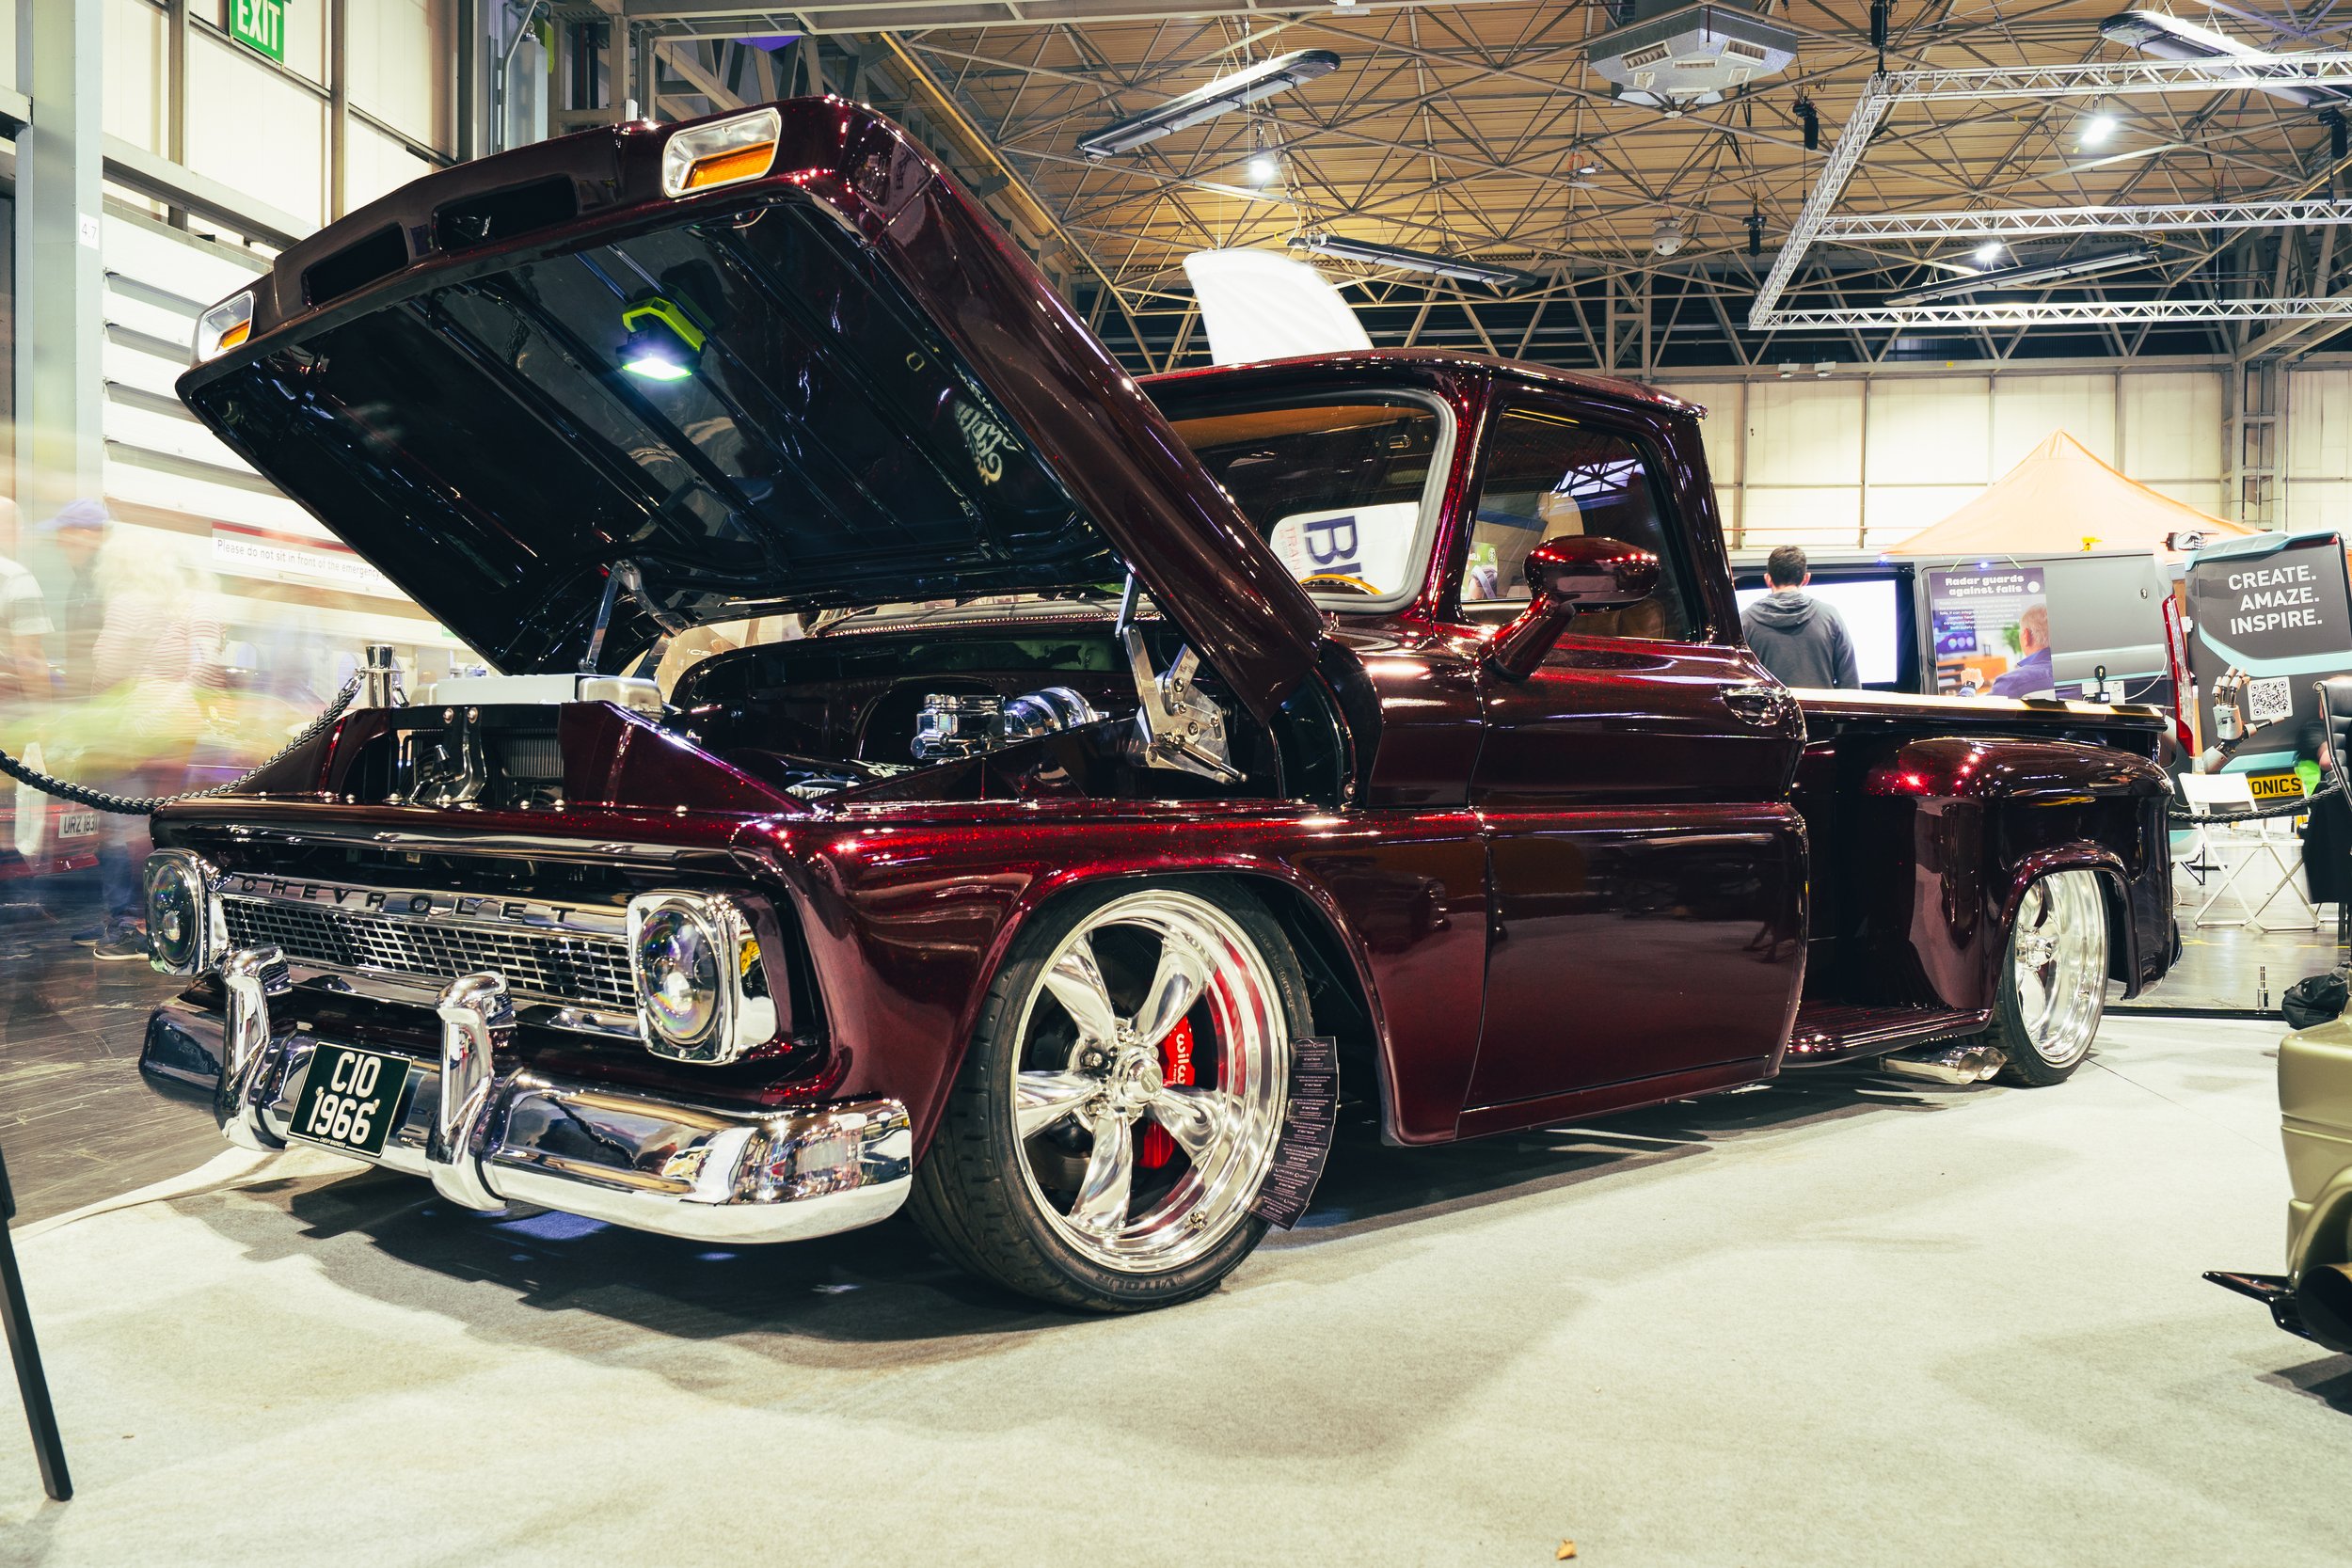
After years of restoration, bespoke fabrication, engineering and craftsmanship, the Chevrolet C10 project reached completion and made its official public debut at the NEC Classic Motor Show.
The NEC provided the perfect setting to unveil the finished truck, bringing together every element of this extensive custom build for the first time. From the LS3 V8 drivetrain, ECU integration and bespoke wiring to the handcrafted caramel leather interior, oak pickup bed and extensive custom bodywork, almost every aspect of the C10 had been redesigned, restored or created specifically for the project.
Its Candy Cherry Red multi-stage paintwork, polished chrome, carefully aligned bodywork and glow-in-the-dark ghost flames brought the exterior together, while the modern drivetrain and electrical systems transformed the classic Chevrolet into a restomod designed to be driven and enjoyed as much as it is displayed.
The NEC debut marked the completion of an extraordinary journey, but importantly, not the end of the C10's story.
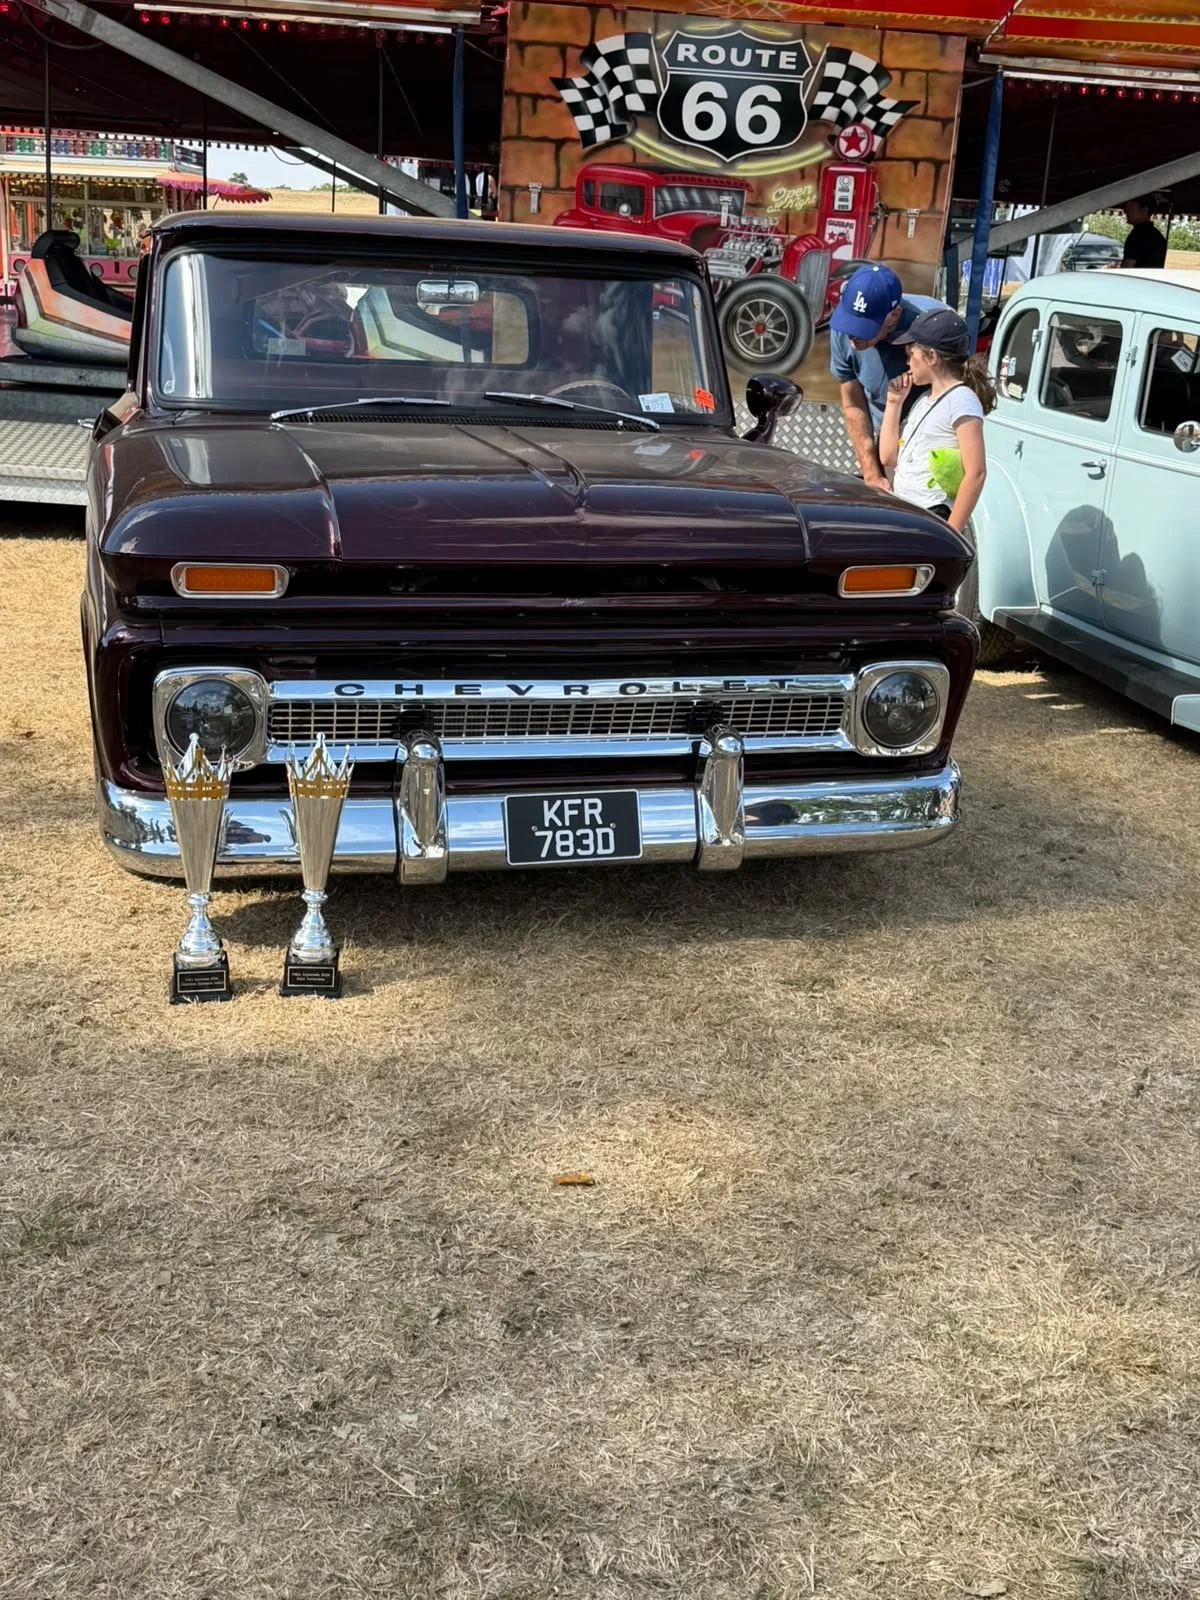
In August 2026, our client took the completed C10 to the NSRA Supernats, where the truck received an incredible response and came away with two awards – Best Custom Paint and Show Favourite.
For a project defined by its bespoke bodywork and highly detailed paint finish, receiving the Best Custom Paint award was a fantastic recognition of the craftsmanship invested throughout the build. Being selected as Show Favourite made the achievement even more special, demonstrating the impact the finished C10 has had beyond the workshop.
From an unfinished project to an award-winning, LS3-powered custom Chevrolet C10, seeing the truck being shown, driven and enjoyed by its owner is exactly what the project was ultimately built for.